
and the site receives a small commission
You are using an out of date browser. It may not display this or other websites correctly.
You should upgrade or use an alternative browser.
You should upgrade or use an alternative browser.
THE PP GAME!
- Thread starter Phil Young
- Start date
Phil-D
Suspended / Banned
- Messages
- 7,553
- Edit My Images
- Yes
PHIL
Download and save raw image then convert with Adobe DNG converter
Open in ACR
Temp 4900, Exp +2.75, Contrast -13, Shad. +26, blacks +58,
clarity +73, Vib. +22
Sharpen 85
Noise Reduction:-
Lum 77, Lum detail 76
Colour 88, Col. detail 49
Crop then clone out the plantation
I had a look on youtube at selective sharpening. I would have liked to try make the head and front legs stand out more..........but then again.......I don't think I'm ready for that just yet
You took an aventurous approach, in the sense that you used a fairly aggressive crop from what was a low quality (small sensor and underexposed) original. This has the advantage (from my perspective) of giving a composition I like; very simple, and with the subject offset from the centre so as to be looking into the picture rather than out of it. Detail retention seems better than I would have expected. The colours of the subject are possibly a tad undersaturated – I'm looking at the legs (front and rear) and the head. I am quite keen on mild colours, but even so I think perhaps these are just a little too mild. I wonder whether, if they had a bit more “substance”, the subject might stand out a bit more from the background. The colours are also perhaps a touch on the cold (blue) side. The noise in the background is nicely fine-grained, but perhaps just slightly more obtrusive in some areas (for example at the top right) than I feel comfortable with. It is marginal in daylight, but more evident in the subdued light that I use for my processing and image evaluation. (I am using a quite good, hardware calibrated monitor btw.)
I tried your numbers in Lightoom and I think that shed some light on what I was seeing.
I think the Contrast -13, Shad. +26, blacks +58 all worked in the same direction, reducing colour intensity and micro-contrast (especially the blacks +58), the reduced micro-contrast reducing the perceived level of detail in the image.
The clarity +73 is a huge amount (by my standards; I generally use 10, or at most 15), and has a discernable negative impact on the noise. It has also significantly increased the blacknesses in the subject, which may be why you used Contrast -13, Shad. +26, blacks +58 to reverse that effect. FWIW I try to get the light in the image to “sing” using Highlights, Shadows, Whites and Blacks (often all four of them, sometimes possibly counter-intuitively, for example taking Whites and Highlights in opposite directions, and/or taking Blacks and Shadows in opposite directions), and then use a light touch on Clarity to add just a little edge to the micro-contrast.
I'm puzzled by the noise reduction. When I use your settings of Lum 77, Lum detail 76 (with your crop and Sharpen 85) the noise is killed pretty much totally, along with a lot of detail. To my eye it doesn't look like the version you posted. With Luminance Detail 76, I have to dial back Luminance to around 25 to get roughly the combination of detail and noise I see in the posted version.
Colour 88, Col. detail 49 puzzles me as well. I think the default Color 25, Detail 50, Smoothness 50 is sufficient. I don't think increasing it does much if any harm in this case, but FWIW I pretty much always leave this at the default values for my images.
Firstly, well done Rhodese
")
Wow Nick, thank you for a very informative piece of feedback
")
I have to be honest and say that I've only been using E11 for about 7 weeks. I'm very much still in the beginners stage when it comes to actually knowing what each slider does. I just move them about till I'm happy with what the image looks like on my £300 laptop

You are certainly right about one thing, the settings I gave you weren't for the image I entered
 they were for the second image I did
I did 2 images in ACR, saved them both then cloned out the plants in the 1st image I wasn't going to submit, without realising
I hope you can make sense of that
Nick, here's a screen shot of the settings I gave you above and the image I should have cloned out the plants on
I've done this just to clarify what I did, as you said, (and I'm impressed you knew
) the setting I gave weren't for the image I'd entered Its still along way from winning this round though

fly pp game screen shot- detail by Phil D 245, on Flickr
Last edited:
- Messages
- 6,343
- Name
- Nick
- Edit My Images
- Yes
TBH...it's something I just do on auto pilot. I didn't even bother checking what RAW it was. If there is no native profile support, this would have done nothing. CA removal however, is independent of profile, and would have been applied. Whether it was necessary is again, something I don't check for. It's part of my work flow, as it's not destructive, and if any linear CA is present, it will be removed.
Understood. That makes sense. Thanks.
- Messages
- 6,343
- Name
- Nick
- Edit My Images
- Yes
And, thanks for the feedback Nick.
That's (part of) what this is about, but just IMO and FWIW of course.
I have a sneaking suspicion, having now tried it from both sides as it were, that mostly what is beneficial about the game is (a) the practical aspect of actually doing stuff, having to handle subjects, types of images, issues and complications that may be new to us and/or outside our "comfort zone", and (b) being able to see other people's take on an image and get an idea how they went about their post processing, with a view to getting new perspectives and trying some of their techniques for ourselves. Well, that's what I'm getting from it anyway.
- Messages
- 6,343
- Name
- Nick
- Edit My Images
- Yes
I did 2 images in ACR, saved them both then cloned out the plants in the 1st image I wasn't going to submit, without realising
I hope you can make sense of that
Understood. Easily done when you have multiple partly completed versions that you come back to to finish off.
Nick, here's a screen shot of the settings I gave you above and the image I should have cloned out the plants on
I've done this just to clarify what I did, as you said, (and I'm impressed you knew
That's the great advantage of having the exact numbers to work with, so as to be able (given the same software) to recreate what you did and look at the individual effects of the slider settings, singly and collectively. That is absolute magic when it comes to providing feedback.
fly pp game screen shot- detail by Phil D 245, on Flickr[/quote]
The sharpening setting you used here raises an issue of interest to me, although it has probably already been done to death here. It is to do with the way sharpening works in Lightroom, and I suspect it applies in ACR too.
I want to be able to adjust the sharpening using visual feedback when looking at an image at 100% of its target viewing size (this is for versions prepared for viewing on screen), which for me at the moment is 1100 pixels high. And I want to apply the sharpening to a version of the image that is already that size, and as the last thing (that effects sharpness) that I do so there are no further changes to the sharpness made out of my control. However, if I export from Lightroom I can't get visual feedback based on viewing the effect of its output sharpening as I change the parameters (which in any case are very crude - basically High, Medium and Low.) That is why I use CS for output sharpening, so that I can see exactly what the effect of the sharpening is (for versions prepared for viewing on screen), and so I can try variations with very delicate control as to exactly how much sharpening is applied. And of course with layers in CS I can use selective sharpening, both as to the areas affected and the amount applied, not that I go in for that type of control much at present, but it's good to have the option.
I don't currently use capture sharpening or creative sharpening, so all I do is output sharpening, so all my sharpening is done in CS (unless you count Clarity as sharpening, which in a sense it is, at least in part. It is unclear to me exactly what Lightroom's Clarity does, but I suspect a large part of it is what I think of as "defogging", USM with a large Radius, a small Amount and Zero threshold). I probably should experiment more with earlier sharpening, but I haven't got round to it yet. When I did try it wasn't obvious to me that I was getting better results, but that may well be just a lack of knowledge on my part as to how best to go about it and/or insufficient experimentation.
overbez
Suspended / Banned
- Messages
- 4,088
- Name
- Graham
- Edit My Images
- Yes
Well done Rhodese - tough round to have won.
Thanks Nick, a lot of thought and time gone into your comments there,
And true, I also think you learn as much from "doing" a wide variety of images, as from looking at the others interpretations of the same file. I've said before, the judging is by far the harder part of the game than the editing!
Thanks Nick, a lot of thought and time gone into your comments there,
And true, I also think you learn as much from "doing" a wide variety of images, as from looking at the others interpretations of the same file. I've said before, the judging is by far the harder part of the game than the editing!
- Messages
- 6,343
- Name
- Nick
- Edit My Images
- Yes
I've said before, the judging is by far the harder part of the game than the editing!
Having now tried it, I'll vote for that!
Pookeyhead
Suspended / Banned
- Messages
- 11,746
- Name
- David
- Edit My Images
- No
I want to be able to adjust the sharpening using visual feedback when looking at an image at 100% of its target viewing size (this is for versions prepared for viewing on screen), which for me at the moment is 1100 pixels high. And I want to apply the sharpening to a version of the image that is already that size, and as the last thing (that effects sharpness) that I do so there are no further changes to the sharpness made out of my control. However, if I export from Lightroom I can't get visual feedback based on viewing the effect of its output sharpening as I change the parameters (which in any case are very crude - basically High, Medium and Low.)
If you want to sharpen for screen (on low resolution images) then you should sharpen for full res (if you need to) in LR or ACR as normal for the print version, then export and size in Photoshop where you can visually assess the process at 100% viewing size so your screen is mapping the image at a 1:1 pixel ratio.
If you have Photoshop CC, a great way of doing this is to convert the sized image into a Smart Object, and use Adobe Camera RAW as a Smart Filter, and apply sharpening using ACR. It's non-destructive, and full reversible so long as you retain the original as a PSD. I think Smart Filters are only available in Photoshop CC though.
Last edited:
- Messages
- 6,343
- Name
- Nick
- Edit My Images
- Yes
If you want to sharpen for screen (on low resolution images) then you should sharpen for full res (if you need to) in LR or ACR as normal for the print version, then export and size in Photoshop where you can visually assess the process at 100% viewing size so your screen is mapping the image at a 1:1 pixel ratio.
Thanks David. I do something rather like this, but based around the fact that my normal (and almost sole) output medium is screen. Exactly as you suggest, I export (from Lightroom) and size in Photoshop where I visually assess the sharpening process at 100%. However, because I so rarely print, the "sharpen for full res .. as normal" isn't normal for me, so I have no feel for output sharpening for print. On the rare occasions that I do print, I prepare a version for screen viewing, right through to the resize and sharpen, and when that looks right I back off the sharpen and resize and sharpen full res, using the same Amount in Smart Sharpen but doubling the Radius. For the size of prints I produce (usually A4, occasionally 16x12) this works fine.
If you have Photoshop CC, a great way of doing this is to convert the sized image into a Smart Object, and use Adobe Camera RAW as a Smart Filter, and apply sharpening using ACR. It's non-destructive, and full reversible so long as you retain the original as a PSD. I think Smart Filters are only available in Photoshop CC though.
That sounds excellent. Unfortunately I have CS2 and don't see the cost/benefit working out for me for an ongoing investment in a CC subscription. The facilities I use in CS are quite limited and I don't find myself pining for the various facilities in newer versions, especially now I am using Lightroom. (I do use some ancillary software, for occasional multi-image manipulations such as stacking and panoramas, and, very occasionally, (realistic, for high dynamic range scenes) HDR and anti-ghosting/moving object removal/noise reduction. This takes the pressure off my requirements of CS as well.)
Pookeyhead
Suspended / Banned
- Messages
- 11,746
- Name
- David
- Edit My Images
- No
On the rare occasions that I do print, I prepare a version for screen viewing, right through to the resize and sharpen, and when that looks right I back off the sharpen and resize and sharpen full res,
I'm sorry.... confused me a little. Are you saying that you resize (reduce for screen), then resize the same file back up to print? Please tell me you're not doing that and that I read that wrong
- Messages
- 6,343
- Name
- Nick
- Edit My Images
- Yes
I'm sorry.... confused me a little. Are you saying that you resize (reduce for screen), then resize the same file back up to print? Please tell me you're not doing that and that I read that wrong
No, I'm not doing that.
Having got the image to look how I like it for screen viewing, I go to the history and go back a couple of steps, undoing the sharpen and the resize, so I am then working on the full size, unsharpened image. I then sharpen that. So I don't upsize the downsized image!
Phil-D
Suspended / Banned
- Messages
- 7,553
- Edit My Images
- Yes
Pookeyhead said: ↑
http://www.talkphotography.co.uk/goto/post?id=6017661#post-6017661
If you want to sharpen for screen (on low resolution images) then you should sharpen for full res (if you need to) in LR or ACR as normal for the print version, then export and size in Photoshop where you can visually assess the process at 100% viewing size so your screen is mapping the image at a 1:1 pixel ratio.
GardenersHelper said
Thanks David. I do something rather like this, but based around the fact that my normal (and almost sole) output medium is screen. Exactly as you suggest, I export (from Lightroom) and size in Photoshop where I visually assess the sharpening process at 100%. However, because I so rarely print, the "sharpen for full res .. as normal" isn't normal for me, so I have no feel for output sharpening for print. On the rare occasions that I do print, I prepare a version for screen viewing, right through to the resize and sharpen, and when that looks right I back off the sharpen and resize and sharpen full res, using the same Amount in Smart Sharpen but doubling the Radius. For the size of prints I produce (usually A4, occasionally 16x12) this works fine.
Pookeyhead said:
↑
Phil-D <thinks>
 ......must be some kind of foreign language these two are using...... can pick out the odd word like, camera, raw, this and and..........but the rest just meks mi head hurt ..
http://www.talkphotography.co.uk/goto/post?id=6017661#post-6017661
If you want to sharpen for screen (on low resolution images) then you should sharpen for full res (if you need to) in LR or ACR as normal for the print version, then export and size in Photoshop where you can visually assess the process at 100% viewing size so your screen is mapping the image at a 1:1 pixel ratio.
GardenersHelper said
Thanks David. I do something rather like this, but based around the fact that my normal (and almost sole) output medium is screen. Exactly as you suggest, I export (from Lightroom) and size in Photoshop where I visually assess the sharpening process at 100%. However, because I so rarely print, the "sharpen for full res .. as normal" isn't normal for me, so I have no feel for output sharpening for print. On the rare occasions that I do print, I prepare a version for screen viewing, right through to the resize and sharpen, and when that looks right I back off the sharpen and resize and sharpen full res, using the same Amount in Smart Sharpen but doubling the Radius. For the size of prints I produce (usually A4, occasionally 16x12) this works fine.
Pookeyhead said:
↑
If you have Photoshop CC, a great way of doing this is to convert the sized image into a Smart Object, and use Adobe Camera RAW as a Smart Filter, and apply sharpening using ACR. It's non-destructive, and full reversible so long as you retain the original as a PSD. I think Smart Filters are only available in Photoshop CC though.
GardenersHelper said
That sounds excellent. Unfortunately I have CS2 and don't see the cost/benefit working out for me for an ongoing investment in a CC subscription. The facilities I use in CS are quite limited and I don't find myself pining for the various facilities in newer versions, especially now I am using Lightroom. (I do use some ancillary software, for occasional multi-image manipulations such as stacking and panoramas, and, very occasionally, (realistic, for high dynamic range scenes) HDR and anti-ghosting/moving object removal/noise reduction. This takes the pressure off my requirements of CS as well.)GardenersHelper said
Phil-D <thinks>
......must be some kind of foreign language these two are using...... can pick out the odd word like, camera, raw, this and and..........but the rest just meks mi head hurt .. DayDreamer
Suspended / Banned
- Messages
- 3,739
- Name
- John
- Edit My Images
- Yes
Phil-D <thinks>


Pookeyhead
Suspended / Banned
- Messages
- 11,746
- Name
- David
- Edit My Images
- No
Essentially, what Nick was saying was.... If he sizes the image for screen as part of the Lightroom export process, he can't "see" how much sharpening it is applying, as it's part of the export process, so he exports at full resolution, and if he is resizing for screen, he resizes in Photoshop afterwards because he can apply sharpening to the image AFTER it's been resized, and actually "see" how much is being applied on a 100% view.. This is important because lower resolution images can often benefit from more sharpening, whereas full resolution images for print, probably don't need much... if any at all actually (so long s your can focus OK and your lenses aren't crap).
Last edited:
Rhodese
Suspended / Banned
- Messages
- 1,154
- Edit My Images
- Yes
Well there’s me having a bit of a lie in, (my backs killing me). Looking through the window, it’s so dark it could be night. I switch on my poota and "WOW" a ray of sunshine to cheer me up on the last day, of the worst year of my life.
Cheers Nick, I didn’t rate my ability on this one, noise and stuff just aint my bag. I decided to use PD4 as its my newest free toy.
The sharpening and noise reduction were done within this, I’m sorry I didn’t show the adjustment panel, I thought the ones I did show were enough, silly me.
Here is the missing bit.

Nobody commented on the film quote, never mind.
Thanks for all your thoughts on all the edits, its nice to hear other peoples opinions.
Thanks again for picking me, “WHOOPIE”
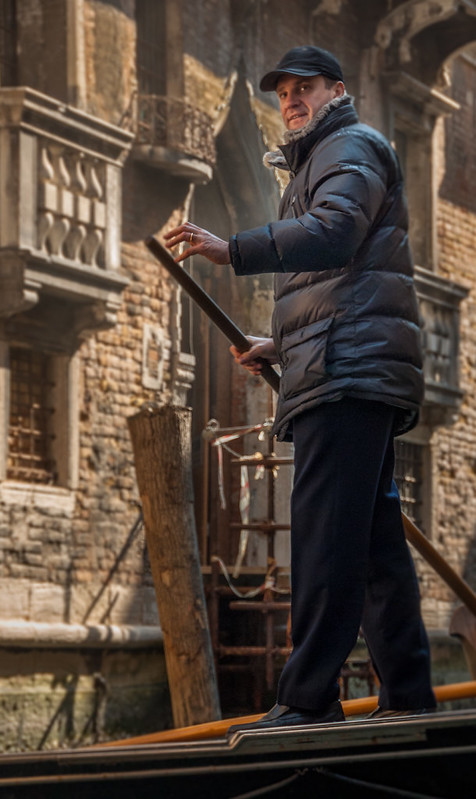
Now for the next one “I don’t remember where I took it, as if ”.") It was bitter cold spring day, high contrast sunshine coming in on the shadows from all directions; I caught this with a bit of both types of light in it.
It was bitter cold spring day, high contrast sunshine coming in on the shadows from all directions; I caught this with a bit of both types of light in it.
Lets see how well you can touch him up.

LINK TO RAW
https://www.dropbox.com/s/7f07b9w8pn6kjzx/20110308_ITALY_0040.NEF
Rhodese.
PS I forgot to say when the day of judgement is, because of the holiday lets say Saturday morning.
Cheers Nick, I didn’t rate my ability on this one, noise and stuff just aint my bag. I decided to use PD4 as its my newest free toy.
The sharpening and noise reduction were done within this, I’m sorry I didn’t show the adjustment panel, I thought the ones I did show were enough, silly me.
Here is the missing bit.
Nobody commented on the film quote,
never mind.Thanks for all your thoughts on all the edits, its nice to hear other peoples opinions.
Thanks again for picking me, “WHOOPIE”
Now for the next one “I don’t remember where I took it, as if ”.
It was bitter cold spring day, high contrast sunshine coming in on the shadows from all directions; I caught this with a bit of both types of light in it.Lets see how well you can touch him up.
LINK TO RAW
https://www.dropbox.com/s/7f07b9w8pn6kjzx/20110308_ITALY_0040.NEF
Rhodese.
PS I forgot to say when the day of judgement is, because of the holiday lets say Saturday morning.
Last edited:
- Messages
- 6,343
- Name
- Nick
- Edit My Images
- Yes
Essentially, what Nick was saying was.... If he sizes the image for screen as part of the Lightroom export process, he can't "see" how much sharpening it is applying, as it's part of the export process, so he exports at full resolution, and if he is resizing for screen, he resizes in Photoshop afterwards because he can apply sharpening to the image AFTER it's been resized, and actually "see" how much is being applied on a 100% view.. This is important because lower resolution images can often benefit from more sharpening,
Now that is what I call a clear explanation. Nice one David.
whereas full resolution images for print, probably don't need much... if any at all actually (so long s your can focus OK and your lenses aren't crap).
That I didn't know. Presumably the reason my (very occasional) prints do (IMO) need sharpening is because I'm using very much lower-grade optics and sensor than you are; sensor 1/32 the area of full frame, a general-purpose large-zoom fixed lens, with another cheap bit of glass in front of that. Oh, and aperture equivalent to full frame f/32 - f/45 in terms of diffraction, so a big sharpness/detail/micro-contrast loss from diffraction on top of the other factors.
- Messages
- 6,343
- Name
- Nick
- Edit My Images
- Yes
Well there’s me having a bit of a lie in, (my backs killing me). Looking through the window, it’s so dark it could be night. I switch on my poota and "WOW" a ray of sunshine to cheer me up on the last day, of the worst year of my life.
I'm sorry to hear about your back. Glad I could provide at least a few seconds' relief.
Cheers Nick, I didn’t rate my ability on this one, noise and stuff just aint my bag. I decided to use PD4 as its my newest free toy.
The sharpening and noise reduction were done within this, I’m sorry I didn’t show the adjustment panel, I thought the ones I did show were enough, silly me.
Here is the missing bit.
I'm gob-smacked that you appear to have applied almost no (global) luminance noise reduction. Did you apply any separately just to the background?
Pookeyhead
Suspended / Banned
- Messages
- 11,746
- Name
- David
- Edit My Images
- No
Now that is what I call a clear explanation. Nice one David.
That I didn't know. Presumably the reason my (very occasional) prints do (IMO) need sharpening is because I'm using very much lower-grade optics and sensor than you are; sensor 1/32 the area of full frame, a general-purpose large-zoom fixed lens, with another cheap bit of glass in front of that. Oh, and aperture equivalent to full frame f/32 - f/45 in terms of diffraction, so a big sharpness/detail/micro-contrast loss from diffraction on top of the other factors.
It depends... there's no fixed rule re: sharpening. For print though... too much sharpening can look awful. It also does depend no what you use too. Generally though... sharpening just end up looking like a sharpened image instead of a sharp one.
Rhodese
Suspended / Banned
- Messages
- 1,154
- Edit My Images
- Yes
I'm sorry to hear about your back. Glad I could provide at least a few seconds' relief.
I'm gob-smacked that you appear to have applied almost no (global) luminance noise reduction. Did you apply any separately just to the background?
No, the image was treated as a whole.
As I said, “noise and stuff is like nuclear physics to me“. I know when to use slow 25ASA or fast 400ASA film (I once used some 1200ASA) and the implication of grain especially when pushing.
The only thing that I do, in these days of “technology can put it right” is that if when using a camera the picture taken is “grainy” at a given ISO, I don’t go there again.
So in respect of this edit, for me its, if it looks OK then that will do, because I don’t know any better or what the terminology means.
The control panels show what I did, though in all honesty most of what I do relating to noise and sharpening is done blindly (Well not blindly as its what I‘m happy with on viewing, but you get my meaning I‘m sure.).
The stuff I do in PS is my interpretation of old darkroom and art skills gleaned over the last sixty years or so. I had my fist camera in the early 1960s and I was deving and printing my own B&W stuff within a couple of years.
August 2012 I bought into the Fuji little X cameras, a X10 and now the X20. The jpegs SOOC are so good I rarely take a Raw shot as for all my efforts editing the RAWs are at best only as good as the in camera jpeg.
Rhodese.
- Messages
- 6,343
- Name
- Nick
- Edit My Images
- Yes
No, the image was treated as a whole.
I am mystified. But never mind - it worked!
Thanks for the extra background. I was a decade behind you with my B&W "darkroom" (in a bedsit). After than I didn't really do any photography to speak of for 30 years or so.
As to RAW, it wasn't available (a simplification, but that will do) for my first two bridge cameras, Canon S3 and SX10. I then got a Panasonic G3 micro four thirds camera, hoping to improve my image quality by using a much larger sensor and better optics. I resisted RAW for some time because I thought my JPEGs were just fine, and I kept reading that dealing with RAW files was really difficult. Eventually, after losing an on-line argument about why I wasn't using RAW I remembered that I had a copy of Lightroom that came as a freebie with the G3. I tried it, tried RAW, and since then have only used JPEG when I had to. (It turned out to be no more difficult to deal with RAW images than JPEGs; indeed it is easier in some respects because of the extra data you have available to work with, which gives more flexibility and greater control).
I have since gone back to using a bridge camera (Panasonic FZ200). After getting the FZ200 I did some quite careful comparisons (based on real-world use out in the field) and for the type of pictures I take (close-ups of invertebrates and flowers), and the way I take them, and the sort of post processing I use and my output media (screen and occasional, not huge, prints), it turned out that I couldn't tell the difference between processed versions of images captured with any of my bridge cameras and those captured with the G3. And for flowers, I threw a point and shoot into the mix, with the same, indistinguishable (to my eye) results. (I put the comparison shots on line - they are still there if anyone is interested - and only one person claimed to be able to tell from the look of them which was taken with which camera, and interestingly enough he didn't reply when I asked him to point out the differences that gave the game away.)
As to whether RAW makes a difference, I now have examples that convince me that, for my purposes, RAW is worthwhile (even with a bridge camera that has a sensor half the area of the sensor on your X10 and X20, and even with a Point and Shoot camera with the same small size of sensor and which doesn't officially support RAW).
Pookeyhead
Suspended / Banned
- Messages
- 11,746
- Name
- David
- Edit My Images
- No
LR5.3:

Which gave....

Then edit PS CC:

Click here for large version.... and click again to zoom
- crop
- lens profile and CA
- then....
Which gave....
Then edit PS CC:
- Convert for Smart Filters
- Open in ACR as Camera Raw Filter
- added radial filter for background edges, and added clarity +30 and cooled down the edges of the frame selectively using the temp/WB
- added new layer filled with grey
- changed blending mode to Soft Light on new layer
- selectively dodged and burned face, and areas of jacket and trousers to increase definition on the grey layer.
- burned in boat area to darken to near black and hide the edge of the hull
Click here for large version.... and click again to zoom
Last edited:
Phil-D
Suspended / Banned
- Messages
- 7,553
- Edit My Images
- Yes
Open in ACR
Moved a few sliders till I liked the look
Cropped down left a little. Then cloned out what was still showing of the stone building on the left by creating more shadow. Then cloned out the coat arm?? in the right bottom corner to get this

20110308_ITALY_0040 by Phil D 245, on Flickr
Ok Ok
Here's the screen shots of what I did in ACR

Screen shot - basic- PP game Italy by Phil D 245, on Flickr

Screen shot - detail- pp game Italy by Phil D 245, on Flickr
Moved a few sliders till I liked the look
Cropped down left a little. Then cloned out what was still showing of the stone building on the left by creating more shadow. Then cloned out the coat arm?? in the right bottom corner to get this
20110308_ITALY_0040 by Phil D 245, on Flickr
Ok Ok
Here's the screen shots of what I did in ACR
Screen shot - basic- PP game Italy by Phil D 245, on Flickr
Screen shot - detail- pp game Italy by Phil D 245, on Flickr
Last edited:
Flying giraffe
Suspended / Banned
- Messages
- 1,189
- Name
- Neil
- Edit My Images
- No
auto in raw plus sharpen increase clarity and crop
lens correction and noise reduction

20110308_ITALY_0040 by flyinggiraffe232, on Flickr
lens correction and noise reduction
20110308_ITALY_0040 by flyinggiraffe232, on Flickr
- Messages
- 6,343
- Name
- Nick
- Edit My Images
- Yes
Click on image for larger version, then right click to select image size to view.
NOT MY IMAGE - Rhodese - Boatman - LR 15 by gardenersassistant, on Flickr
In Lightroom
Crop, with a bit of rotation in the crop.
Exposure: +1.28
Highlights: -95
Shadows: +88
Whites: +26
Blacks: -5
Noise reduction (default)
Luminance: 0
Color: 25, Detail 50, Smoothness 50
Remove Chromatic Aberration
Apply 12 Radial Filters:
10 using either one or two from: Exposure, Clarity, Contrast, Sharpness, Highlights, Saturation;
One using Temp, Tint, Exposure and Sharpness;
One using Exposure, Shadows, Clarity, Saturation, Sharpness and Noise Reduction.
Use the Adjustment Brush on three partially overlapping areas using Exposure and Saturation, and on one separate area using Noise Reduction.
Export full size with sharpening for screen viewing, using setting Normal.
Rhodese
Suspended / Banned
- Messages
- 1,154
- Edit My Images
- Yes
Good morning all and a “HAPPY NEW YEAR“.
Well I’m flabbergasted, this was one from my dump, a disc I keep for rubbish.
I have never edited it because it was so, well rubbish and look at what’s being achieved . This is going to be a tough one to judge.
Rhodese.
Well I’m flabbergasted, this was one from my dump, a disc I keep for rubbish.
I have never edited it because it was so, well rubbish and look at what’s being achieved . This is going to be a tough one to judge.
Rhodese.
Farmerjim
Suspended / Banned
- Messages
- 1,756
- Name
- Jim
- Edit My Images
- Yes
Congrats on being PP King Rhodese, I hope you had a bostin Christmas and New year.
Here's my go on the test.............
Started with ACR and boosted the shadows and blacks while turning down the whites and highlights.
View attachment 3174 click for larger
Then I straightened it a tadge and got rid of the bit of dark wall on the left with a bit of cloning.
Tweaked the highlights/shadows a bit, sharpened a bit and reduced the noise a bit.
Here is your Gondolier..............Click for larger.

20110308_ITALY_0040 by Farmejim, on Flickr
Here's my go on the test.............
Started with ACR and boosted the shadows and blacks while turning down the whites and highlights.
View attachment 3174 click for larger
Then I straightened it a tadge and got rid of the bit of dark wall on the left with a bit of cloning.
Tweaked the highlights/shadows a bit, sharpened a bit and reduced the noise a bit.
Here is your Gondolier..............Click for larger.
20110308_ITALY_0040 by Farmejim, on Flickr
overbez
Suspended / Banned
- Messages
- 4,088
- Name
- Graham
- Edit My Images
- Yes
ViewNX2
Set WB to 6000
Sharpen 2
Contrast 10
Shadow Protection 100
Highlight Protection 100
Colour Booster 10
Slight Straighten
Slight crop
Export as TIFF
Lightzone
Add some yellow to highlights (masking off the man before)
Darkened the blacks a small amount
Export as jpg
10 mins for this one, plus 3 more lots of 10-15 mins for the ones in the recycle bin!

Rhodese
Suspended / Banned
- Messages
- 1,154
- Edit My Images
- Yes
Congrats on being PP King Rhodese, I hope you had a bostin Christmas and New year.
Cheers Jim, ar a boster it was. I owp yo ad a gud un.
Rhodese.
Rhodese
Suspended / Banned
- Messages
- 1,154
- Edit My Images
- Yes
Hi everyone,
What a revelation this has been for me. I never edited this, other than to show the jpeg to the missus as a holiday snap.
It was then filed on an old 500gig external dive as an also ran because, everything about it is off, exposure, noise, camera shake blar blar blar.
I resurrected it for the PP game thinking it would be a stumpper with little to be done or could be done, then “pow” you lot have breathed life into it.
To criticise any of your edits would be an injustice as I had given up on it, they are all a presentable impression of a poor start image.
I have taken note of your fixes and will use them to my advantage in the future, thanks for that.
One question, what are radial filters?
A winner well you all are, but the one to carry the torch on, is … Phil-D.
Well done everyone, over to you Phil.
Rhodese.
DayDreamer
Suspended / Banned
- Messages
- 3,739
- Name
- John
- Edit My Images
- Yes
Excellent Phil D 
And Rhodese where's your edit
Now all our festive season guests have buggered off I must get back to taking part
And Radial Filters are part of Lightroom 5 & sometimes I find them very useful.
And Rhodese where's your edit
Now all our festive season guests have buggered off I must get back to taking part
And Radial Filters are part of Lightroom 5 & sometimes I find them very useful.
overbez
Suspended / Banned
- Messages
- 4,088
- Name
- Graham
- Edit My Images
- Yes
Firstly - well done Phil.
Good question!
Ahhh - but what do they DO!!
Presume they're a localised adjustment tool? Similar to what you could do with an adjustment brush but just a different way of selecting / feathering the area to be adjusted?
Lightzone which I've been using recently has similar (I presume), by way of polygonal selections, and / or colour based selections. I find useful for just applying NR to blue parts, or darkening just the top half, or adding local contrast to just a triangular area in the foreground etc. All layer based and non-destructive.
One question, what are radial filters?
Good question!
And Radial Filters are part of Lightroom 5 & sometimes I find them very useful.
Ahhh - but what do they DO!!
Presume they're a localised adjustment tool? Similar to what you could do with an adjustment brush but just a different way of selecting / feathering the area to be adjusted?
Lightzone which I've been using recently has similar (I presume), by way of polygonal selections, and / or colour based selections. I find useful for just applying NR to blue parts, or darkening just the top half, or adding local contrast to just a triangular area in the foreground etc. All layer based and non-destructive.
Rhodese
Suspended / Banned
- Messages
- 1,154
- Edit My Images
- Yes
Excellent Phil D
Rhodese where's your edit
Mornin John,
I hadn’t done an edit but yes, I should.
Here goes.
ACR, auto, open in PS.
Crop, copy layer.
Convert to mono. Adjust contrast.
After seeing what others edits had achieved, I did not adjust for noise, I felt it would be a kind of plagiarism.
So I added noise with an HP5plus film grain layer, dropping the opacity to 15% and then flattening.
Add the border with stroke and save for the web.
Done.

Are the Radial filter thingies available for PS?
Rhodese.
Last edited:
DayDreamer
Suspended / Banned
- Messages
- 3,739
- Name
- John
- Edit My Images
- Yes
Hi again Rhodese & Graham this dull dreary Saturday morning - not even brightened up after my daily cappuccino at my favourite coffee shop
I use CS2, PE10 & LR5 but have been a convert to LR for less than a year before using many PSP, PE & even Ulead for many many years. Why not download a free 30 day trial of LR which I did. Initially I thought b****r what a learning curve but I had to time to watch many YouTube tutorials & I find it being used 90% of the time with the rest in PE10 when layers/masking/fine selections are required.
This link can explain better than me about the detail of what it offers.
http://helpx.adobe.com/lightroom/help/lightroom-radial-filter.html
This is the link to the free trail from Adobe.
https://www.adobe.com/cfusion/tdrc/index.cfm?product=photoshop_lightroom&promoid&promoid=DTEML
Last edited:
- Messages
- 6,343
- Name
- Nick
- Edit My Images
- Yes
Well done Phil.
To use a Radial Filter you define an oval area.
(Click on an image for a larger version)
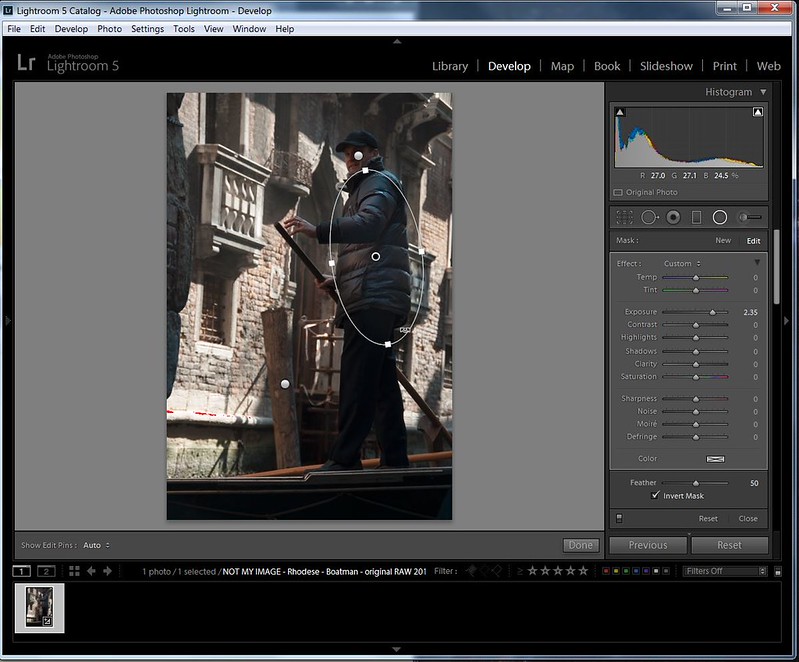
Radial Filter example by gardenersassistant, on Flickr
You can use the four little squares on the oval to alter its size (it can go beyond the edge of the image) and shape, and you can rotate the oval.
You can see on the panel on the right the numerous effects you can apply. Here for example I have upped the exposure of the boatman's jacket by over two stops.
You can use as many effects as you want.
The Color setting at the bottom of the panel lets you apply a colour. Here I have added a very slightly orangey yellow to the boatman's jacket.

Radial Filter - applying a colour by gardenersassistant, on Flickr
The effects can be applied inside the oval (as in this example) or outside it.
You can alter the feathering for the transition between the effect and non-effected areas.
You can have as many Radial Filters as you want. Each is indicated by a little round “pin”. The pin which is black in the middle is the currently selected pin.
New pins can be added, existing pins deleted and the effects of pins can be altered all independently of one another.
The effects you can apply with a Radial Filter are the same as those you can apply with the Adjustment Brush. The difference is that with the Adjustment Brush you can select arbitrary, discontinuous, irregularly-shaped areas, and within an area you can use different opacities, thus changing the intensity of the effect in different parts of a selected area. The automated masking for the Adjustment Brush (similar in effect to using the Magic Wand in CS) is very clever, and it is very easy to reverse the selection when the automated masking gets it wrong (hold the Alt key and the brush deletes from the selection rather than adding to it, and you can turn off the automated masking if needs be.) Like Radial Filters, each selected Adjustment Brush area is shown with a separate pin that can be manipulated independently of the other Adjustment Brush pins and their effects.
So what is the point of Radial Filters if you can already to the same things with the Adjustment Brush? Radial Filters make it much easier to achieve certain sorts of adjustment. For example, with flowers I may apply a Radial Filter that calms down the background so the subject stands out more. This can be done with sufficient subtlety to avoid the look of having used vignetting. In addition I might not just turn the exposure down in the background (or more often perhaps turn the Highlights down in the background), but might also apply other effects such as a slight desaturation. Doing this with a Radial Filter (or two, or three...) is much faster than it would be using the Adjustment Brush.
Good question!
Ahhh - but what do they DO!!
Presume they're a localised adjustment tool? Similar to what you could do with an adjustment brush but just a different way of selecting / feathering the area to be adjusted?
Lightzone which I've been using recently has similar (I presume), by way of polygonal selections, and / or colour based selections. I find useful for just applying NR to blue parts, or darkening just the top half, or adding local contrast to just a triangular area in the foreground etc. All layer based and non-destructive.
To use a Radial Filter you define an oval area.
(Click on an image for a larger version)
Radial Filter example by gardenersassistant, on Flickr
You can use the four little squares on the oval to alter its size (it can go beyond the edge of the image) and shape, and you can rotate the oval.
You can see on the panel on the right the numerous effects you can apply. Here for example I have upped the exposure of the boatman's jacket by over two stops.
You can use as many effects as you want.
The Color setting at the bottom of the panel lets you apply a colour. Here I have added a very slightly orangey yellow to the boatman's jacket.
Radial Filter - applying a colour by gardenersassistant, on Flickr
The effects can be applied inside the oval (as in this example) or outside it.
You can alter the feathering for the transition between the effect and non-effected areas.
You can have as many Radial Filters as you want. Each is indicated by a little round “pin”. The pin which is black in the middle is the currently selected pin.
New pins can be added, existing pins deleted and the effects of pins can be altered all independently of one another.
The effects you can apply with a Radial Filter are the same as those you can apply with the Adjustment Brush. The difference is that with the Adjustment Brush you can select arbitrary, discontinuous, irregularly-shaped areas, and within an area you can use different opacities, thus changing the intensity of the effect in different parts of a selected area. The automated masking for the Adjustment Brush (similar in effect to using the Magic Wand in CS) is very clever, and it is very easy to reverse the selection when the automated masking gets it wrong (hold the Alt key and the brush deletes from the selection rather than adding to it, and you can turn off the automated masking if needs be.) Like Radial Filters, each selected Adjustment Brush area is shown with a separate pin that can be manipulated independently of the other Adjustment Brush pins and their effects.
So what is the point of Radial Filters if you can already to the same things with the Adjustment Brush? Radial Filters make it much easier to achieve certain sorts of adjustment. For example, with flowers I may apply a Radial Filter that calms down the background so the subject stands out more. This can be done with sufficient subtlety to avoid the look of having used vignetting. In addition I might not just turn the exposure down in the background (or more often perhaps turn the Highlights down in the background), but might also apply other effects such as a slight desaturation. Doing this with a Radial Filter (or two, or three...) is much faster than it would be using the Adjustment Brush.
DayDreamer
Suspended / Banned
- Messages
- 3,739
- Name
- John
- Edit My Images
- Yes
Thanks for that Nick - you have a better way of putting it than I ever could - my fingers just don't seem to hit the keys in the right place & order as they used to so typing too much it a bit like a foreign (or even alien) language to me

- Messages
- 6,343
- Name
- Nick
- Edit My Images
- Yes
Thanks for that chaps, so would I be correct in saying it’s the same as making a selection in PS, copy and paste the selection into a new layer then applying adjustments, or adjustment layers to that layer only.
Rhodese.
Somewhat similar. I'm going outside my comfort zone here, but I imagine it is more like adjustment layers with masks. That is more dynamic and (more easily) adjustable than a static cut and paste.
Phil-D
Suspended / Banned
- Messages
- 7,553
- Edit My Images
- Yes
A winner well you all are, but the one to carry the torch on, is … Phil-D.
Well done everyone, over to you Phil.
Rhodese.
Well I wasn't expecting that
! Thank you Rhodese Give me 10 minutes or so and I'll get an image and raw up, cheers
Last edited:
Seajay
Suspended / Banned
- Messages
- 1,493
- Name
- Cathy
- Edit My Images
- Yes
Well done Phil! well deserved!
Happy new year to you all and hope you all have a super healthy 2014!
We are still house hunting and I am missing my time on this thread hopefully new properties will come popping on soon and I can get back in to it all.
Cathy
Happy new year to you all and hope you all have a super healthy 2014!
We are still house hunting and I am missing my time on this thread
hopefully new properties will come popping on soon and I can get back in to it all.Cathy
Phil-D
Suspended / Banned
- Messages
- 7,553
- Edit My Images
- Yes
Here's another photo I took when I first got my camera. I took a few similar shots with different exposure lengths and only did a bit of PP on one of them when I was learning to use NX2.
This one is probably about 15 seconds too long and possibly needed a smaller aperture ??
It will be interesting to see what you talented lot can do with it
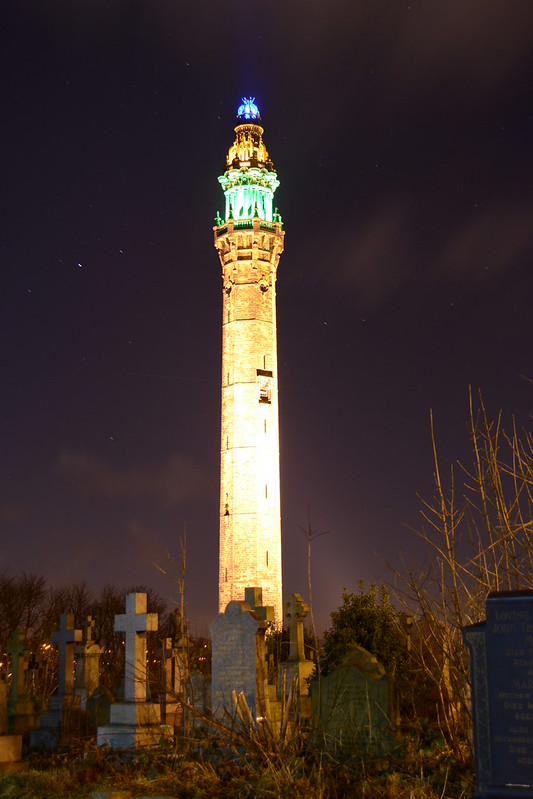
Wainhouse tower 1 by Phil D 245, on Flickr
Edit:- Forgot, I'll call it Tuesday evening
Link to raw file (hopefully )
)
https://www.dropbox.com/s/p89hfiuznldw1f0/DSC_0447.NEF
This one is probably about 15 seconds too long and possibly needed a smaller aperture ??
It will be interesting to see what you talented lot can do with it
Wainhouse tower 1 by Phil D 245, on Flickr
Edit:- Forgot, I'll call it Tuesday evening
Link to raw file (hopefully
) https://www.dropbox.com/s/p89hfiuznldw1f0/DSC_0447.NEF
Last edited: