Paper negatives anyone?

Asha

Blithering Idiot
Suspended / Banned
Messages
11,274
Name
Asha
Edit My Images
Yes
Never ever have I had a play with paper negs.
For those who aren’t aware, it’s simply using paper ( as in what is used for wet prints) as a replacement to film.
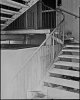
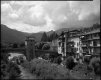
Went out this afternoon beneath very stormy skies ( see the old bridge / landscape neg ) and grabbed a couple of 10x8s

The staircase is very overexposed in parts but the landscape might offer something.

Either way I’m delighted to have got such reasonable results at a first attempt.

I never had much joy the Harmans direct positive paper and with that in the back of my mind, I wasn’t overly confident about this process but now it could prove to be a regular part of my photography output.

Next stage is to contact print them to a positive.

883E8F8E-A6D5-4CF4-BDD0-EECB200A0E82.jpeg
BF864C41-13F1-4280-BD2F-B537AD560922.jpeg57D9AA3B-2DE7-4D8A-86D4-2B70E543873D.jpegF4E68380-E0E7-4AB5-89C6-BFCAA00A3DDE.jpeg
 
Last edited:
Looks fun. I once had access to a reflecting enlarger that worked like an epidiascope.
It was designed for making prints from direct positive street photographs that used paper negatives. The other way was to soak them in a camphor like wax which made them far more transparent so they could be printed with a daylight enlarger.
 
What sort of exposure times do you need for those?

The paper is blue sensitive iirc and as such the speed at which you expose it can be very much determined by how bright the light is.

I exposed at iso 6 for both of these but I reckon I could have got away at iso 12

Bear in mind where I live so in the uk possibly 6 or even iso 3

The landscape had a yellow filter added and was a one second exposure . I went for sunny 16 as the sky highlights were well bright.
I’m interested what an orange and or polarising filter will do.

The staircase was a two minute exposure with no filter.
No reciprocal bumph to deal with.
 
Looks fun. I once had access to a reflecting enlarger that worked like an epidiascope.
It was designed for making prints from direct positive street photographs that used paper negatives. The other way was to soak them in a camphor like wax which made them far more transparent so they could be printed with a daylight enlarger.

Camphor like wax?? Interesting !
I’ll have to do some googling ......
 
The paper is blue sensitive iirc and as such the speed at which you expose it can be very much determined by how bright the light is.

I exposed at iso 6 for both of these but I reckon I could have got away at iso 12

Bear in mind where I live so in the uk possibly 6 or even iso 3

The landscape had a yellow filter added and was a one second exposure . I went for sunny 16 as the sky highlights were well bright.
I’m interested what an orange and or polarising filter will do.

The staircase was a two minute exposure with no filter.
No reciprocal bumph to deal with.

An orange filter will kill it stone dead as the paper it's not sensitive to orange light at all... Think dark room safe lights ...a 2 times yellow filter will act much like an orange. Filters do little useful on blue sensitive emulsions. As they are literally only sensitive to blue and the ultra violet end of the spectrum. Kodak used to make a panchromatic paper which was much more useful. But only professionals and scientific users had it listed in their catalogues. I think it ended some time in the 70's it was useful for making prints from colour negatives. You could dial in colour corrections in your enlarger to give filter effects. But opposite in colour to those on a camera.
 
Last edited:
An orange filter will kill it stone dead as the paper it's not sensitive to orange light at all... Think dark room safe lights ...a 2 times yellow filter will act much like an orange. Filters do little useful on blue sensitive emulsions. As they are literally only sensitive to blue and the ultra violet end of the spectrum. Kodak used to make a panchromatic paper which was much more useful. But only professionals and scientific users had it listed in their catalogues. I think it ended some time in the 70's it was useful for making prints from colour negatives. You could dial in colour corrections in your enlarger to give filter effects. But opposite in colour to those on a camera.

Hmmm maybe the yellow was a waste of effort too then?

What about polarisers ?.... will they have an effect, I would have thought so tbh but as you know I’m a bit of a daydreamer [emoji23]

Grads will be ok though surely?
 
Hmmm maybe the yellow was a waste of effort too then?

What about polarisers ?.... will they have an effect, I would have thought so tbh but as you know I’m a bit of a daydreamer [emoji23]

Grads will be ok though surely?

A polariser or grads should work but not if they are tinted..
 
These are very impressive, Asha, specially the staircase... which BTW looks pretty darn good just as a negative!

How do you make a positive from them? I'm not clear how contact printing works with paper, unless as Terry seemed to be suggesting you make it transparent first...
 
These are very impressive, Asha, specially the staircase... which BTW looks pretty darn good just as a negative!

How do you make a positive from them? I'm not clear how contact printing works with paper, unless as Terry seemed to be suggesting you make it transparent first...

Thanks Chris.

For the positive it’s basically the same idea as any other contact print.
Negative placed on flat surface with emulsion side up.
Unexposed paper placed on top placed emulsion down.
Bit of weight ( sheet of glass)
Light source for x amount of time.
Dev as a wet print.
Voilà

Might try later this evening if I can find energies...
Looking forward to hearing more about this Asha, as it might encourage me to get out my wholeplate camera with the halfplate back that can take 5x7 holders. With 25 sheets of 5x7 paper available for £12 posted, this has to be way cheaper than shooting film. ;)
 
Thanks Chris.

For the positive it’s basically the same idea as any other contact print.
Negative placed on flat surface with emulsion side up.
Unexposed paper placed on top placed emulsion down.
Bit of weight ( sheet of glass)
Light source for x amount of time.
Dev as a wet print.
Voilà

Might try later this evening if I can find energies...


Should be paper to be exposed emulsion up on a flat base
Negative emuslion down in contact
Heavy sheet on top to hold all in contact.
To do test print use black card as shield and expose in progressive strips
Develop.
use bare bulb at good distance to expose for fairly sharp image.
can use enlarger with lens as light source , might be sharper.
paper negs are heavily diffused. and depending on the quality of the paper base can look clumpy and strandy.
Sharper results come from using an Epidiascope. as it makes a reflected image. from the surface. but is more contrasty
 
Should be paper to be exposed emulsion up on a flat base
Negative emuslion down in contact

You are correct of course and indeed that's what I do with standard 10x8 neg film contacts so why I stated negative facing emulsion side up, I don't know......It has been a very long tiring day! ;)
 
Should be paper to be exposed emulsion up on a flat base
Negative emuslion down in contact
Heavy sheet on top to hold all in contact.
To do test print use black card as shield and expose in progressive strips
Develop.
use bare bulb at good distance to expose for fairly sharp image.
can use enlarger with lens as light source , might be sharper.
paper negs are heavily diffused. and depending on the quality of the paper base can look clumpy and strandy.
Sharper results come from using an Epidiascope. as it makes a reflected image. from the surface. but is more contrasty
Any thoughts on scanning rather than contact printing? It's OK for the 10x8 crowd to contact print, but lesser sizes may not look special enough in a contact print. :oops: :$
 
Any thoughts on scanning rather than contact printing? It's OK for the 10x8 crowd to contact print, but lesser sizes may not look special enough in a contact print. :oops: :$


AFAIK scanning and then printing out to whatever size you wish is possible.

As for the actual scanning method, I have yet to find out for myself.

I'm presuming to scan like a standard film neg although a part of me wonders if the paper neg has to be scanned as if scanning a positive print and then inverted to a positive in PP.

I won't know 'til i try and that's not likely to be this evening.
I think it would need to be scanned as a print then inverted, as the light won't be able to shine through it like a neg.
 
I think it would need to be scanned as a print then inverted, as the light won't be able to shine through it like a neg.
yes just scan as you would a normal print
Then correct neg-pos and left-right in photoshop or the like. it will probably need considerable curves adjustment to get the tonality and contrast right.
 
I think it would need to be scanned as a print then inverted, as the light won't be able to shine through it like a neg.
Since you can scan a normal negative on a standard all-in-one flatbed scanner (just with reflected light), I'm sure you can scan a paper negative. I thought for a bit you could get Vuescan to do the inversion for you, but I suspect that option might disappear with an all-in-one... should surely be there with an Epson 750 though?
 
Rightly or wrongly, I'm assuming that glossy paper would be better for this than a textured surface paper as far as detail is concerned? :thinking:

25 sheets of wholeplate FP4+ @ £118.73 or 100 sheets of wholeplate Multigrade V @ £40.90. Hmmm ........ :snaphappy:
 
RC paper is recommended as fibre based shows textures in the image when transférés to a positive .

I would also think glossy would’ve the better option too
 
I tried a few paper negatives when I first got a 5x4, to get experience with the handling of the camera, although I didn't have much success and just moved on to film. I have been meaning to have another go as I've seen some good paper negative results from Matt Lethbridge (https://www.instagram.com/matt.lethbridge/).

So this thread spurred me on to do some tests of paper speed. I tried six exposures in the garden at IS0 0.75, 1.5, 3, 6, 12, and 25.
The paper I used was Ilford MGIV RC glossy. I usually prefer the Lustre finish for prints but have some old glossy 8*10 which I was happy to sacrifice for this purpose. (cut into quarters).
I had expected ISO3 to give the best result but in fact ISO 1.5 gave the best result. Perhaps the age of the paper may have reduced the sensitivity.

I've attached the inverted scan here, although the subject's not very interesting and the paper has suffered some physical damage and/or chemical contamination. I metered off a grey card in the foreground of the scene.

Ilford MGIV RC glossy, ISO1,5  (v2).jpg

Contrast is clearly a problem - there is no detail in the pot in the bottom left. I think there were some clouds which don't show up.

Andrew Sanderson, who wrote a small book on paper negatives, recommends trying a very diluted paper developer to establish a developing time which gives appropriate contrast. I haven't tried that yet.
 
I tried a few paper negatives when I first got a 5x4, to get experience with the handling of the camera, although I didn't have much success and just moved on to film. I have been meaning to have another go as I've seen some good paper negative results from Matt Lethbridge (https://www.instagram.com/matt.lethbridge/).

So this thread spurred me on to do some tests of paper speed. I tried six exposures in the garden at IS0 0.75, 1.5, 3, 6, 12, and 25.
The paper I used was Ilford MGIV RC glossy. I usually prefer the Lustre finish for prints but have some old glossy 8*10 which I was happy to sacrifice for this purpose. (cut into quarters).
I had expected ISO3 to give the best result but in fact ISO 1.5 gave the best result. Perhaps the age of the paper may have reduced the sensitivity.

I've attached the inverted scan here, although the subject's not very interesting and the paper has suffered some physical damage and/or chemical contamination. I metered off a grey card in the foreground of the scene.

View attachment 283270

Contrast is clearly a problem - there is no detail in the pot in the bottom left. I think there were some clouds which don't show up.

Andrew Sanderson, who wrote a small book on paper negatives, recommends trying a very diluted paper developer to establish a developing time which gives appropriate contrast. I haven't tried that yet.

That looks to be a decent result Kevin.

I appreciate the contrast issues but your result and my negs certainly offer me more encouragement than the Harman positive paper that I really didn’t get on with.

I haven’t got round to scanning or contact printing my efforts yet so can’t compare ..... all being well I’ll get chance tomorrow.

Well done for having a play and posting the result / info .
I’m pleased the thread encouraged you[emoji6]
 
Last edited:
Quick scans.

The stairway image was very over exposed bottom right so I've pulled that back quite a bit..

The Old bridge image though has practically no adjustments made to the original scan.

Overall I'm impressed

What do you guys think?

Paper negative Old Bridge.jpg

Paper neg stairs.jpg
 

Attachments

  • Paper neg stairs.jpg
    Paper neg stairs.jpg
    150.7 KB · Views: 3
  • Paper negative Old Bridge.jpg
    Paper negative Old Bridge.jpg
    141 KB · Views: 3
Last edited:
I like them both very much mate.You can tell that work has been done on the staircase shot but the bridge is spot on.(y)
 
I tried a few paper negatives when I first got a 5x4, to get experience with the handling of the camera, although I didn't have much success and just moved on to film. I have been meaning to have another go as I've seen some good paper negative results from Matt Lethbridge (https://www.instagram.com/matt.lethbridge/).

So this thread spurred me on to do some tests of paper speed. I tried six exposures in the garden at IS0 0.75, 1.5, 3, 6, 12, and 25.
The paper I used was Ilford MGIV RC glossy. I usually prefer the Lustre finish for prints but have some old glossy 8*10 which I was happy to sacrifice for this purpose. (cut into quarters).
I had expected ISO3 to give the best result but in fact ISO 1.5 gave the best result. Perhaps the age of the paper may have reduced the sensitivity.

I've attached the inverted scan here, although the subject's not very interesting and the paper has suffered some physical damage and/or chemical contamination. I metered off a grey card in the foreground of the scene.

View attachment 283270

Contrast is clearly a problem - there is no detail in the pot in the bottom left. I think there were some clouds which don't show up.

Andrew Sanderson, who wrote a small book on paper negatives, recommends trying a very diluted paper developer to establish a developing time which gives appropriate contrast. I haven't tried that yet.

was the pot red... if so that would add to any contrast problem as it is not sensitive to red.
 
I like them both very much mate.You can tell that work has been done on the staircase shot but the bridge is spot on.(y)

Litterally scanned and spent a coupl of mins with them to sharpen slightly etc.

A better result could be gotton from the stairs I reckon but the bottom RHS is blown to bits but i can retake easy enough if I fancy.

The bridge as you say is pretty much spot on, very liitle work done to it tbh ...here's exactly as it looks straight off the scanner

Paper negative Old Bridge original scan.jpg
 
Quick scans.

The stairway image was very over exposed bottom right so I've pulled that back quite a bit..

The Old bridge image though has practically no adjustments made to the original scan.

Overall I'm impressed

What do you guys think?

View attachment 283295

View attachment 283294
They work for me Asha, especially the bridge shot, and it's all a decent learning curve for the technique. I've read a couple of articles and threads about it, and a pack of 5x7 Multigrade is somewhere in the post as I write! Now I just need to dig out the big camera and get it ready ......... :thinking:
 
They work for me Asha, especially the bridge shot, and it's all a decent learning curve for the technique. I've read a couple of articles and threads about it, and a pack of 5x7 Multigrade is somewhere in the post as I write! Now I just need to dig out the big camera and get it ready ......... :thinking:

I reckon the bridge shot will contact print quite nicely seeing as its required next to no PP ...... I’ll have to give it a go out of curiosity if nowt else.

I just knew you wouldn’t be able to resist..... Good on ya, I think you’ll have some fun and at a fraction of the cost of film.
 
I like the bridge one; the bottom half of the stairs lets it down for me. Naturally so, as the bottom of any staircase lets people down :exit:

Contrast will always be a problem with printing paper, as its the stage where most tonal compression occurs. From memory, I think Carson Graves' book gives information on reducing print contrast. And I don't knowif you can still get single weight paper, but if so that might make a better negative.

I have a 10x8 portrait of me taken on Harman direct positive paper at Focus a few years back which to my eyes is technically up to a normal neg/pos print.
 
Really like the bridge shot, asha, I'd say that's looking rather good indeed!

Should you find the positive paper isn’t for you when you get the 11x14 camera up and running, then paper negs might be an alternative?

I dunno why I couldn’t get to grips with the HPP as I’ve seen some cracking results. Hopefully you’ll have more luck.
 
The bridge shot looks especially good in terms of tone and contrast - what paper did you use?

The few paper negs that I've done were on multigrade. Early efforts were really contrasty (in f/11 light, so quite bright). Putting a yellow filter in front (of the lens or pinhole) helped a bit, but I've fancied trying some fixed grade paper (grade 1 or 2, probably). My developing so far has been in normal strength paper developer.
 
I like the bridge one; the bottom half of the stairs lets it down for me. Naturally so, as the bottom of any staircase lets people down :exit:

Contrast will always be a problem with printing paper, as its the stage where most tonal compression occurs. From memory, I think Carson Graves' book gives information on reducing print contrast. And I don't knowif you can still get single weight paper, but if so that might make a better negative.

I have a 10x8 portrait of me taken on Harman direct positive paper at Focus a few years back which to my eyes is technically up to a normal neg/pos print.

Was the HPP pre flashed?
That’s something I haven’t tried and maybe it’s necessary .... some sources would seem to say so.
 
Should you find the positive paper isn’t for you when you get the 11x14 camera up and running, then paper negs might be an alternative?

I dunno why I couldn’t get to grips with the HPP as I’ve seen some cracking results. Hopefully you’ll have more luck.

I'm keeping all options open. The box of paper I bought served a number of purposes, but yes, I'll give it a good effort, and evaluate once the box is empty :)
 
The bridge shot looks especially good in terms of tone and contrast - what paper did you use?

The few paper negs that I've done were on multigrade. Early efforts were really contrasty (in f/11 light, so quite bright). Putting a yellow filter in front (of the lens or pinhole) helped a bit, but I've fancied trying some fixed grade paper (grade 1 or 2, probably). My developing so far has been in normal strength paper developer.

I’ve had to dig out the box of paper used as I wasn’t sure.
It dates back yonks I think [emoji23] lol
Dev was in standard multigrade 1:9

IMG_1238.JPG
 
Was the HPP pre flashed?
That’s something I haven’t tried and maybe it’s necessary .... some sources would seem to say so.

As far as I know, not. But that is an assumption as the details weren't fully disclosed - and I was more interested in what they did in the temporary darkroom at the time.
 
My 5x7 Multigrade RC (aka V) sheets arrived on Monday and I went out yesterday to shoot a few of them. I used iso 3 as the lowest on my meter, but reults are suggesting this was too low for the new MG, although the 4th sheet of the viaduct looks way different to the others for some reason. :thinking: I used Multigrade developer at 1:14, which pretty much had them fully developed at 1 minute, although this Emulsive video suggests 1:28 for easier control. I've posted them as developed and before scanning, since clearly I had a few issues with some of them at the taking stage. Still, I've convinced myself that the process works, so that's the positive for me and I'll scan them later today to see how they look.

20200624_094618-tp.jpg
 
Back
Top