

Garry Edwards
Moderator
- Messages
- 13,475
- Name
- Garry Edwards
- Edit My Images
- No
Despite the limited participation in the earlier lighting challenges, I’ve decided to post another, and see whether the level of participation justifies the time . . .
Lighting for beauty often involves more than one light, for example there may also be a fill light, a hair light, a back light and so on, but sticking to my own “rules” There’s just one light here. This makes sense because it’s always one light that does about 90% of the work anyway.
This is going to be a long and detailed post (my apologies) because the results will vary depending on the lighting modifier used, and we’ll all have different gear, so there are 3 different modifiers used here, a large softbox, a large beauty dish and a standard reflector. The softbox and the beauty dish are in fact the same tool, a 100cm beauty dish that comes with 2 diffusers, turning it into a softbox.
100cm is too large for just a headshot, but it’s what I have. I say that it’s too large because the sculptured effect is reduced by the size, with the light coming from such a large area and, therefore, from different directions. People who have met me know that I’m not Uriah Heep, I’m not ever so humble and I always KNOW that I’m right – but feel free to get better results than I can with a really large light")
The whole idea of beauty lighting is that it shows the qualities of the subject’s bone structure, and to show these qualities at their best we need a fairly hard light, placed at the angle that creates the right shadows in the right places – under the cheekbones, under the nose, under the lips and under the chin. Flat lighting doesn’t do this.
It needs the right model, of course, because this fairly hard lighting also emphasises poor complexion and we also need, if possible, a model with high cheekbones, often found with African and East Asian people, but less often with British people.
Sadly, the only “model” I have to hand in my cheap and cheerful eBay mannequin head, not ideal because she’s made of plastic, but it’s what it is. Ignore the catchlights, which are painted on and which aren't created by the lighting.
My own tool of choice would be a 40cm metal beauty dish, and I know that my own one is at the back of the Lencarta warehouse somewhere, but I decided against it because they have now fallen out of fashion and very few TP members are likely to have one, so I’ve gone with the tools I mentioned earlier.
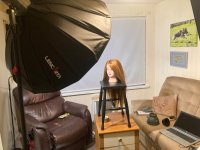
And, typically, I would have the light on a boom arm, which would have allowed me to light the model from the front without the lighting stand getting in the way, but most of us don’t have a boom arm so for most of these shots I’ve shot my “model” with the light off to the side and with her face at an angle, to match. But, it was (just) possible to shoot it straight on, but the light had to be either behind or immediately next to the camera, which was a bit of a challenge because to maintain the angle I had to lower the "model" because I ran out of ceiling height, and I also ran out of background

Having the light 2 1/2 times further away did make it effectively 2 1/2 times smaller, which helped, but it wasn't easy in a small room . . .

It’s all about the light position and distance – high enough to sculpt the shadows, close enough for the inverse square law to make a real difference, distant enough not to create ugly highlights.
I’ve also taken each shot with and without a reflector, which has worked too well because I couldn’t get it far enough away. A correctly-positioned reflector would have created a very similar effect to clamshell lighting.
One small point – the depth of field varies because I changed the lens aperture to compensate for the differing light output with different modifiers, which especially shows up with the diffused standard reflector shot, instead of changing the flash power.
So, the first example is with the softbox, but each example is with the light in exactly the same position – but please experiment with different angles, positions and distances


Moving on, here “she” is with the beauty dish, which inevitably creates harsher shadows with more clearly defined shadow edges


And now with the standard reflector. The result is even more dramatic, but the lighting is pretty uneven because of the reflector design. I've always felt that standard reflectors are seriously under-appreciated


So, I put a diffuser over the light to even out the inconsistent light delivery. Diffusers don’t soften the light, they just even out inconsistencies.

Here it is, without the reflector shown in the stepback shot above

And with it

Over to you!
Lighting for beauty often involves more than one light, for example there may also be a fill light, a hair light, a back light and so on, but sticking to my own “rules” There’s just one light here. This makes sense because it’s always one light that does about 90% of the work anyway.
This is going to be a long and detailed post (my apologies) because the results will vary depending on the lighting modifier used, and we’ll all have different gear, so there are 3 different modifiers used here, a large softbox, a large beauty dish and a standard reflector. The softbox and the beauty dish are in fact the same tool, a 100cm beauty dish that comes with 2 diffusers, turning it into a softbox.
100cm is too large for just a headshot, but it’s what I have. I say that it’s too large because the sculptured effect is reduced by the size, with the light coming from such a large area and, therefore, from different directions. People who have met me know that I’m not Uriah Heep, I’m not ever so humble and I always KNOW that I’m right – but feel free to get better results than I can with a really large light
The whole idea of beauty lighting is that it shows the qualities of the subject’s bone structure, and to show these qualities at their best we need a fairly hard light, placed at the angle that creates the right shadows in the right places – under the cheekbones, under the nose, under the lips and under the chin. Flat lighting doesn’t do this.
It needs the right model, of course, because this fairly hard lighting also emphasises poor complexion and we also need, if possible, a model with high cheekbones, often found with African and East Asian people, but less often with British people.
Sadly, the only “model” I have to hand in my cheap and cheerful eBay mannequin head, not ideal because she’s made of plastic, but it’s what it is. Ignore the catchlights, which are painted on and which aren't created by the lighting.
My own tool of choice would be a 40cm metal beauty dish, and I know that my own one is at the back of the Lencarta warehouse somewhere, but I decided against it because they have now fallen out of fashion and very few TP members are likely to have one, so I’ve gone with the tools I mentioned earlier.
And, typically, I would have the light on a boom arm, which would have allowed me to light the model from the front without the lighting stand getting in the way, but most of us don’t have a boom arm so for most of these shots I’ve shot my “model” with the light off to the side and with her face at an angle, to match. But, it was (just) possible to shoot it straight on, but the light had to be either behind or immediately next to the camera, which was a bit of a challenge because to maintain the angle I had to lower the "model" because I ran out of ceiling height, and I also ran out of background
Having the light 2 1/2 times further away did make it effectively 2 1/2 times smaller, which helped, but it wasn't easy in a small room . . .
It’s all about the light position and distance – high enough to sculpt the shadows, close enough for the inverse square law to make a real difference, distant enough not to create ugly highlights.
I’ve also taken each shot with and without a reflector, which has worked too well because I couldn’t get it far enough away. A correctly-positioned reflector would have created a very similar effect to clamshell lighting.
One small point – the depth of field varies because I changed the lens aperture to compensate for the differing light output with different modifiers, which especially shows up with the diffused standard reflector shot, instead of changing the flash power.
So, the first example is with the softbox, but each example is with the light in exactly the same position – but please experiment with different angles, positions and distances
Moving on, here “she” is with the beauty dish, which inevitably creates harsher shadows with more clearly defined shadow edges
And now with the standard reflector. The result is even more dramatic, but the lighting is pretty uneven because of the reflector design. I've always felt that standard reflectors are seriously under-appreciated
So, I put a diffuser over the light to even out the inconsistent light delivery. Diffusers don’t soften the light, they just even out inconsistencies.
Here it is, without the reflector shown in the stepback shot above
And with it
Over to you!
")


")


