Lighting Challenge 5, Short Lighting

Garry Edwards

Moderator
Messages
13,475
Name
Garry Edwards
Edit My Images
No
This is a very useful and fairly popular single-light technique, although a lot of the people who make use of it don’t know the term “Short Lighting”, which doesn’t matter at all, and if we google “short lighting” we can get some hilarious results:)

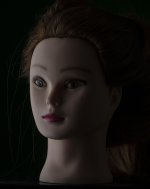
Short lighting is a technique that involves lighting the side of the subject's face that is furthest from the camera, which leaves the side closest to the camera in shadow.

Short lighting can create a dramatic and flattering look with shadows that sculpt the subject's face. It can also make faces appear longer and slimmer, which can be ideal for people with round, wide, or heavier set faces, so it’s a very useful flattering technique.

Short lighting is the opposite of broad lighting, which illuminates the part of the subject's face that's most seen by the camera. Broad lighting produces photos with fewer shadows and a lighter mood but makes faces look wider, so short lighting is (or can be) a flattering/slimming light.

But we’re not limited to lighting faces, we can light the entire body in this way and we can also light static subjects. Because of my personal circumstances, I’m struggling to photograph people at the moment, I’ve asked for volunteers to host lighting challenges involving people but nobody has stepped forward yet . . .

I thought about photographing my mannequin head, but it’s somewhere in the back of the Lencarta warehouse and may be difficult to find. So I decided to “Go to work on an egg” – for anyone who remembers old advertising campaigns that I worked on:)

So I decided to photograph an egg, using short lighting. It’s an OK subject because everyone who isn't vegan can photograph an egg, which is also small enough to light in small spaces.

I used a black background to prevent unwanted reflected light, but any background will do.

This egg may have a bit more “texture” than most because it isn’t a supermarket egg, typically 4-6 weeks old by the time it’s on sale and often washed, it came from one of our own free-range hens and I photographed it as is, and on the day she laid it:)

So, photograph an egg if you want to, or a face, or anything else.

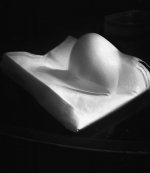
This shot shows the setup from behind the camera, the background is a black bath towel and the shiny acrylic base can be bought online from various sources and in a choice of sizes https://www.ebay.co.uk/ipp/360875050516?transactionId=1510119856023&_trksid=p4429486.m149906.l48352


setup 1.jpg
What you see in this stepback shot is the egg with ambient lighting, compare the effective shape with the short lighting side by side comparison below, but bear in mind that neither the shooting angle nor the light colour is the same.
comparison.jpg

It was quite difficult to get this almost-alive egg to keep still and I messed up with this essential and specialised bit of gear
blu tak.jpg

Which is showing in the shot – easily retouched out but we don’t do any PP in these challenges.

Here’s another stepback shot
setup 3.jpg

And another. This one shows the light position. It’s fitted with a standard reflector and is aimed to only just catch the subject.
setup 2.jpg
Any light of any kind will do, but of course if you don’t use flash then the low power of a continuous light will need a longer shutter speed, which will allow ambient light to “fill” Shadow areas, sometimes we want this and sometimes we don’t, flash gives us the choice.

And, finally, the actual short-lit shot, complete with the unwanted blu-tak
egg_flash only.jpg

Whether it's the right or best lighting for the job isn't the point, what it demonstrates is the slimming effect.

I’ve also shot a much more complex subject, judge for yourself whether this short lighting technique suits it . . .

camera_flash only.jpg

It’s my old Nikon F90X camera, which I think I bought in about 1994. I really must use it again, I just need to get a memory card for it and my memory card of choice is FP4 Plus https://analoguewonderland.co.uk/pr...nuAmzvqw16YQs-ude8MoNaXrC0HIfyeEaAkgpEALw_wcB

As with all still-life subjects, the subject should be scrupulously clean and preferably brand new, and obviously a 30 year old camera that’s been used by a pro photographer isn’t a perfect subject, but it’s what it is. All creative lighting techniques create harsh lighting that emphasises all faults, so require more retouching than when the lighting is flat and boring.

As with all of these lighting challenges, I’ve used a single light with no post-processing work.


Over to you, I KNOW that you can do much better . . .
 
Last edited:
This looks like it'll be fun (y)
 
Just a quick question, in the second step back shot what is the purpose of the light to the left of the egg?
 
Just a quick question, in the second step back shot what is the purpose of the light to the left of the egg?
This one?
setup 3.jpg
it's just a reflection of the overhead room light, it's a dull rainy day:)
 
Gary did I get it right in any of these pics ? :P Source lighting window with curtains.
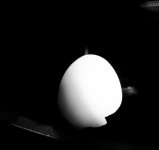
 

Attachments

  • 20241001_115931.jpg
    20241001_115931.jpg
    41.5 KB · Views: 15
  • Untitled_HDR-2.jpg
    Untitled_HDR-2.jpg
    64.3 KB · Views: 15
  • 20241001_120107.jpg
    20241001_120107.jpg
    40.5 KB · Views: 15
I think that the third one, 120107.jpg sort of works, but the light needs to be coming from behind as well as from the side, in other words from a different angle . . .

But a combination of a very large (relative to the subject) light source and that white serviette, which is reflecting a lot of light back on to the subject, is making it difficult for you.

One of the basic "rules" in this challenge is that we don't do any PP work. But thanks for posting, and keep them coming:)
Oh. I thought it was literally a challenge. Not a competition. Ha my bad.
 
This one is most interesting, very simple in concept much less so in execution.
Quite amazing in terms of the effects that can be obtained by varying the light placement and using light modifiers.
All are taken with a Fuji XT-1 , 18-135 lens and a Godox TT685 flash using either a standard relector or a Snoot with a white reflector behind the subject.

Standard Reflector

p402164586-4.jpg


Standard Reflector with light further behind subject

p229774907-4.jpg


Snoot with no reflector behind subject

p433699222-4.jpg


Snoot with White card reflector behind subject

p398939550-4.jpg


Lighting Setup
p58188187-4.jpg


Thanks for the challenge Gary very educational
 
This one is most interesting, very simple in concept much less so in execution.
Quite amazing in terms of the effects that can be obtained by varying the light placement and using light modifiers.
... And that's really what these challenges are all about:)
Ads soon as we start actually thinking about specific lighting effects and stop throwing light light in all directions, we find out just how much differences very small adjustments actually make.
Over to you, I KNOW that you can do much better . . .
And you're the first to prove me right:)
 
Thank you for your comments they are greatly appreciated.
As a matter of interest when doing this commercially obviously experience plays a large part in light and subject placement to obtain a specific result but have done that and established the parameters would you record these for future reference to aid reproducibilty ( a photographic recipe?) via a diagram or similar or simply rely on knowledge and experiece.
 
Lots of eggs, so thought I`d try an egg-head ;)
Bit of faffing with the light (and remote), but hey ho.

Sorry I forgot to take a set up shot, but took a snap from where the tripod was, and drew in the light and stick me ;)

Fuji XT5 56mm @f5.6 iso 400 Godox 685 on 1/8 and a half.

Short Lighting.jpgset-up.jpg
 
That's worked really well, and I think that the hard lighting suits this particular subject very well.
I normally manage to forget the step-back shots myself, I get a bit too absorbed . . .

A pity about the light spill on the opposite collar, easily avoided by a flag to control light spill, or easily fixed in PP.
Thanks, Garry (y)
I guess it's easier when everything is in one place, too.

Yeah, there's a few bits to be done in pp. But as the challenge goes... Soc, warts n all ;)
 
Having now spent a small fortune on my flashy new mannequin head https://www.talkphotography.co.uk/threads/mannequin-head.763126/ I thought I'd have a play and add to this thread. Ignore the catchlights in the eyes, they're painted on to the mannequin head.

My background here is one of those big pop-up chromakey things that, in theory at least, fold up again and go back into a small bag. Whether it's ideal or not, it's what it is. Of course, it photographs as black in the short-lighting examples because no light is reaching the background. Edit: Because of this I didn't need to have a background at all, but because I'm bone idle I also did some shots for a future challenge, that do need a background:)

Here's my stepback shot with the softbox - which to be honest is bigger than it needs to be, but it's what I had available
short_softbox_stepback.jpg

Here she is, shot with a softbox. The @Paulie-W example is better, but at a more extreme angle. As with his example, and almost inevitably, there's some unwanted light spill near the right bottom that needs to go.
short_softbox_red.jpg
This lighting can be flattering to broad subjects because it has a strong narrowing effect, here's the same shot but without the short lighting, for comparison. The colour balance is off, but ignore that - no computer work in these challenges:)
not short_red.jpg
@Paulie W used a distant, small light source to emphasise his good looks, right choice. A large softbox is usually a preferred choice when we want to make people look good, but here's the same shot but using a standard reflector instead, but first, here's my stepback shot
short_standard_stepback.jpg

short_standard_red.jpg
More dramatic, but inevitably showing up the texture of the "skin", which can be either good or bad depending on what we want to achieve

I really wanted to show you a more extreme example, easily done by moving the light further away, but as I didn't have the space to do that, I added my very tight honeycomb, to exaggerate the effect even more . . .
short_honeycomb_red.jpg

That lighting might suit my face:)

Over to you. These lighting challenges are only worth doing if enough people contribute, and as they can all be carried out by anyone, in any size of shooting space, with a single light of any type . . .
 

Attachments

  • short_softbox_red.jpg
    short_softbox_red.jpg
    103.9 KB · Views: 8
Last edited:
I'm late at posting the pictures again. Even worse, I can't find the pictures of the lighting setup.

I used a golf ball. I have a bit of a theory that they can be used to tell you what is happening with lighting- the light is coming from twice the angle to the centre of the ball of the brightest part. Under hard/soft light, the dimples move into the light differently if you rotate the ball.

Light direct from a flash to the right and up a bit. About 2-3' away so hard light.

2024 Lighting 5 2.JPG

Light from the right bounced off an A4 white card about 2' away. Less well defined transition from light to dark and the edges of the dimples are softer.
2024 Lighting 5 1.JPG

Light reflected off a big silver sparkly windscreen cover behind and to the left. Light seems to be all over the place but it looks the most 3 dimensional of the 3 to me. I think it is the light curving around the top of the ball.

2024 Lighting 5 3.JPG

Being perfectly round with a regular texture, the shapes are not that interesting in my opinion. Particularly the second one as it looks like a badly defined hemisphere.
 
I only vaguely know what a golf ball looks like, I've never felt the need to spoil a good walk by playing golf, but it does seem to be a challenging subject.
One of the obvious problems seems to be its shine, which would need a large light source to create diffused specular highlights, but which would reduce the drama of the surface texture quite a lot.

It seems to me that the most interesting way of lighting it might be with a combination of (very) short lighting and Chiaroscuro, but that's a different challenge . . .
I think that my subject choice of an egg was probably easier, which dates back to many years ago when I had to make eggs look interesting with the "Go to work on an egg" advertising campaign, although @Paulie-W showed what can be done with his self-portrait and, using a golf metaphor, knocked my effort into the long grass:)

I think you've done well with this subject.
 
I had another go with my Halloween clown mask. It is a gorilla face mask painted up like a clown with jelly eye sweets pit in the eye sockets.

Short lighting definitely exaggerates all the curves and ridges in the face.

2024 Nov Mask 1.JPG
 
Last edited:
I had another go with my Halloween clown mask. It is a gorilla face mask painted up like a clown with jelly eye sweets pit in the eye sockets.

Short lighting definitely exaggerates all the curves and ridges in the face.

View attachment 437917
Really liking this. Great work :thumbs:
 
Very nice shot:)
It's a simple, minimalist technique that, IMO, deserves to be much more popular than it is, It does emphasise imperfections in skin texture when used as a single-light technique, but when used with a minimum of on-axis fill it can be very flattering. It may not be politically correct to say this (not that being politically correct causes me to lose any sleep :) but it also has a very good slimming effect.

There's a general reluctance to use simple, single-light techniques and my guess is that this is largely down to sellers promoting kits. I think that Bowens started this off with their "studio in a box" kits, everyone else followed and beginners tended to assume that if they have 2 or 3 lights then every shoot involved using all of them, which is the worst possible approach. There's only one sun, and we should always use just one light to achieve the effect we want, and then add one or more other lights, one at time, only to mitigate unacceptable faults caused by the first light or to achieve special effects.
 
Okie-Dokie. Here's my effort, Im not sure I've gotten it right to be honest as it feels like its "too" short? is that a thing? Initially I was using a softbox but due to the space again I kept getting light spill everywhere so decided to get the beauty dish (ironic on my old fizzog) out as felt it would be more controllable?

Anyway, BTS scene in my ever crowded dumping, I mean dining room


IMG_9429 by Donnie Canning, on Flickr

Now the shot, straight from the camera other than a square crop


Shortlighting by Donnie Canning, on Flickr
 
Yes, that's a good example of short lighting. I don't think that there can be such a thing as 'too short', because the whole thing is subjective. Fairly small changes in camera position, movement of the subject and position of the light can make a massive difference, we just have to experiment to see what we think works best in any given situation.
 
Another entertaining and informative challenge. Sorry, no setup shot as I forgot, but it was just a single flashgun with my cardboard snoot, a stool, and the camera slightly off axis from the subject.

Also apologies for the model - it is my ugly mush. I hope no one is of a nervous nature. I was channelling film villains.

Short Lighting-1.jpg
 
That's a nice shot but, if I'm being pedantic it isn't really short lighting because the lit/unlit bits are about equal. "Short" really involves having the head (with a human subject) turned so that much more of one side is visible to the camera than the other side, and lighting just the least visible side.

Before we all became politically correct and before everyone was equally beautiful, it was a very popular technique to make round faces narrower.

Sorry Garry! I hadn't quite understood that. I'll have a look through the myriad of shots I took, as I may well have done it properly without realising. I was concentrating on getting some light on both eyes for the "evil villain" look.

If I didn't get it earlier, I'll reshoot.
 
Would you consider this to be an example of the technique?

Short Lighting-4.jpg

I used a mirror to reflect a bit of light back to the dark side of my face. But I'm not sure it is quite right, because my head is turned the wrong way for the technique.
 
Yes and no.
Yes becaus it IS short lighting
No because the effect would have been so much better if your head had been tilted the other way

These are explanations, not criticisms:)
 
IMO this, and a few others is/are not short lighting.

There is short lighting, and broad lighting, referring to when turned away from the camera. Pretty much everyone has heard/understands the term "broad side of a barn." The same applies to the terms in relation to lighting (in general, a person's head is deeper than it is wide).


Broad lighting (broad side of the barn)
Another way of understanding it is that, if the light is colocated with the camera (frontal), and the subject turns away from the light, it is broad lighting.

broad.jpg


Short lighting (short side of the barn)
Another way of understanding this is that, if the light is located to the side, and the subject turns towards it, it is short lighting.

short.jpg

There is a saying, "never broad light a broad" because it is less flattering (short lighting is slimming). This also correlates with the saying "nose towards the light."

There's also hatchet lighting, side lighting, rim lighting, etc, etc; those are not this (or they are variations/complications of this).
 
Last edited:
Yes and no.
Yes becaus it IS short lighting
No because the effect would have been so much better if your head had been tilted the other way

These are explanations, not criticisms:)

Thanks Garry, I'll have another go!
 
Steven's illustration is beautiful, it explains it far better than I have.

I'm beginning to feel that I'm now redundant, and that's a great feeling. There are a lot of people here who have great talent, I had always hoped that other people would pick up the ball and run with it, and Steven is the first mug volunteer :exit:
 
Hopefully this now qualifies as short lighting (fingers crossed). Straight out of the camera.

Short Lighting-5.jpg
 
So does short lighting need to have the entire broad side of the subject in complete darkness (the closest to the camera side)?

If so this was what I came up with. Using a standard reflector with honeycomb from about 5 ft away.
DSC07293.jpg

Personally I wasn't a fan of the solid black right hand side of the image. Dramatic yes but too extreme for my taste.

This was more to my liking. This time using a softbox as my key light/ short light but also introducing a hard light from around 5 ft from the left hand side to define the ear and add some minor lighting to that side of the face.
The main light is still short just adding second helper light to polish the effect. (yes I know we are only supposed to use one light but we did introduce 2 in the mixed light challenge)
DSC07283.jpg
 
So does short lighting need to have the entire broad side of the subject in complete darkness (the closest to the camera side)?
No.
IMO, the second is true short lighting. The first is more split lighting (50/50); only not looking directly at the camera.

For short lighting the broad (near) side should be in shadow relative to the short side, but it doesn't have to be deep/dark shadow.

If it blends into the BG it doesn't "exist"; when I look at the first image I don't see a broadside, and my mind doesn't "fill it in." My mind does imagine/fill in the missing half of the face... i.e. 50/50.
 
Last edited:
Hopefully this now qualifies as short lighting (fingers crossed). Straight out of the camera.
I would call this rim lighting... the light is too far behind and nothing but the edges (rim) are really illuminated.
Of your attempts I would say the first is short lighting, but it would have been better if you had turned a little more into the light. In your second attempt the light is in the right location, but you are turned the wrong way.
 
No.
IMO, the second is true short lighting. The first is more side lighting (50/50 split); only not looking directly at the camera.

For short lighting the broad (near) side should be in shadow relative to the short side, but it doesn't have to be deep/dark shadow.
Thanks, think I understand now.
The angles of the face in relation to the camera were not dissimilar (just switched sides) between the 2 shots but the first I had the light too much from the side. With the second shot the light was coming more from the side/ front as well as much closer with the softbox.
 
I would call this rim lighting... the light is too far behind and nothing but the edges (rim) are really illuminated.
Of your attempts I would say the first is short lighting, but it would have been better if you had turned a little more into the light. In your second attempt the light is in the right location, but you are turned the wrong way.
OK, thanks Steven!
 
Back
Top