

Garry Edwards
Moderator
- Messages
- 13,475
- Name
- Garry Edwards
- Edit My Images
- No
2nd Lighting challenge – Something shiny.
Standard rules apply here – use just one light, and post the results with no post processing (which tends to hide faults), and I shot it in a small room, to show that very little space is needed,
This is a bit like a product shot, in that it sets out to show the subject at its best, but if it was a product shot then it would have had to show all 6 lumps of squishy sugar, my angle only shows 3 of them. And as it’s all about the lighting I didn’t bother to use a “suitable” background, I just used a sheet of reflective plastic that I happened to have around.

If you want to use the same item for your own contribution, you can get these Tunnock’s tea cakes just about everywhere, and they cost just £1 in Poundland. Or you can use something different, but shiny, it doesn’t matter. The reason I chose this item (despite being an insulin-dependent diabetic who can’t eat them) is that the convex shape and the shiny metal foil makes controlling the reflections more difficult, and difficult subjects can be a better learning experience than easier ones.
A good starting point is always to look at what other people have done, so let’s see what a really large Company, which presumably has the best people and the best equipment, has achieved – so I looked at Tesco, here https://www.tesco.com/groceries/en-...wGTAeH_9JC7j-uKfx-xoCWuQQAvD_BwE&gclsrc=aw.ds No comment from me because I’m polite, but if I did comment then I might say that my cat could do a better job if I had a cat, and if my non-existent cat can do better then you can do much better too . . . But I mustn't be evil, their photos show what the product looks like, which is all that they need to do.
There are a couple of obvious challenges.
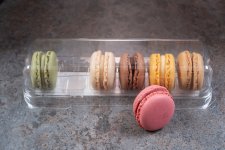
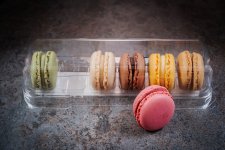
Firstly, unwanted reflections are bound to occur when a box is fitted with a clear plastic cover, and even if the reflection can be avoided there will still be a loss of contrast so, as always with this type of subject, we simply get rid of the plastic cover. But I left it in place at first, so you can see why it's important to remove it.
Secondly, this subject has a convex shape, wrapped in shiny foil, so we need a big light, which needs to be both very close to the subject and 3 –4 times the subject size. But, to make it easy for everyone, a subject this small (7cm long) is easily photographed with even a small softbox, measuring say 30cm. I used a much larger (100cm) folding beauty dish, but fitted with diffusers to effectively convert it to a softbox, because that’s what I have. A window, with a shower curtain or plain white sheet covering it, will do just as well if the angle allows.
The flash head I used for this is . . . a bit flashy and high-tech – battery powered, TTL, high-speed sync, strobe flashes and a powerful 400 Ws output and lots of other features, none of which are needed for this. Any flash head will do, or you can use a flashgun, a continuous light or anything else, it makes no difference. It also has a powerful LED modelling lamp, this really is useful because we can see a good approximation of the finished result, but although not having one will slow the job down, it won’t affect the quality.
I used a standard lighting stand, because that’s what most people have. A boom arm would have been better because the angle adjustment is more limited with a lighting stand, but it was enough for this shot. If push comes to shove, we can always change the angle by propping up the subject.
So, we start off by deciding what we want to show, and then place it in position. Then we decide on the camera height and angle of camera tilt required, and stick the camera on a tripod, The final part is to place the light in position, because the “correct” angle of the light depends entirely on the subject and camera position.
So, we start off with the softbox above and behind, angled forward so that the subject is basically backlit, and the angle on the plastic see-through window (which is still there at this point) diffuses the reflection of the light source (the specular reflection). The lighting angle and position isn't quite perfect for the plastic cover, but that doesn't matter because my Stanley knife will take care of that")

And this stepback shot shows the lighting arrangement etc

I shot at f/16 for adequate depth of field*, the flash power was just 1/128th (of 400 Ws), so just over 3 Ws, we don’t need much lighting power for close lighting. ISO was 200 and the camera lens was F200, to minimise perspective distortion.
*I pushed my luck a bit with the depth of field, I could have (and maybe should have) shot at f/22 to gain a bit more, but didn’t want to introduce diffraction limitation. If this had been an actual product shot then I would have avoided the problem by using a tilt/shift lens. My camera is full-frame, if you use a smaller format then you should be fine.
And here we are, from the other end of the set


These stepback shots show my fill card, which is a bit of folded white paper, held in place by a “third hand” gizmo from eBay.
This was essential because the angle of the light didn’t allow any light at all to reach the front elevation of the box, which made it far too dark
This simple paper reflector made a world of difference, see below, without and with it.

The inverse square law tells us that the spare light, which has travelled some distance beyond the subject before hitting the reflector, and then travelled the same distance back, has lost a lot of power and so cannot “match” the lighting that directly lights the subject, but then we don’t want it to.
Sometimes though we may need a bit more than a piece of white paper (which reflects most but not all of the light) can give us, so we can use a mirror instead, which is more efficient.

This cheap makeup mirror is great, it has a convex side, which concentrates the light into a small “spotlight” area, and a plain side. I also have a roll of plastic mirror material, easily cut to size and shape with scissors, but I didn’t need either of these here.
Once I’d tested the setup, I added an individual cake, and then I added another (both removed from the box), cut it in half and added the half that hadn’t collapsed , ending up with the final shot.

“No post processing” is a rule with these challenges, but real-world I would have either tidied up or removed the product base/background, adjusted curves and would have cleaned up that jagged area of the box, front (and back) right, which is the perforated bit that makes the box easy to open. I would also have burned in the dark unlit bits showing on 3 of the cakes, and would have lightened the white gooey stuff inside the cut example, plus a bit or sharpening and so on.
So, over to you, please photograph something similar and post it here. A very easy shoot, as long as the light is big enough and the angle is right.
Previous challenge (still open) here https://www.talkphotography.co.uk/threads/lighting-challenge-1-coffee-cup.759315/
Standard rules apply here – use just one light, and post the results with no post processing (which tends to hide faults), and I shot it in a small room, to show that very little space is needed,
This is a bit like a product shot, in that it sets out to show the subject at its best, but if it was a product shot then it would have had to show all 6 lumps of squishy sugar, my angle only shows 3 of them. And as it’s all about the lighting I didn’t bother to use a “suitable” background, I just used a sheet of reflective plastic that I happened to have around.
If you want to use the same item for your own contribution, you can get these Tunnock’s tea cakes just about everywhere, and they cost just £1 in Poundland. Or you can use something different, but shiny, it doesn’t matter. The reason I chose this item (despite being an insulin-dependent diabetic who can’t eat them) is that the convex shape and the shiny metal foil makes controlling the reflections more difficult, and difficult subjects can be a better learning experience than easier ones.
A good starting point is always to look at what other people have done, so let’s see what a really large Company, which presumably has the best people and the best equipment, has achieved – so I looked at Tesco, here https://www.tesco.com/groceries/en-...wGTAeH_9JC7j-uKfx-xoCWuQQAvD_BwE&gclsrc=aw.ds No comment from me because I’m polite, but if I did comment then I might say that my cat could do a better job if I had a cat, and if my non-existent cat can do better then you can do much better too . . . But I mustn't be evil, their photos show what the product looks like, which is all that they need to do.
There are a couple of obvious challenges.
Firstly, unwanted reflections are bound to occur when a box is fitted with a clear plastic cover, and even if the reflection can be avoided there will still be a loss of contrast so, as always with this type of subject, we simply get rid of the plastic cover. But I left it in place at first, so you can see why it's important to remove it.
Secondly, this subject has a convex shape, wrapped in shiny foil, so we need a big light, which needs to be both very close to the subject and 3 –4 times the subject size. But, to make it easy for everyone, a subject this small (7cm long) is easily photographed with even a small softbox, measuring say 30cm. I used a much larger (100cm) folding beauty dish, but fitted with diffusers to effectively convert it to a softbox, because that’s what I have. A window, with a shower curtain or plain white sheet covering it, will do just as well if the angle allows.
The flash head I used for this is . . . a bit flashy and high-tech – battery powered, TTL, high-speed sync, strobe flashes and a powerful 400 Ws output and lots of other features, none of which are needed for this. Any flash head will do, or you can use a flashgun, a continuous light or anything else, it makes no difference. It also has a powerful LED modelling lamp, this really is useful because we can see a good approximation of the finished result, but although not having one will slow the job down, it won’t affect the quality.
I used a standard lighting stand, because that’s what most people have. A boom arm would have been better because the angle adjustment is more limited with a lighting stand, but it was enough for this shot. If push comes to shove, we can always change the angle by propping up the subject.
So, we start off by deciding what we want to show, and then place it in position. Then we decide on the camera height and angle of camera tilt required, and stick the camera on a tripod, The final part is to place the light in position, because the “correct” angle of the light depends entirely on the subject and camera position.
So, we start off with the softbox above and behind, angled forward so that the subject is basically backlit, and the angle on the plastic see-through window (which is still there at this point) diffuses the reflection of the light source (the specular reflection). The lighting angle and position isn't quite perfect for the plastic cover, but that doesn't matter because my Stanley knife will take care of that
And this stepback shot shows the lighting arrangement etc
I shot at f/16 for adequate depth of field*, the flash power was just 1/128th (of 400 Ws), so just over 3 Ws, we don’t need much lighting power for close lighting. ISO was 200 and the camera lens was F200, to minimise perspective distortion.
*I pushed my luck a bit with the depth of field, I could have (and maybe should have) shot at f/22 to gain a bit more, but didn’t want to introduce diffraction limitation. If this had been an actual product shot then I would have avoided the problem by using a tilt/shift lens. My camera is full-frame, if you use a smaller format then you should be fine.
And here we are, from the other end of the set
These stepback shots show my fill card, which is a bit of folded white paper, held in place by a “third hand” gizmo from eBay.
This was essential because the angle of the light didn’t allow any light at all to reach the front elevation of the box, which made it far too dark
This simple paper reflector made a world of difference, see below, without and with it.
The inverse square law tells us that the spare light, which has travelled some distance beyond the subject before hitting the reflector, and then travelled the same distance back, has lost a lot of power and so cannot “match” the lighting that directly lights the subject, but then we don’t want it to.
Sometimes though we may need a bit more than a piece of white paper (which reflects most but not all of the light) can give us, so we can use a mirror instead, which is more efficient.
This cheap makeup mirror is great, it has a convex side, which concentrates the light into a small “spotlight” area, and a plain side. I also have a roll of plastic mirror material, easily cut to size and shape with scissors, but I didn’t need either of these here.
Once I’d tested the setup, I added an individual cake, and then I added another (both removed from the box), cut it in half and added the half that hadn’t collapsed , ending up with the final shot.
“No post processing” is a rule with these challenges, but real-world I would have either tidied up or removed the product base/background, adjusted curves and would have cleaned up that jagged area of the box, front (and back) right, which is the perforated bit that makes the box easy to open. I would also have burned in the dark unlit bits showing on 3 of the cakes, and would have lightened the white gooey stuff inside the cut example, plus a bit or sharpening and so on.
So, over to you, please photograph something similar and post it here. A very easy shoot, as long as the light is big enough and the angle is right.
Previous challenge (still open) here https://www.talkphotography.co.uk/threads/lighting-challenge-1-coffee-cup.759315/


") )
)


")


.jpg")
.jpg")
.jpg")
.jpg")