Double garage conversion

popcorna

Suspended / Banned
Messages
3
Edit My Images
No
Hi all,

The wife and I have been talking about possibly converting our detached double garage into a studio space for her. At the moment they have been passing conversations as we try to decide what to do with the space. I've got all the information I can out of her without giving away that I may convert the garage as a surprise for her. I'm a chippy by trade so doing the works is fine, just need some photography questions answered before I decide whether it's actually worth it in the long run. I've done some searching on the web, just have some follow up questions from my research. I'm clueless when it comes to photography so what may seem like a stupid question isn't to me!

-Once the conversion is completed, the space will be about 5.5m wide and 5m long, with 2.4m high ceilings. First issue I've noticed is the ceiling height. It's a flat roof so utilising any pitched roof space for lighting isn't possible. I've seen lots of posts suggesting that 3m high ceilings is ideal for photography. Can she make it work with 2.4m ceilings? Is the space itself large enough to get around the low ceilings?

-Natural light - how much is required? The garage is south facing and receives a large amount of sun during the day. There's currently one small window on the south facing wall approximately 1.5m wide and 1m tall. Today has been relatively sunny but I've still had to have the lights on as it's fairly dim in the garage. I've got space on the same wall to install another window of the same size to increase the amount of light coming through. Is this needed or will she be using enough of those big lights and umbrella looking things that it's a moot point?

Following on from increasing natural light, what kind of artificial light would be best to install? The previous owner installed 12 strip lights (the old kind with the fluorescent tubes), there's certainly enough light in there but will this amount be required? Should I just put a few strip lights back in? LED lights? Couple of hanging pendant lights? The more light the better?


I did have some more questions but they elude me at the moment, I'm sure they'll come to me.

Any thoughts greatly appreciated.

Thanks.
 
The answers to your questions really depend on the type(s) of photography (subjects) she wants to pursue, and at what level.
As above, so if you could come back to us with some more info . . .

But basically, it's big enough for many kinds of studio photography. The ceiling height can be an issue, but there will be enough room for high lighting provided that tall victims subjects aren't standing up. The ceiling should be painted black, to prevent unwanted reflected light from interfering with her lighting arrangements. Ideally, the walls should also be painted black or dark grey for the same reason, but this can produce a depressing work environment.

There are always people who like natural light, but the whole purpose of a studio is really to create a controlled working environment, so most of us do everything possible to exclude natural light, and we use flash heads to put the light where it needs to be.

It might be an idea to have some detailed discussions with her, and come back with more info.
 
The answers to your questions really depend on the type(s) of photography (subjects) she wants to pursue, and at what level.

Mainly newborn, but I think she wants to expand into all kinds really. Toddlers and cake smashes. I think it's more having a space that she can call her own and develop from there.

As above, so if you could come back to us with some more info . . .

But basically, it's big enough for many kinds of studio photography. The ceiling height can be an issue, but there will be enough room for high lighting provided that tall victims subjects aren't standing up. The ceiling should be painted black, to prevent unwanted reflected light from interfering with her lighting arrangements. Ideally, the walls should also be painted black or dark grey for the same reason, but this can produce a depressing work environment.

There are always people who like natural light, but the whole purpose of a studio is really to create a controlled working environment, so most of us do everything possible to exclude natural light, and we use flash heads to put the light where it needs to be.

It might be an idea to have some detailed discussions with her, and come back with more info.

Thanks for the info. I had seen that about the wall and ceiling colours.

I think you're right, would probably need to discuss exactly what she wants. Even from my research and limited understanding of it all, I can see there's too many nuances to providing a one-size-fits-all studio.
 
If it’s only for shooting newborns to toddlers, the ceiling height won’t be a problem.
It’s just too low for standing adults.

As for lighting, as above, flash is the answer, 3 or 4 heads, softboxes, stands, brollies, reflectors.
A background system and some storage might be the best jobs from a build perspective.

If your wife is really keen on using natural light you might need to put in a massive window, but it’ll also need to be completely covered sometimes too.
 
Thanks for even more great info. Definitely sounds like I'll have to give up any possible surprise and involve her from the outset. A lot of what you're all saying makes sense but it also doesn't, if you know what I mean.
 
The ceiling should be painted black, to prevent unwanted reflected light from interfering with her lighting arrangements. Ideally, the walls should also be painted black or dark grey for the same reason, but this can produce a depressing work environment.
just going to emphasise this in case it gets overlooked. If you want the space to be flexible then it's important. You might be able to contrive something with curtains along the walls or roller blinds across the ceiling if you really don't want it dark.

If you only want the space to do one type of softish, natural light then paint the whole thing white and bounce flash off the walls & ceiling.
 
I'm across the pond from you, so some of the ways that I do things may be a bit different than what you will need to do, but here is a description of my photo studio, which is in a space about the size of your 2 car garage/ pending photo studio. If you want help understanding anything, ask questions and I will try to help. I'll be adding a few photos here to help too.

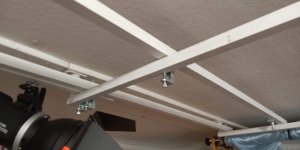
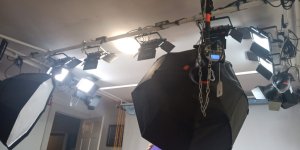
I built my present studio in a former 2nd master bedroom suite on the 2nd floor of my large home. It's small by most studio standards, but I have been able to do just about everything that I've wanted to do, except for difficulties shooting taller standing people. I give them stools instead. Macro is something that I also do that doesn't require much space. My shooting room is 19' wide, 26' long, and with an 8' ceiling height. All of the walls and the ceiling are painted "ceiling white". Yes, it is limiting for photographing tall people, but I can "make do" quite well for every other kind of shooting that I do here (mostly portrait work) I have a walk-in closet for gear storage, but hang my unused soft boxes on a side wall. Chairs, stools, and posing chair and table all get stored under the soft boxes. The South wall is windowed and below them is a line of computer tables with my editing computer, printers, scanner, charging area, and disk media storage on them. To block the Sunlight, as well as give me a blank white wall to bounce light off of or to just hide the computer tables, I have sliding closet door tracks attached to the ceiling, two track sections side by side, giving me 4 tracks total. Four 8' track sections, two side by side with needed spacing, and two more end to end for 16' length in a 26' room. I have coated foam insulation panels hanging on the rollers, one panel on each track, so one panel per track that I can pull to overlapping, which will cover all of the computer tables and Sunlight from the windows to block the view of the tables, etc as well as give me a white side wall for bounced lighting. I frequently bounce light intentionally off the ceiling too. These tracks and panels have worked so well for me that I am considering the installation of same to cover the opposite wall, with it's soft box and prop chair storage. I have 10' wide backdrops on a ceiling mounted roller system that holds 6 backdrops total. Black, gray, white, chroma green, chroma blue, and a pleated light blue backdrop that looks like a theater stage curtain. A 1 X 1 X 1/4 thick steel angle 10' long with 1/2" X 4" long steel pipe nipples are welded to each end and steel floor flanges allow attaching to the ceiling. This angle is parallel with the front backdrop roller and gets used to temporarily hang other backdrops or 5 X 7' backdrops, should I wish to use something different.

Because it doesn't take a significant setup of several light stands and power cords on the floor in this small studio to become a major trip hazard, I have built four more of the 10' long steel angles and spaced them parallel, but about 4' apart from the first steel angle to hang my lights from. The farthest is about 1' away from the wall behind the usual camera position. I use the 5' long pieces of this same steel angle to bridge between any two of the 10' long steel angles when I want to hang a light somewhere that there is no 10' angle. All of these angles get joined together for safety using electrician's beam clamps, two clamps attached back to back tor attaching the 5' angle to the 10' angle, and the short angles are always placed above the 10' angles. I use these same beam clamps with photography spigots attached to hang the lights, upside down from these angles. All of the angles are painted white, same paint as the ceiling. I have shot in studios with black ceilings and some with black walls as well as ceilings. It isn't a friendly place, though the black tends to prevent light reflections, I once used a theater stage with all of the curtains closed for my studio while working for the theater. It was just too black for personal comfort. I and the models did not like being in there. I prefer white walls and ceilings, at least in small studios , and I make use of their reflectability, instead of preventing it.

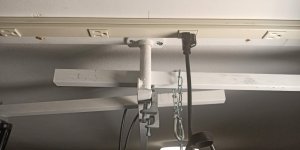
For electric power, I attached "Wiremold - a Brand name", outlet strips (multiple electric outlet strips) attached to the ceiling along both ends of the 10' angles, so there is an electric outlet every 6" on either side of the shooting area ceiling and within 5' of any light position within the ceiling grid from the backdrops all the way back and behind the usual camera location. These are all controlled by a switch in the wall behind the camera location. All power for the lights and strobes comes from outlets within 5' of the lights, wherever they are located under this grid. I do use light stands occasionally, when I'm determining the ideal position for the light. Then it is usually hung from the ceiling grid in that position. If on a stand, the light is usually powered from above anyway. All of my lights are radio fired and adjusted from the camera, so no sync cables to deal with. My tether cable is the only cable that might be on the floor, but it also is routed to the ceiling and along the grid to my computer desk and laptop. So there are usually no other cables or tripods on my studio floor to cause trip hazards. I mostly use ball bungies to secure the cabling to the steel angles, so easy on and off. I use chain loops with a snap hook looped around the handle of the light and the ceiling grid for safety should anything fall (A leftover from my stage lighting experience). I also always place the 5' lengths of angle to cross above the 10' angles and secure with beam clamps for safety. If one end of the 5' angle ever comes loose, it cannot fall from the 10' angle.

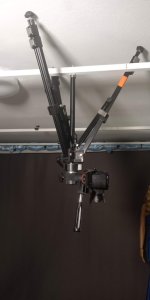
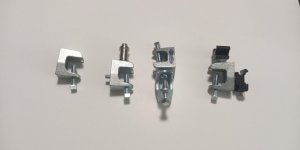
The electricians beam clamps are a standard commodity here. They work much like a C-clamp, with two already tapped 1/4-20 holes in them at 90 degrees from each other, making them ideal for attaching photography equipment to the steel angles and one 5/16" threaded hole with a 5/16-18 square head bolt included, for clamping the beam clamp to the structure (steel angle). I modified my smaller tripod stands, inserting a short round dowel drilled in the center to allowing installation of a 1/4-20 X 2" hanger bolt (wood threads one end and 1/4-20 threads on the other). This lets me hang the tripods upside down from a beam clamp on the ceiling grid with the lights attached, and easily adjustable for height. (Glue the dowel into the base end of the tripod. I used 5 minute epoxy).

I have also attached one of my tripods upside down to this grid with the legs extended to the ceiling for stabilization, to digitize large antique theater coming attraction posters placed on the floor. Using blue tape for corner markings on the floor to make it easy to place each poster for the shoot it was easy and fast to do this way. I use several LED light panels, also hung from the grid, to provide the constant and even light needed for this shoot.

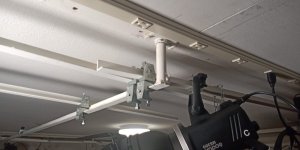
When I buy steel angle here, it comes in 20'-4" lengths, and I have them cut it into a 10' length and two 5' lengths. This makes hauling them home much easier as well as providing the lengths that I needed for my project. Here, each 20' 4" length costs me about $22 and when buying five of them they cut it free. After welding the pipe 4" (one 8" cut in half) nipples to the ends of the 10' lengths, I prime, and then paint them flat ceiling white ( See 2nd photo for positioning before welding). Screw on the floor flanges before painting too.

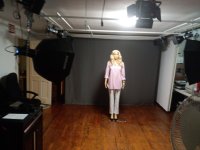
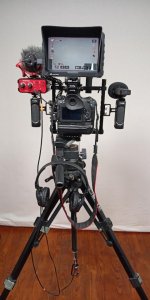
Here are 4 shots (using cell phone) of the ceiling grid, then one from my usual shooting position, where you can see the sliding panels on the right. Also a shot of one of my tripods when hung from the ceiling grid. My laptop and computer table is behind camera right in the corner of the room. All available light was from the one center ceiling LED light (my work light). On camera left I have a small metal wheeled tool box for holding the camera when not in use, plus lenses and accessories that I might need for the camera during the shoot. The next ot last photo shows the beam clamps and various common uses of the electricians beam clamps with photography spigots, cold shoes, etc. attached via 1/4-20 X 1/2" bolts. Since the holding bolt included with the beam clamps has a 5/16" square head, and because I tend to drop tools often, I use security badge lanyards, attached to my tools, and a slip knot around my wrist to keep the tools from falling when they get away from me. The 5/16" box/open wrench gets attached box end to the snap hook on the lanyard. The square head of the beam clamp bolt only fits the open end of the wrench anyway. I use a 2 step plus platform type folding ladder for all ceiling work. It folds easily for storage, and gives me a platform with a railing to work from safely. I have even hung props like signs, etc. on clear fishing line from this ceiling grid.

There is a full bathroom through a door behind the camera shooting position, and I have sometimes backed up into it for a few long shots. There is also a 6' wide by 10' deep gear storage closet behind the camera and next to the bathroom. Outside the shooting room in the large hallway is set up to be the hair/make-up and break area. Coffee, soft drinks, snacks, etc. are all available there, but our breaks usually occur in the center of the shooting room. Off the hallway is another very long closet that is used for about 1/2 prop storage and the other half for family personal storage. Stairs from this hallway go down into my home living space.

I hope some of this will give you some ideas to incorporate into your wife's studio. Hopefully she will like these ideas and have you incorporate them. Doing this has made my studio much safer of both me and anyone who comes here. Contact me or reply here if you want more information.

Charley
 

Attachments

  • IMG_20210219_164318.jpg
    IMG_20210219_164318.jpg
    59.6 KB · Views: 27
  • Tripod on Ceiing lIMG_20210826_134500.jpg
    Tripod on Ceiing lIMG_20210826_134500.jpg
    44.7 KB · Views: 28
  • Beam Clamp configurations IMG_20210217_114509.jpg
    Beam Clamp configurations IMG_20210217_114509.jpg
    33.1 KB · Views: 27
  • Ceiling grid 1 IMG_20210217_153423.jpg
    Ceiling grid 1 IMG_20210217_153423.jpg
    59.6 KB · Views: 29
  • IMG_20200821_181107_01.jpg
    IMG_20200821_181107_01.jpg
    91.6 KB · Views: 29
  • IMG_20210217_153423.jpg
    IMG_20210217_153423.jpg
    60.4 KB · Views: 28
  • IMG_20210218_190402.jpg
    IMG_20210218_190402.jpg
    71.5 KB · Views: 26
My photos in my previous post don't show my recent addition of LED light panels that I use for pet photography and video work. I have eight GVM LED 480 LS light panels presently hanging from my ceiling lighting grid in a wide U fashion, with them positioned so as to create a nearly shadow free area large enough to be able to evenly light an 8' banquet table with people sitting around it. I can't imagine having these eight lights each on separate light stands and power cords running around to each on my studio floor. The ceiling lighting grid was a "must have" for being able to do this. The light panels are located high enough and very close to the 8' ceiling, that I can use the same area of my studio for still shots below them without the need to remove any of them. So I have both a portrait studio and video studio combined. For video, I can either swing the ceiling hung strobes with soft boxes out of the way, or remove them, leaving the electricians beam clamps in place, so I can put the soft boxes back up in their original positions, if I should want to. My daughter-in-law creates and distributes health food and this lighting setup was intended for making sales and educational videos of her and the health food. Right after the lighting was set up, she ended up in the emergency room, and is presently recovering at home. So this video shoot hasn't happened yet, but I did use the constant lighting setup to take some still portraits of pets, since using flash on animals proves to be very stressful for them. These constant light pet shooting sessions went very well and I can see me doing pet shoots with this setup quite often.

The GVM LED light panels are bi color with color and brightness controls on their backs, as well as a dual display to show the levels. When powered on, they default to the back panel settings, but they can also be controlled from a WIFI App on a cell phone. Each panel can have a separate WIFI name, so they can be adjusted separately. There is supposed to be some way to make this WIFI setup a master/slave system where one WIFI address will change all at the same time, but so far, I have not been successful at getting this to work. It would be nice if I could.

Because both the LED constant light panels and my studio strobes are all powered from one ceiling mounted electrical power circuit with a wall switch to turn it all on and off that's located above the computer table located behind camera right that holds my laptop, I wanted a way to control the power of each type of light separately, so I could use either the strobes or the LED panels without the other group being powered. I considered running a second power circuit and outlets on the ceiling, but found some remote control modules on Amazon that are working well for me. These modules come in groups of five with two transmitters having 5 sets of on/off buttons on each transmitter. The modules are number stamped 1-5 and programmed to work from the separate buttons, but they can be easily reprogrammed. I now have one transmitter that sits on my camera stand tool box, and have reprogrammed the modules. (I bought several boxes of them). Now, all of the LED light panels are powered on and off via one on/off button set on the transmitter, and another button set on the transmitter turns all of the strobes on and off. So one power supply circuit on the ceiling, a power control module for each light that is programmed for the type of light, and three button sets left on the transmitter to assign to other uses and modules, or to creating different groups of the already existing lights. I don't have photos of these power control modules, but will post them soon.

Photo #2 shows my present video camera setup. It's a Canon 77D in a SmallRig camera cage, with a 7" Lilliput 4K monitor, audio mixer, H1N back-up audio recorder, and Rode Shotgun mic, which is frequently removed from the camera cage and hung from a cold shoe attached directly above the model's location on the ceiling grid. The mic cable then runs along the grid to the point where the tether cable drops to the camera. So the two cables run together to the camera with adequate slack to allow moving the camera around about 1/2 of my studio without a problem. The SmallRig cage has side handles and a chest pad, so when in use and off the tripod, I put the camera strap around my neck and the chest pad against the center of my chest. Hanging onto the side handles then gives me a very stable way to position and move the camera around while shooting the video. The headphones are plugged into a monitoring jack on the 7" display or into the audio mixer to monitor the audio as it's going into the camera.

So, now my studio has the ability to shoot portraits, macros, and videos with very little change-over needed to switch from one to the other. If you like any of these ideas I will be happy to provide more information and photos to help you make use of them.

Charley
 

Attachments

  • LED Lights IMG_20211116_101134.jpg
    LED Lights IMG_20211116_101134.jpg
    49.3 KB · Views: 10
  • Video Camera Setup 10  IMG_20220206_163505.jpg
    Video Camera Setup 10 IMG_20220206_163505.jpg
    82.5 KB · Views: 10
  • GVM Lights 1  IMG_20211114_130659.jpg
    GVM Lights 1 IMG_20211114_130659.jpg
    69.7 KB · Views: 10
I would paint the "model" wall matt white, and also get the floor with presumably gloss white laminate, all joined in a seamless way. That way you can shoot white background without any additional setting up, and you can drop in black or colour one as required. Re walls (Black or White) this would depend on intended use, and you can always use screen or panels to alter that.
 
Back
Top