

You are using an out of date browser. It may not display this or other websites correctly.
You should upgrade or use an alternative browser.
You should upgrade or use an alternative browser.
Chroma - Lasercut Acrylic 4x5 Field Camera
- Thread starter stevelmx5
- Start date


OP
stevelmx5
Suspended / Banned
- Messages
- 10,176
- Name
- Steve
- Edit My Images
- No
Slightly tongue in cheek suggestion but could it be displayed as "FOUR-FIVE" in one orientation and "FIVE-FOUR" in t'other?
You know what, I've been trying to decide what the 'right' way is to write that. It could be a good idea to just put both on!
35millimetre
Suspended / Banned
- Messages
- 1,401
- Name
- Charlotte
- Edit My Images
- Yes
That looks really good, Steve!


OP
stevelmx5
Suspended / Banned
- Messages
- 10,176
- Name
- Steve
- Edit My Images
- No
How about Cryllic 45? Then if someone asks you can say "It's a Cryllic"...
I'll get me coat...
Wow, that is a genuine dad joke right there ;0)
OP
stevelmx5
Suspended / Banned
- Messages
- 10,176
- Name
- Steve
- Edit My Images
- No
How about The Wirrall? You wouldn't expect to sell too many to Japan anyway...
What do you mean, I'm expecting a global sales success!
Anyway, I'm originally from Liverpool so maybe it should be the "Eh Eh Eh 45"
That'll work. It could be a Mk 1 Lloyd, or a Mk 1 Lloyd Chroma. Or just a Lloyd Chroma.It's Lloyd. Not sure that inspires a spirit of adventure and a majestic cape blowing in the wind like @Carl Hall ;0)
OP
stevelmx5
Suspended / Banned
- Messages
- 10,176
- Name
- Steve
- Edit My Images
- No
Clot 45?
Oi!
I've just had another idea for the front standard while walking home from work. Instead of the traditional dual threaded knob securing method which basically clamp the sides of the lens board surround, is there any merit in using a simple ratchet to secure the surround? I reckon I could cut edges with a 3mm step so that would mean that the most exact change in rise/fall would be 3mm. I'll draw it up in a bit to explain but basically, I could pull the lens board upwards with one hand and the ratchet would hold it in position. When I wanted to lower the lens, I'd just move a small sprung clip and lower the surround.
The main benefit is that the lens can be raised with one hand and no need to fiddle with a pair of screws while adjusting it.
The main limitation is potentially less accuracy in the adjustment but I'm thinking that most rise/fall adjustments are pretty inexact anyway?
- Messages
- 49,339
- Name
- Nod (UK)
- Edit My Images
- Yes
TBH, IMO the prototype needs to be played with (OK, used properly!) for a while and any issues in real life can then be addressed rather than complicating things more than necessary. It's all to easy to keep adding features that while occasionally handy often end up just adding extra weight, cost and fiddlyness for very little gain. This camera is never going to be used for snapshots and setting the thing up will be at least part of the fun/whole experience when using it. The KIS(S) principle would seem to me to be the way to go until any real life shortcomings come to light.


OP
stevelmx5
Suspended / Banned
- Messages
- 10,176
- Name
- Steve
- Edit My Images
- No
I find adjusting the front rise and fall on my Shen Hao no problem, even by feel under the dark cloth. I wouldn't be into a ratchet system - too granular. Also a potential wear point if it's made from the acrylic.
Thanks for the feedback. I appreciate it from a user.
RaglanSurf
Suspended / Banned
- Messages
- 11,477
- Name
- Nick
- Edit My Images
- Yes
One thing I would suggest is that there should be an obvious "standard" position, whether that's achieved by notches or by lining up marks on the various components.
OP
stevelmx5
Suspended / Banned
- Messages
- 10,176
- Name
- Steve
- Edit My Images
- No
One thing I would suggest is that there should be an obvious "standard" position, whether that's achieved by notches or by lining up marks on the various components.
Thanks Nick. I've got magnets embedded in the frame to give tactile feedback at 90 degrees vertical tilt and middle rise.
- Messages
- 12,294
- Name
- Brian
- Edit My Images
- Yes
We were talking about the Peaks meet and remembered Brian's mishearing of Google Sketch up and thought in honour of that the camera should be called 'The Dougal'
It can be amusing not hearing things correctly and a funny one was Dean telling me his nick "strappy" and repeated "stroppy" ??

Terrywoodenpic
Suspended / Banned
- Messages
- 8,172
- Name
- Terry
- Edit My Images
- Yes
You know what, I've been trying to decide what the 'right' way is to write that. It could be a good idea to just put both on!
Americans say 4x5 .... British and Europeans say 5x4
ianp5a
Suspended / Banned
- Messages
- 4,719
- Name
- Ian
- Edit My Images
- Yes
Do they have to buy special 4x5 film for portrait orientation?Americans say 4x5 .... British and Europeans say 5x4
Terrywoodenpic
Suspended / Banned
- Messages
- 8,172
- Name
- Terry
- Edit My Images
- Yes
Do they have to buy special 4x5 film for portrait orientation?
I am sure some can be supplied at a very special price.
Those with the mental capacity to vote for Trump would be a ready market for it.
OP
stevelmx5
Suspended / Banned
- Messages
- 10,176
- Name
- Steve
- Edit My Images
- No
We were talking about the Peaks meet and remembered Brian's mishearing of Google Sketch up and thought in honour of that the camera should be called 'The Dougal'
Ah, Dougal Sketchup, my favourite piece of software :0)
trevorbray
Suspended / Banned
- Messages
- 9,141
- Name
- Trevor
- Edit My Images
- No
Acrilux
OP
stevelmx5
Suspended / Banned
- Messages
- 10,176
- Name
- Steve
- Edit My Images
- No
Acrilux
I like that. Bit of a retro nod and with the reference to the acrylic. Cheers
Last edited:

trevorbray
Suspended / Banned
- Messages
- 9,141
- Name
- Trevor
- Edit My Images
- No
OP
stevelmx5
Suspended / Banned
- Messages
- 10,176
- Name
- Steve
- Edit My Images
- No
I reckon 'The Big Steve', but you may have to enter negotiations with Ann Summers over the name")
It's certainly a way to get some free marketing!
I've now got my ground glass supplier sorted as well. The guy in Lithuania who's supplied my previous ground glass has confirmed that he can supply bulk orders too so that's another part ticked off the list :0)
OP
stevelmx5
Suspended / Banned
- Messages
- 10,176
- Name
- Steve
- Edit My Images
- No
@ChrisR Is going to love this.....
I've changed the major design of the hinge :0) It's been bugging me that the 270 degree hinge would mean that I couldn't fit the camera to a tripod unless it was half-opened as the rear standard would cover the tripod mount. I didn't like the idea of having the rear standard loosened while mounting the camera so I've flipped it round to use a more traditional 90 degree forwards tilt.
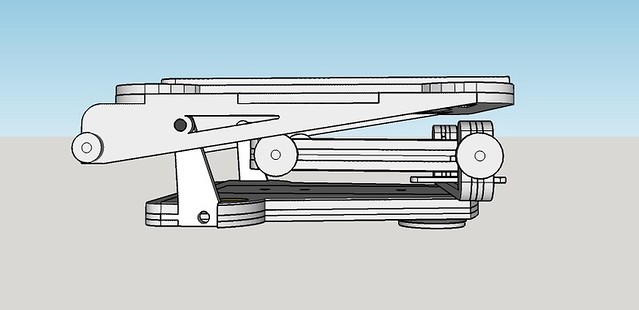
As well as meaning that the camera can be mounted to the tripod whilst closed, I've also massively simplified the assembly and number of parts used overall which will also marginally reduce the weight too.

(I've also embedded a 19x8mm bubble spirit level into the camera bed to help with adjustments)


To fold the camera down, I'll split the front of the bellows from the standard (4 magnets) then tilt the standard backwards 90 degrees. Once that's folded, I'll unscrew the two locking bolts for the rear standard and fold the standard/bellows forwards, over the top of the front standard.
When folded, the whole camera will be around 75mm thick.
I've changed the major design of the hinge :0) It's been bugging me that the 270 degree hinge would mean that I couldn't fit the camera to a tripod unless it was half-opened as the rear standard would cover the tripod mount. I didn't like the idea of having the rear standard loosened while mounting the camera so I've flipped it round to use a more traditional 90 degree forwards tilt.
As well as meaning that the camera can be mounted to the tripod whilst closed, I've also massively simplified the assembly and number of parts used overall which will also marginally reduce the weight too.
(I've also embedded a 19x8mm bubble spirit level into the camera bed to help with adjustments)
To fold the camera down, I'll split the front of the bellows from the standard (4 magnets) then tilt the standard backwards 90 degrees. Once that's folded, I'll unscrew the two locking bolts for the rear standard and fold the standard/bellows forwards, over the top of the front standard.
When folded, the whole camera will be around 75mm thick.
OP
stevelmx5
Suspended / Banned
- Messages
- 10,176
- Name
- Steve
- Edit My Images
- No
Since taking those screenshots, I've also added a 3mm plate to the bottom of the rear standard that overlaps the bed of the camera and acts as an extra stop point (and a place for a logo). I may fit a central thumb screw to secure the rear standard to bed at another point to add some stability too.
OP
stevelmx5
Suspended / Banned
- Messages
- 10,176
- Name
- Steve
- Edit My Images
- No
Also, my sample bellows arrived today. They are a little more stiff than the ones I built because their internal ribs are made from a single piece of folded card. I need to try them on the camera to see if I like the way they flex. An unexpected benefit is that the end plates are cut from 2mm plastic (I was expecting card) so I should be able to specify Pre-drilled holes for mounting magnets into them which will save on me cutting a 3mm plate of Acrylic for each end.
Last edited:
ianmarsh
Suspended / Banned
- Messages
- 4,727
- Edit My Images
- Yes
'Infinity' obvious photo connection and hints at the possibilities .
It makes coming up for a name for the next generation version tricky though, unless you go with "Infinity and Beyond"
Despite having no need ability to use such a camera I am getting tempted - what is the all in cost for a single exposure of a decent colour film in a 5x4 camera?
About £5 for the film, and roughly the same again for processing. Processing cost is a lot lower - pennies - if you do it yourself (assuming you don't amortise the cost of the equipment into an unknown number of sheets). Equipment can be pricey if you want good control of the higher temperatures.
B&W works out much cheaper. About 60p to £1.50-ish per sheet. I'd guess lab processing is still about the same as for colour, and home processing is certainly pennies. Equipment cost is lower because temperatures are easy to deal with (just a tank, maybe some larger mixing jugs to match the tank).
If you're thinking of trying large format for the first time, I'd suggest starting with B&W. Mistakes can happen, especially at first, because the process of taking pictures is very manual - no safety interlocks like roll film cameras have.
(Edited to clarify lab processing costs for B&W.)
Last edited: