I have just bought an OM 1 Mkii and have the 12-100mm, 9-18mm and 100-400mm lenses. I'd like to do more still life and macro photography. I could get a used Canon 5D mkii body and Tamron 90mm macro lens for about £350 from mpb or buy either the 60mm or 90mm (although much more expensive) macro lenses for the OM1. So which way to go? Any experiences or advice gratefully received.


You are using an out of date browser. It may not display this or other websites correctly.
You should upgrade or use an alternative browser.
You should upgrade or use an alternative browser.
Which to choose for still life/macro
- Thread starter Charles B
- Start date
GreenNinja67
Suspended / Banned
- Messages
- 6,176
- Name
- Terry
- Edit My Images
- Yes
I have the 60mm Olympus macro lens and it's superb.

 www.hdewcameras.co.uk
Not more expensive and way better in my opinion. I've used both.
Olympus M.Zuiko Digital ED 60mm f/2.8 Macro - New
function { tabs tabs } Product Information Specifications Box Contents Payment Delivery A versatile lens optimized for working with close-up subjects
Not more expensive and way better in my opinion. I've used both.
I do quite a bit of "Still Life" type photography, product photography, and some macro photography.
For the "Still Life shots" and product photography I'm usually shooting one or a group of things on a 34" square table 2-5' away from my camera. I'm usually using one of several high end Canon DSLR cameras (77D, 80D, or 90D), and most of the time a 24-70 lens for these, but I do have a 24 mm tilt-shift lens that sees a bit of use for this too. The camera being used gets attached to one of my camera stands, but a good solid tripod with a crank-up center column and lock will work well too. A geared tripod head, in my case a K&F Concepts CD3W is better than a standard tripod head, but a good tripod head that has good locking capability will work to begin with too. The micro adjust capability just makes precise camera positioning easier, and a camera stand tends to be more stable than even my best tripods. Stability becomes important when you will be stacking many shots in layers during post processing. I also use a remote shutter trigger for the same stability reason.
For most of my macro photography I have usually used one of the same cameras on a "Copy Stand", which is kind-of like an enlarger, but with a camera mount instead of the enlarger head. There are two continuous lights on goose necks, one on each side of the base, for lighting the subject. I do sometimes use Macro lenses, but frequently use the lens extender rings for the additional magnification sometimes needed. This setup resides in a back corner of my studio and is seldom used, but it does work well.
Last year a friend asked me if I could digitize his large collection of movie theater coming attraction posters. If you can remember, it was common to post these in glass cases at the entrance to the theaters to show what movies that they would be showing next. It seems that these have become quite rare and valuable to certain collectors. Well, my copy stand wasn't large enough, so I ended up hanging one of my tripods from my studio ceiling lighting grid, extending the tripod legs to the ceiling for stability, using a couple of LED Light Panels, also attached to the ceiling lighting grid and the movie posters placed one at a time in a position on the floor with tape marking on the floor for the diagonal corners of the best position for the shots of the posters. This was quite an exercise, because his collection is huge. Once this setup was all in place and ready, an assistant and I managed to do his whole collection in about a day and a half.
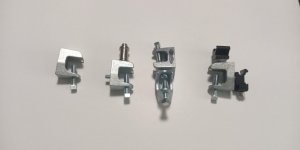
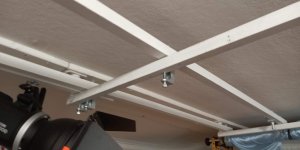
I built a ceiling lighting grid from 1 X 1 X 1/4 steel angle. There are five 10' long angles with 4" long steel pipe nipples welded L fashion to each end of the angles. These pipe nipples get 1/2" floor flanges threaded onto their open ends so they can be attached to the ceiling. They run parallel with my backdrop system and are spaced about 4' apart all the way to behind the usual camera position. I use 5' lengths of this same steel angle, attached to, but above the 10' angles to bridge between any two of the 10' long steel angles. Attachment is done by using electrician's beam clamps, a small kind-of "C" clamp used by electricians for attaching cteel conduit and electrical boxes to the steel beams of modern buildings her in the USA. Each of these has a 5/16" square head bolt included for tightening the clamp to the beam, and in my case, two 1/4-20 threaded holes for attaching other things or for bolting two clamps together to use for attaching one of the steel ceiling angles to another. I use many of these beam clamps, some in pairs bolted together, some with cold shoes attached, some with spigots (the piece like on the top of light stands), etc. I always add a safety chain loop around the ceiling angles and a sturdy piece of what is being hung. Porer for anything on the ceiling comes from multi outlet strips past each end of the 10' log angles on the ceiling. There is an outlet every 6" along these, so power is on the ceiling and within 5' of any place that I choose to hang a light. If the light needs to be on a stand, power is available from above, so there are almost never any cables on my studio floor. Very few light stands too, so a very low chance of anyone tripping over anything in the studio.
So in all, a kind-of erector set for easily hanging studio lights and other things from my studio ceiling. For these posters, I attached one of these beam clamps to the 1/4-20 stud on the bottom end of the center column of one of my tripods, then inverted and hung the tripod from the ceiling grid using the beam clamp, then extended the legs of the tripod up until they were firmly against the studio ceiling. Sometimes photography requires thinking outside the box. This was one of my times for this. I'm certain that there are other ways, but this way worked very well for this project. Feel free to adopt and use any of my ideas above if/when you build a studio for yourself. I did this about 5 years ago and it has been well worth it for me. My studio is in what had been a 2nd Master Bedroom suite in my home. It is 19 X 26' and with an 8'2" ceiling height. Above is a roof, so no financially reasonable chance of having a higher ceiling, at least not here. It all works well, except for an occasional wish for a higher ceiling, but I do use the white ceiling and walls when a light reflection off of them would help.
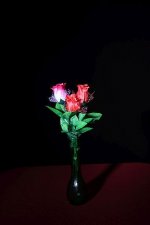
Still, i can do dark shots in there like you see in photo# 4 when I want to. I make heavy use of the inverse square law of light for the darkness needed. This flower photo was taken using a Godox SK400 studio strobe with 7" reflector and 10 degree grid spaced about 5' from the roses. The room ceiling light above was lit during this shoot. Careful adjustment of the camera and F-Stop setting kept the ceiling light and reflections from the white walls and ceiling from affecting the shot. There are several lights on stands about 4' behind the table that don't show in the shot either. This was indeed shot two of this. Only one shot with a 1/2 Stop less light level adjustment was needed before this shot.
I hope some, or all of this has been of some help to you. You might also want to watch some of the work being done by a friend. His Youtube Channel is "Camera Club Live" and he takes you step by step through the set up and shoot of many "Still Life" type photo shoots. You will learn a lot from watching his videos, and he is one of your fellow countrymen.
Charley
For the "Still Life shots" and product photography I'm usually shooting one or a group of things on a 34" square table 2-5' away from my camera. I'm usually using one of several high end Canon DSLR cameras (77D, 80D, or 90D), and most of the time a 24-70 lens for these, but I do have a 24 mm tilt-shift lens that sees a bit of use for this too. The camera being used gets attached to one of my camera stands, but a good solid tripod with a crank-up center column and lock will work well too. A geared tripod head, in my case a K&F Concepts CD3W is better than a standard tripod head, but a good tripod head that has good locking capability will work to begin with too. The micro adjust capability just makes precise camera positioning easier, and a camera stand tends to be more stable than even my best tripods. Stability becomes important when you will be stacking many shots in layers during post processing. I also use a remote shutter trigger for the same stability reason.
For most of my macro photography I have usually used one of the same cameras on a "Copy Stand", which is kind-of like an enlarger, but with a camera mount instead of the enlarger head. There are two continuous lights on goose necks, one on each side of the base, for lighting the subject. I do sometimes use Macro lenses, but frequently use the lens extender rings for the additional magnification sometimes needed. This setup resides in a back corner of my studio and is seldom used, but it does work well.
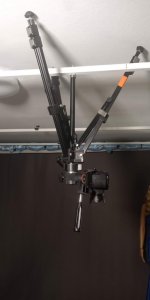
Last year a friend asked me if I could digitize his large collection of movie theater coming attraction posters. If you can remember, it was common to post these in glass cases at the entrance to the theaters to show what movies that they would be showing next. It seems that these have become quite rare and valuable to certain collectors. Well, my copy stand wasn't large enough, so I ended up hanging one of my tripods from my studio ceiling lighting grid, extending the tripod legs to the ceiling for stability, using a couple of LED Light Panels, also attached to the ceiling lighting grid and the movie posters placed one at a time in a position on the floor with tape marking on the floor for the diagonal corners of the best position for the shots of the posters. This was quite an exercise, because his collection is huge. Once this setup was all in place and ready, an assistant and I managed to do his whole collection in about a day and a half.
I built a ceiling lighting grid from 1 X 1 X 1/4 steel angle. There are five 10' long angles with 4" long steel pipe nipples welded L fashion to each end of the angles. These pipe nipples get 1/2" floor flanges threaded onto their open ends so they can be attached to the ceiling. They run parallel with my backdrop system and are spaced about 4' apart all the way to behind the usual camera position. I use 5' lengths of this same steel angle, attached to, but above the 10' angles to bridge between any two of the 10' long steel angles. Attachment is done by using electrician's beam clamps, a small kind-of "C" clamp used by electricians for attaching cteel conduit and electrical boxes to the steel beams of modern buildings her in the USA. Each of these has a 5/16" square head bolt included for tightening the clamp to the beam, and in my case, two 1/4-20 threaded holes for attaching other things or for bolting two clamps together to use for attaching one of the steel ceiling angles to another. I use many of these beam clamps, some in pairs bolted together, some with cold shoes attached, some with spigots (the piece like on the top of light stands), etc. I always add a safety chain loop around the ceiling angles and a sturdy piece of what is being hung. Porer for anything on the ceiling comes from multi outlet strips past each end of the 10' log angles on the ceiling. There is an outlet every 6" along these, so power is on the ceiling and within 5' of any place that I choose to hang a light. If the light needs to be on a stand, power is available from above, so there are almost never any cables on my studio floor. Very few light stands too, so a very low chance of anyone tripping over anything in the studio.
So in all, a kind-of erector set for easily hanging studio lights and other things from my studio ceiling. For these posters, I attached one of these beam clamps to the 1/4-20 stud on the bottom end of the center column of one of my tripods, then inverted and hung the tripod from the ceiling grid using the beam clamp, then extended the legs of the tripod up until they were firmly against the studio ceiling. Sometimes photography requires thinking outside the box. This was one of my times for this. I'm certain that there are other ways, but this way worked very well for this project. Feel free to adopt and use any of my ideas above if/when you build a studio for yourself. I did this about 5 years ago and it has been well worth it for me. My studio is in what had been a 2nd Master Bedroom suite in my home. It is 19 X 26' and with an 8'2" ceiling height. Above is a roof, so no financially reasonable chance of having a higher ceiling, at least not here. It all works well, except for an occasional wish for a higher ceiling, but I do use the white ceiling and walls when a light reflection off of them would help.
Still, i can do dark shots in there like you see in photo# 4 when I want to. I make heavy use of the inverse square law of light for the darkness needed. This flower photo was taken using a Godox SK400 studio strobe with 7" reflector and 10 degree grid spaced about 5' from the roses. The room ceiling light above was lit during this shoot. Careful adjustment of the camera and F-Stop setting kept the ceiling light and reflections from the white walls and ceiling from affecting the shot. There are several lights on stands about 4' behind the table that don't show in the shot either. This was indeed shot two of this. Only one shot with a 1/2 Stop less light level adjustment was needed before this shot.
I hope some, or all of this has been of some help to you. You might also want to watch some of the work being done by a friend. His Youtube Channel is "Camera Club Live" and he takes you step by step through the set up and shoot of many "Still Life" type photo shoots. You will learn a lot from watching his videos, and he is one of your fellow countrymen.
Charley
Attachments
dibbly dobbler
Suspended / Banned
- Messages
- 3,158
- Name
- Mike
- Edit My Images
- Yes
Another vote for the 60mm - brilliant little lens and cheap ")

Common Carder Bee by Mike Smith, on Flickr
Common Carder Bee by Mike Smith, on Flickr
- Messages
- 43,206
- Name
- Alan
- Edit My Images
- No
If it helps... Our wedding pictures were taken with a 5DII and I ended up having to process the raws and I think my aging MFT cameras beat the 5DII IQ so in your place I'd be going for a MFT lens rather and an older Canon body and lens which is probably going to give you inferior IQ.
LCPete
Suspended / Banned
- Messages
- 9,785
- Edit My Images
- Yes
I’m not familiar with Olympus gear but assuming that you are happy with the image quality on your Olympus body I would get a macro lens for that rather than run 2 systems will be easier to use
in my opinion for macro the lens is what really matters
I use an old Sigma 150 non OS on my Canon R5 it’s an amazing very sharp lens
I don’t know if the Sigma macro lenses are available for Olympus but they are all excellent and not too expensive
in my opinion for macro the lens is what really matters
I use an old Sigma 150 non OS on my Canon R5 it’s an amazing very sharp lens
I don’t know if the Sigma macro lenses are available for Olympus but they are all excellent and not too expensive