The "before and after" thread

lolage

Suspended / Banned
Messages
911
Name
Ben
Edit My Images
Yes
Have tried to find similar thread but cannot so I'll start one. I'm interested to see how people edit their own photos, and to perhaps show photos which have a major transformation.

I'll start. :)

Before
OrncC.jpg


After

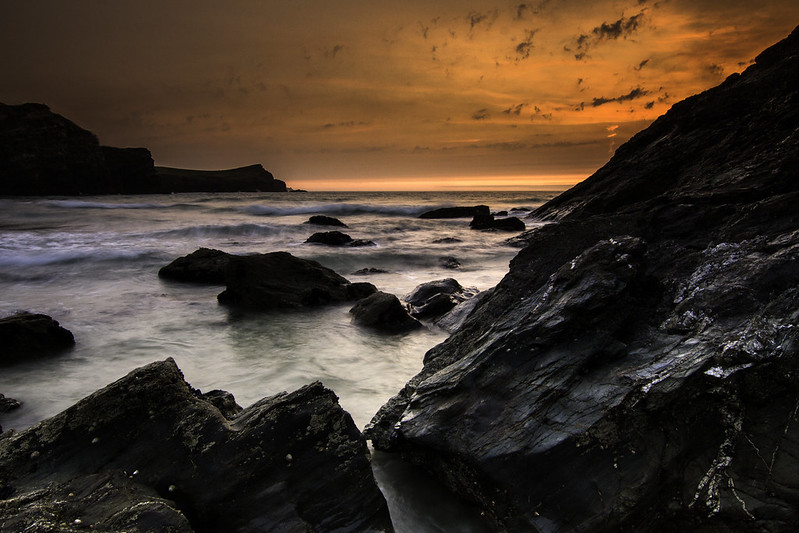
sunset1 by BenMDavies, on Flickr

That's nice - might also be useful to say what you have done to get to that state. There is a before and after somewhere but it is so old many of the pictures are no longer there :)

Sure.

It was shot at ISO 100, f/14 and 0.8 second exposure. I edited it in Adobe Lightroom, I used a Cokin graduated filter and also added one later on in lightroom.

  • Colour temp was a little cold, so warmed it up slightly using the temp slider.
  • Photo was quite a bit underexposed so added +1.9 exposure
  • I love it when photos give a lot of punch, I get this kind of effect by adding contrast. I used +62 contrast
  • I lowered the highlights to bring out the sky a litle more, it darkened it a bit which I liked
  • Lowered the blacks slightly by -14 to make the blacks stand out
  • Added +21 clarity to give the rocks that detailed look

I also added a graduated filter and warmed it up by +61 to give the sky the dramatic look, darkened the exposure by -1, boosted contrast by 60 and decresed the highlights. I then added +100 to shadows so that the graduated filter didn't go too much over the rocks.
 
Last edited:
Be nice to know what software you used and a bit of detail on your process, which might help those of us who aren'y quite as acomplished as you chaps
Nice to see the difference a bit of pp can achieve
This thread has potential to be a great help for us noobs
 
Completely agree, the first set in the thread is jaw-droppingly awesome. That's the type of image I normally produce (before image) and would love to be able to show people (after). It would be nice if someone can post a step by step video of the whole process so we could learn it too.
 
That's nice - might also be useful to say what you have done to get to that state. There is a before and after somewhere but it is so old many of the pictures are no longer there :)

Sure.

It was shot at ISO 100, f/14 and 0.8 second exposure. I edited it in Adobe Lightroom, I used a Cokin graduated filter and also added one later on in lightroom.

  • Colour temp was a little cold, so warmed it up slightly using the temp slider.
  • Photo was quite a bit underexposed so added +1.9 exposure
  • I love it when photos give a lot of punch, I get this kind of effect by adding contrast. I used +62 contrast
  • I lowered the highlights to bring out the sky a litle more, it darkened it a bit which I liked
  • Lowered the blacks slightly by -14 to make the blacks stand out
  • Added +21 clarity to give the rocks that detailed look

I also added a graduated filter and warmed it up by +61 to give the sky the dramatic look, darkened the exposure by -1, boosted contrast by 60 and decresed the highlights. I then added +100 to shadows so that the graduated filter didn't go too much over the rocks.

It would be nice if someone can post a step by step video of the whole process so we could learn it too.
I could probably have a go at making a video, not really done a tutorial type of video before but I can have a go. :)
 
Thank you, Ben!

Really helpful post there!! Might try your photo and have a practise ... assuming no objection, of course (and only private use!)

No problem at all, will upload the RAW file for you in a sec for you to play with rather than messing around with a small JPG.
 
Nice transformation. I hope you don't mind me asking but the RAW looks fairly 'noisy' for 100 ISO, what would you put that down to, the filter?
 
Nice one Ben, thats a good bit of info
Very helpful
:thumbs:


Sure.

It was shot at ISO 100, f/14 and 0.8 second exposure. I edited it in Adobe Lightroom, I used a Cokin graduated filter and also added one later on in lightroom.

  • Colour temp was a little cold, so warmed it up slightly using the temp slider.
  • Photo was quite a bit underexposed so added +1.9 exposure
  • I love it when photos give a lot of punch, I get this kind of effect by adding contrast. I used +62 contrast
  • I lowered the highlights to bring out the sky a litle more, it darkened it a bit which I liked
  • Lowered the blacks slightly by -14 to make the blacks stand out
  • Added +21 clarity to give the rocks that detailed look

I also added a graduated filter and warmed it up by +61 to give the sky the dramatic look, darkened the exposure by -1, boosted contrast by 60 and decresed the highlights. I then added +100 to shadows so that the graduated filter didn't go too much over the rocks.[/QUOTE]
 
Nice transformation. I hope you don't mind me asking but the RAW looks fairly 'noisy' for 100 ISO, what would you put that down to, the filter?

Yeah I did notice that, have reduced in lightroom on another edit but thats not the point. I don't really know why to be honest, I think as I've messed with lightroom noise gets added, but even the before image on full res has noise so not really sure.

If anyone knows I'd love to know! :thumbs:

I'd put it down to the fact the original is underexposed as you have added +1.9 in editing.
 
Yeah fair enough, needed a stronger ND filter really.

Still a great example of how to create a cool shot from something underexposed which most might just delete.
 
Last edited:
That's some big improvement Shaun, had to look back and forth to convince myself it was the same shot
 
Very nice, wouldn't have believed that the before shot could have been made into such a nice picture. :)
 
Yeah I quite like the idea of this thread nice one :thumbs:
 
What a good idea..

Here's one of my before...

before4.jpg


I was setting up before shooting my nephew and his gf, before their prom and they were looking very sombre, so I said "stop looking so serious and pretend you'll enjoy yourself."
You can see the coloured wall creeping into the corners, the closed eyes, the missing earring and the youthful slightly textured complexion on him. After some messing....

after4.jpg


Process:

graft eyes and earring from other shots, blend in eyes with masks. Earring just c&p in.
Spot heal
dodge n' burn
levels


the skin tones were quite different because of the false tan stuff, and to be honest it still needs some work when I've got time.
 
Last edited:
Here are a couple of before and afters from me. A little different, but pp all the same...

Rust_In_Pieces_by_BluKoo.jpg

Corsa_VXR_BAT_by_BluKoo.jpg

E30_M3_by_BluKoo.jpg


Here's a slightly more conventional one...
before___after_by_blukoo-d59xyav.jpg
 
Last edited:
these are pretty cool Murray :thumbs: nice job ;)
 
Shaun, that is amazing! I'd love to be able to be that good!
 
Oooh - tell me you did that with the 50D not with the new one ;)
 
Very nice Stuart, how did you pp this?

Fairly simple really, all three shots loaded into CS5, cropped, perspective amended to straighten the verticals.
Each image was saved as Jpeg before being processed through Photomatix.

TIFF from Photomatix then reloaded in CS5 where final image was given a saturation and contrast boost and finished off with a high pass sharpen before adding the custom borders.

Oooh - tell me you did that with the 50D not with the new one ;)

Yeah this was done on the 50D :thumbs:
 
Yeah *bringonthedancinggirlssmiley*

Loving it so far thank you very much
 
Back
Top