OK - just quick thoughts, while looking at the pic on one monitor whilst I type of another one, so not studying the image as such . . .
The continuous light one is a non-starter, so just talking about the flash one here.
Not an easy subject because all that you can really do is to show what it looks at, whatever benefits it may have aren't actually visible in a photo. That's a common problem though, our job is to make the product look good so that potential buyers want it, easy enough for things that we don't actually need, but not so easy for utility products.
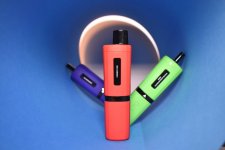
The first thing to do is always to think about what we need to show, and my guess is that (for a single shot) you're almost there with the one in the centre, I can't see enough of the one on the right, one on the left is a bit wrong, needs rotating left a bit.
The second thing is to decide on the composition, this is just a test shot and of course the composition has been overlooked.
Next, we decide on the camera height. You've got it almost right, but not quite because the camera is looking down a bit. The camera often does need to look down, but not this time because you don't need to show the top of the screw caps, they don't matter. So, I would position the camera looking up a bit, this makes the product look more important, bigger, dominant, heroic.
And, when all that's done, we move to the lighting. I think that you've pretty much done what can be done here, but I would try having the light a bit closer, to create slightly larger and softer specular highlights (reflections of the light source) and to make the right hand side a bit brighter than the left, to make it look a little less boring, but very little change is probably needed - just experiment with it.
You can also try moving the light much closer (see my article on the ISL
here) and add a reflector on the other side, all is explained in that article.
I also think the the light needs to be moved forward, just a bit, so that the knurled knobs don't go black on the left, those knurled knobs, which presumably allow the bottles to be unscrewed easily, are probably an important feature. Again, just experiment.
In product photography, tiny changes to the things I've highlighted above make a huge difference. That statement also applies to other small subjects, so when you have small products to photograph it applies in spades
")
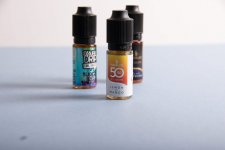
All in all, I think that you've made a good start.
I think that the colour is a bit off, a bit blue, but easily corrected in PP. And you clearly have a focus problem, maybe you need to use a smaller f/number, or move the subjects closer together depth-wise, or use focus stacking, but in product photography everything needs to be either perfectly sharp or very blurred, one extreme or the other. And you need to either arrange the background so that it's behind all of the subject, not just a bit of it. Or just don't bother about the background at all, cut the product out in PP and create your own background - this is the more professional approach but takes time, fine for the odd shot but not for a few hundred of them.