

jammy_c
Suspended / Banned
- Messages
- 991
- Name
- James
- Edit My Images
- Yes
Hey Guys!
It's been a long time in the coming, but i've eventually got the "build" pictures up of my DIY ringflash.
This one was a bit "blue peter", but i wanted to make sure the principle were about right, so it probably took a a couple of hours all-in-all.
The results were pretty good IMHO, so i'm planning on making a better quality one soon!
I used the following:
Tools:
Scissors
Rule
Stanley Knife
Superglue
Materials:
Plasti-card
Aluminium Tape
Gaffer (black fabric) Tape
Sellotape (clear)
an empty masking tape reel
Transparent film (similar to tracing paper)
(Please Click Thumbnails to Enlarge):
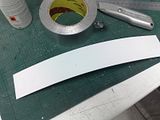
I cut some pieces of plasti-card to right size. one large square one for the main circular housing, a much longer thinner piece for the outer ridge:
all need covering in silver tape to have better reflective properties.
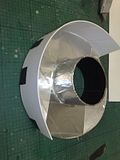
I then marked out a circle on the square piece to form the basis for the main section, i put an empty masking tape roll in the centre and cut out the inner section of plasticard in order for the lens to poke through.
I then ran a bead of superglue around the outside. whilst this was drying, i added the long strip that i had cut to the outer circumerence of the plasticard. this was superglued, taped from the rear, then alu-taped from the inside to give a nice smooth reflective finish:
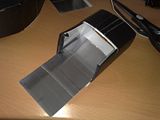
Next, i started work on the mounting to the flashgun. I have a Nissin Di622, but the method should be the same for most guns.
I cut another rectangular piece of plasticard and folded it around the flash, then removed, covered in alu-tape and creased properly with the metal rule.
this was then folded up properly and taped tight. the result is an extension to the flashgun which will slide on and off with a bit of force, but not too loose so that it won't drop off.


Another one of these was made in the same way, then a a hole cut in the top of the main circular section, and it was inserted, glued, trimmed and taped. a lot of external taping was needed to keep it in place, and internal taping to ensure no light-loss.

This was then cut to size, and another strip was added (covered with alu-tape) to form a 90° radius for the light to be reflected to the main section. a section was also removed from the bottom edge of the "tunnel" to allow it to fit on the other section
It's been a long time in the coming, but i've eventually got the "build" pictures up of my DIY ringflash.
This one was a bit "blue peter", but i wanted to make sure the principle were about right, so it probably took a a couple of hours all-in-all.
The results were pretty good IMHO, so i'm planning on making a better quality one soon!
I used the following:
Tools:
Scissors
Rule
Stanley Knife
Superglue
Materials:
Plasti-card
Aluminium Tape
Gaffer (black fabric) Tape
Sellotape (clear)
an empty masking tape reel
Transparent film (similar to tracing paper)
(Please Click Thumbnails to Enlarge):
I cut some pieces of plasti-card to right size. one large square one for the main circular housing, a much longer thinner piece for the outer ridge:
all need covering in silver tape to have better reflective properties.

I then marked out a circle on the square piece to form the basis for the main section, i put an empty masking tape roll in the centre and cut out the inner section of plasticard in order for the lens to poke through.
I then ran a bead of superglue around the outside. whilst this was drying, i added the long strip that i had cut to the outer circumerence of the plasticard. this was superglued, taped from the rear, then alu-taped from the inside to give a nice smooth reflective finish:

Next, i started work on the mounting to the flashgun. I have a Nissin Di622, but the method should be the same for most guns.
I cut another rectangular piece of plasticard and folded it around the flash, then removed, covered in alu-tape and creased properly with the metal rule.
this was then folded up properly and taped tight. the result is an extension to the flashgun which will slide on and off with a bit of force, but not too loose so that it won't drop off.


Another one of these was made in the same way, then a a hole cut in the top of the main circular section, and it was inserted, glued, trimmed and taped. a lot of external taping was needed to keep it in place, and internal taping to ensure no light-loss.

This was then cut to size, and another strip was added (covered with alu-tape) to form a 90° radius for the light to be reflected to the main section. a section was also removed from the bottom edge of the "tunnel" to allow it to fit on the other section


")


")