

sk66
Suspended / Banned
- Messages
- 9,557
- Name
- Steven
- Edit My Images
- Yes
The brief: A dark and dramatic picture of a black lens on a black background. Branding is important.
The challenge here is to photograph a black object on a black background while providing separation. It’s really a challenge about falloff, one of the key characteristics of lighting. In order to illuminate a black object while also not illuminating the background notably you need to have a high rate of falloff, a large separation distance, or some combination of both.
This is a chart that shows the light falloff of a diffused light source verses a very hard point light source (the Inverse Square Law). The main thing to take away from this is that falloff increases rapidly when the subject distance is less than ~ 3x the diagonal/diameter for a diffused source. And by approximately 5x the distance the diffused light source looks and acts like a hard light source. I.e. there is no point to using small modifiers from large distances.

Because the distance is shorter, the power must be lower, and the light travels less distance... If you cannot get the power low enough, just add more diffusion. You cannot move the light farther away, because that makes the light harder and the rate of falloff less. This shows the fallacy of changing the distance to change the softness (apparent size)… that works, but it affects only one aspect of lighting character. And you cannot just change the camera exposure settings, because that doesn’t change the lighting ratio or where it’s falling.
My setup. (this is not the exact setup/positioning as the original image was taken years ago)

- Black paper roll background. Doesn’t really matter what it is as long as it is black. It doesn’t need to be seamless as the break should be invisible in the blackness (or edited out).
- A stainless steel mirror for the reflection; the mirror becomes the color of the background at the right camera angles, and it is highly effective at creating the reflected image; sometimes too effective (can be faded in post).
Other options would be black acrylic (perspex), or a gloss black tile (sample tile?). I’ve gotten double sink cutouts (marble/etc) for free from custom countertop shops before. A very thin sheet of clear acrylic over a black surface can work (e.g. poster frame "glass"). Thicker sheets/glass will create two reflections; one from each air interface/surface; that can be eliminated by painting the back of the plate black. A glass mirror will create a double reflection.
- The reflection is optional; but it makes creating the separation easier. Pointing the light away from the camera creates a larger range of angles/height the camera can be placed without the light showing in the surface; but all of the surface is illuminated. And because it is a reflective surface it is bouncing some light back up into the object, illuminating it from below and separating it from the surface. This is more obvious in the setup image.
Without the reflective surface you will need a bounce panel placed close, but in a position where it can be edited out. And a lighting angle that works for both the subject and the bounce panel. A gloss black surface will still reflect some light; it may/may not be enough.
- The light is a 4ft x 2ft (4.4 ft diagonal) diffused LED panel on a boom stand. It is not the light I actually used. I probably used a 4ft octa, or a 2ft x 3ft softbox… it doesn’t matter, I could have used a sheet; I could have placed the surface close to the ceiling and used a bounced table lamp. What matters is that it is large enough and close enough.
- The entire left side of the table area is covered by a silk (transparent shower curtain). This is necessary because convex surfaces see a huge area, and reflect it back to the camera. When photographing shiny things I find it’s easier to think in terms of creating the environment that is going to be reflected as opposed to “lighting.”
The white surface is also required for illumination from that side. It could be a bounce panel and a separate light. It could be a bounce panel placed close enough to bounce the main light (probably difficult with the high curvature of this lens). Or the silk could be lit from the opposite side… in this case there’s an open window and a white wall (bounce surface) a short distance away.
- The window to the right would probably need covered; I believe I blacked out both windows when I took the final image… I often do that as default for this kind of work.

A few notes:
It is extremely hard to eliminate an unwanted reflection/catchlight by changing camera position… it follows the camera around. I.e. almost every surface of the lens is being illuminated, so the reflection/catchlight exists everywhere. The camera can only see the one being reflected back to it, and when you move the camera it sees that one.
The reflection in the surface is at a greater focal distance than the subject is.
A dark image means a lack of light recorded which means a lack of data, higher levels of noise, and a reduced ability to edit it without causing issues (banding, blocking up, etc). These types of images benefit from overexposure knowing the exposure will require editing.
Specular highlights and white lettering can be allowed to clip. However, translucent highlights cannot (i.e. the focus distance window).
Once you understand everything the basics of lighting are rather easy. I was able to setup and take the setup image in about 10 minutes ; that includes swapping backgrounds, placing/cleaning the mirror, positioning the light, and snapping the picture. And the result is probably 90% there… it’s the remaining 10% that takes all the time. It does help that the table, BG's, and light are always set up and that I have a dedicated space. But FWIW, everything I used was "overkill" for this challenge...
And finally, if I were to take the picture again I would probably try to change some things; mainly the reflection in the lens; maybe composite a couple different exposures, maybe try to get a touch more light in under the lens… the image isn’t perfect; I don’t think I’ve ever taken a perfect image.
The challenge here is to photograph a black object on a black background while providing separation. It’s really a challenge about falloff, one of the key characteristics of lighting. In order to illuminate a black object while also not illuminating the background notably you need to have a high rate of falloff, a large separation distance, or some combination of both.
This is a chart that shows the light falloff of a diffused light source verses a very hard point light source (the Inverse Square Law). The main thing to take away from this is that falloff increases rapidly when the subject distance is less than ~ 3x the diagonal/diameter for a diffused source. And by approximately 5x the distance the diffused light source looks and acts like a hard light source. I.e. there is no point to using small modifiers from large distances.
Because the distance is shorter, the power must be lower, and the light travels less distance... If you cannot get the power low enough, just add more diffusion. You cannot move the light farther away, because that makes the light harder and the rate of falloff less. This shows the fallacy of changing the distance to change the softness (apparent size)… that works, but it affects only one aspect of lighting character. And you cannot just change the camera exposure settings, because that doesn’t change the lighting ratio or where it’s falling.
My setup. (this is not the exact setup/positioning as the original image was taken years ago)
- Black paper roll background. Doesn’t really matter what it is as long as it is black. It doesn’t need to be seamless as the break should be invisible in the blackness (or edited out).
- A stainless steel mirror for the reflection; the mirror becomes the color of the background at the right camera angles, and it is highly effective at creating the reflected image; sometimes too effective (can be faded in post).
Other options would be black acrylic (perspex), or a gloss black tile (sample tile?). I’ve gotten double sink cutouts (marble/etc) for free from custom countertop shops before. A very thin sheet of clear acrylic over a black surface can work (e.g. poster frame "glass"). Thicker sheets/glass will create two reflections; one from each air interface/surface; that can be eliminated by painting the back of the plate black. A glass mirror will create a double reflection.
- The reflection is optional; but it makes creating the separation easier. Pointing the light away from the camera creates a larger range of angles/height the camera can be placed without the light showing in the surface; but all of the surface is illuminated. And because it is a reflective surface it is bouncing some light back up into the object, illuminating it from below and separating it from the surface. This is more obvious in the setup image.
Without the reflective surface you will need a bounce panel placed close, but in a position where it can be edited out. And a lighting angle that works for both the subject and the bounce panel. A gloss black surface will still reflect some light; it may/may not be enough.
- The light is a 4ft x 2ft (4.4 ft diagonal) diffused LED panel on a boom stand. It is not the light I actually used. I probably used a 4ft octa, or a 2ft x 3ft softbox… it doesn’t matter, I could have used a sheet; I could have placed the surface close to the ceiling and used a bounced table lamp. What matters is that it is large enough and close enough.
- The entire left side of the table area is covered by a silk (transparent shower curtain). This is necessary because convex surfaces see a huge area, and reflect it back to the camera. When photographing shiny things I find it’s easier to think in terms of creating the environment that is going to be reflected as opposed to “lighting.”
The white surface is also required for illumination from that side. It could be a bounce panel and a separate light. It could be a bounce panel placed close enough to bounce the main light (probably difficult with the high curvature of this lens). Or the silk could be lit from the opposite side… in this case there’s an open window and a white wall (bounce surface) a short distance away.
- The window to the right would probably need covered; I believe I blacked out both windows when I took the final image… I often do that as default for this kind of work.
A few notes:
It is extremely hard to eliminate an unwanted reflection/catchlight by changing camera position… it follows the camera around. I.e. almost every surface of the lens is being illuminated, so the reflection/catchlight exists everywhere. The camera can only see the one being reflected back to it, and when you move the camera it sees that one.
The reflection in the surface is at a greater focal distance than the subject is.
A dark image means a lack of light recorded which means a lack of data, higher levels of noise, and a reduced ability to edit it without causing issues (banding, blocking up, etc). These types of images benefit from overexposure knowing the exposure will require editing.
Specular highlights and white lettering can be allowed to clip. However, translucent highlights cannot (i.e. the focus distance window).
Once you understand everything the basics of lighting are rather easy. I was able to setup and take the setup image in about 10 minutes ; that includes swapping backgrounds, placing/cleaning the mirror, positioning the light, and snapping the picture. And the result is probably 90% there… it’s the remaining 10% that takes all the time. It does help that the table, BG's, and light are always set up and that I have a dedicated space. But FWIW, everything I used was "overkill" for this challenge...
And finally, if I were to take the picture again I would probably try to change some things; mainly the reflection in the lens; maybe composite a couple different exposures, maybe try to get a touch more light in under the lens… the image isn’t perfect; I don’t think I’ve ever taken a perfect image.
Last edited:
") )
)


 Plus all my flat surfaces are below big ass skylights. So had to use the sofa.
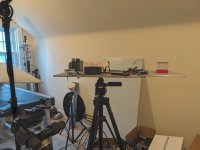
")


")


