

Garry Edwards
Moderator
- Messages
- 13,475
- Name
- Garry Edwards
- Edit My Images
- No
Firstly, my apologies for posting a challenge that, at first sight, looks complicated – but it’s actually very straightforward.
I ‘m going to write a tutorial about it, complete with video, and have decided to also make it into this Lighting Challenge.
The planned tutorial is going to be a follow-up on this one, on food photography.
Food photography can be both artistically and technically challenging, but (usually) has the benefit of bright colours with lots of colour contrast, and in the planned tutorial I was going to demonstrate that the right lighting can make even a very dull, almost mono subject look almost edible. Because of this I chose to shoot a pair of Asda garlic baguettes, a brown subject on a brown wooden chopping board on a brown background. In case you’re interested in how the professionals do it, this is the link to Asda’s own product photo")
But, you should do as I say and not do as I do so please feel free to shoot a simpler subject, anything that is both fairly shiny but which has texture will be ideal – perhaps cylindrical in shape?
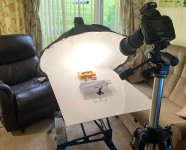
My starting point, to deal with the semi-shiny surface, was to set up a softbox above and behind, the softbox is in rough position but is switched off in this first shot

And here it is, switched on

The setup was on an uncooked product, it has to be because all the prep work takes time, in a pro shot I would have set up on a cooked product, while a chef prepared a second product that could be photographed piping hot, but forget about that.
The background here was a bit of flat printed plastic, no relief on it, one of a set bought from Temu at a silly cheap price , not perfect but good enough for the purpose, not really big enough but this isn’t a pro shoot and I made the vinyl sheet ‘bigger’ by moving the camera back as far as my very limited space allowed, to reduce perspective distortion as much as I could. The lens was set at 88mm, full-frame.
And the ‘serving platter’ is my chopping board, with about 30 years of daily use, with plenty of patina – and far too much on the front edge, which is in shadow, but, for this purpose, you can use any props that are handy, it doesn’t need to be brown on brown on brown.
The softbox setup is very similar to that used for photographing very shiny subjects, here
But with an important difference – the angle, about 45 degrees, did the job of avoiding unwanted reflections of the softbox (unwanted specular reflections) but the subject isn’t all that shiny, and so the softbox was moved further away, to make it effectively smaller, than in the other thread.
Softboxes are very versatile tools. Used big, close and at a slight angle to the subject, they can produce low-contrast, soft lighting that wraps around the subject. But, move them further away, making it effectively smaller, and used at a sharper angle, and they can create high local contrast, which is what I’ve tried to do here.

In the shot above, the softbox needed to be as big as possible, which also means as close as possible, but with this subject the softbox was too big for the job so I had to make it effectively smaller, and harder, by moving it further away, which created a harder light that emphasised the texture and irregularities of the baguette – this is apparent in the first shot and even more obvious in the second one, below, with the baguette ‘well’-cooked. I overcooked it a bit to create a bit more contrast. You may say that it’s unevenly cooked, that isn’t deliberate, I’m terrible at cooking
I then added the second baguette

I broke the second baguette to show the inside, as you do, and spread a few crumbs around, for authenticity.
We now have the beginnings of a shot, with just one light, but I think it needs more. So, I added a honeycombed light, from the far left, this is the first attempt, with far too much power, and with the softbox switched off (which we should always do when adding extra lights, we deal with one light at a time)

I don’t care about the exposure, I just adjust it as I go
This honeycombed light was as far away as my space allowed. This is essential because of the effect of the inverse square law, which effectively dramatically reduces power over distance, so if the honeycombed light had been closer then the left hand side of the shot would have received far more light than the right-hand side.
Now, my honeycomb is a bit special, it has a very limited spread of light which makes it ideal for this type of shot, but you can manage with an ‘ordinary’ honeycomb simply by placing flags close to the subject to block unwanted light.

These flags can be anything that blocks the light, and I normally use hardback books covered with Cinefoil.
Not terrible, but the far right end of the front bagette is unlit, and so, as I happen to have a second honeycomb, see here I used it to light that bit, here

But, that extra honeycombed light is a luxury that you may not have, and a workaround is to use a small mirror, just out of shot, to direct spare light back on to the end, which works just as well but is a bit more fiddly. I use one of those small round shaving mirrors, with a concave side, which concentrates the light beautifully.
We can also use one of those focussing LED torches, just increase the exposure time to get the effect we want.
So, switch both of the other lights back on and we get this

As I mentioned earlier, the background isn’t quite big enough, but very easily fixed in PP, also there’s a bit of Sellotape, used to hold the background flat, visible right at the top, and I may or may not want to to clean up the chopping board in places, all easily done, but as always, no PP work at all is allowed in these challenge threads - I haven’t even cropped the images except for the one above.
So, over to you, prove that you can do better than me, not difficult, and anyway it’s the learning process that matters, not the result. Please include explanations and stepback shots.
I ‘m going to write a tutorial about it, complete with video, and have decided to also make it into this Lighting Challenge.
The planned tutorial is going to be a follow-up on this one, on food photography.
Food photography can be both artistically and technically challenging, but (usually) has the benefit of bright colours with lots of colour contrast, and in the planned tutorial I was going to demonstrate that the right lighting can make even a very dull, almost mono subject look almost edible. Because of this I chose to shoot a pair of Asda garlic baguettes, a brown subject on a brown wooden chopping board on a brown background. In case you’re interested in how the professionals do it, this is the link to Asda’s own product photo
But, you should do as I say and not do as I do
so please feel free to shoot a simpler subject, anything that is both fairly shiny but which has texture will be ideal – perhaps cylindrical in shape?My starting point, to deal with the semi-shiny surface, was to set up a softbox above and behind, the softbox is in rough position but is switched off in this first shot
And here it is, switched on
The setup was on an uncooked product, it has to be because all the prep work takes time, in a pro shot I would have set up on a cooked product, while a chef prepared a second product that could be photographed piping hot, but forget about that.
The background here was a bit of flat printed plastic, no relief on it, one of a set bought from Temu at a silly cheap price , not perfect but good enough for the purpose, not really big enough but this isn’t a pro shoot
and I made the vinyl sheet ‘bigger’ by moving the camera back as far as my very limited space allowed, to reduce perspective distortion as much as I could. The lens was set at 88mm, full-frame.And the ‘serving platter’ is my chopping board, with about 30 years of daily use, with plenty of patina – and far too much on the front edge, which is in shadow, but, for this purpose, you can use any props that are handy, it doesn’t need to be brown on brown on brown.
The softbox setup is very similar to that used for photographing very shiny subjects, here
But with an important difference – the angle, about 45 degrees, did the job of avoiding unwanted reflections of the softbox (unwanted specular reflections) but the subject isn’t all that shiny, and so the softbox was moved further away, to make it effectively smaller, than in the other thread.
Softboxes are very versatile tools. Used big, close and at a slight angle to the subject, they can produce low-contrast, soft lighting that wraps around the subject. But, move them further away, making it effectively smaller, and used at a sharper angle, and they can create high local contrast, which is what I’ve tried to do here.
In the shot above, the softbox needed to be as big as possible, which also means as close as possible, but with this subject the softbox was too big for the job so I had to make it effectively smaller, and harder, by moving it further away, which created a harder light that emphasised the texture and irregularities of the baguette – this is apparent in the first shot and even more obvious in the second one, below, with the baguette ‘well’-cooked. I overcooked it a bit to create a bit more contrast. You may say that it’s unevenly cooked, that isn’t deliberate, I’m terrible at cooking
I then added the second baguette
I broke the second baguette to show the inside, as you do, and spread a few crumbs around, for authenticity.
We now have the beginnings of a shot, with just one light, but I think it needs more. So, I added a honeycombed light, from the far left, this is the first attempt, with far too much power, and with the softbox switched off (which we should always do when adding extra lights, we deal with one light at a time)
I don’t care about the exposure, I just adjust it as I go
This honeycombed light was as far away as my space allowed. This is essential because of the effect of the inverse square law, which effectively dramatically reduces power over distance, so if the honeycombed light had been closer then the left hand side of the shot would have received far more light than the right-hand side.
Now, my honeycomb is a bit special, it has a very limited spread of light which makes it ideal for this type of shot, but you can manage with an ‘ordinary’ honeycomb simply by placing flags close to the subject to block unwanted light.
These flags can be anything that blocks the light, and I normally use hardback books covered with Cinefoil.
Not terrible, but the far right end of the front bagette is unlit, and so, as I happen to have a second honeycomb, see here I used it to light that bit, here
But, that extra honeycombed light is a luxury that you may not have, and a workaround is to use a small mirror, just out of shot, to direct spare light back on to the end, which works just as well but is a bit more fiddly. I use one of those small round shaving mirrors, with a concave side, which concentrates the light beautifully.
We can also use one of those focussing LED torches, just increase the exposure time to get the effect we want.
So, switch both of the other lights back on and we get this
As I mentioned earlier, the background isn’t quite big enough, but very easily fixed in PP, also there’s a bit of Sellotape, used to hold the background flat, visible right at the top, and I may or may not want to to clean up the chopping board in places, all easily done, but as always, no PP work at all is allowed in these challenge threads - I haven’t even cropped the images except for the one above.
So, over to you, prove that you can do better than me, not difficult, and anyway it’s the learning process that matters, not the result. Please include explanations and stepback shots.


![PXL_20260130_144545477.RAW-01.MP.COVER[1].jpg](https://www.talkphotography.org/data/attachments/458/458059-ecd79606a665418dbe0df795b47588e8.jpg?hash=7NeWBqZlQY "PXL_20260130_144545477.RAW-01.MP.COVER[1].jpg")


![PXL_20260131_152216866.RAW-01.COVER[1].jpg](https://www.talkphotography.org/data/attachments/458/458144-75b94ef0d6fe742242f07f12c0a60fcd.jpg?hash=dblO8Nb-dC "PXL_20260131_152216866.RAW-01.COVER[1].jpg")


")


