Good entry level adjustable lighting for tabletop photography

totalwise

Suspended / Banned
Messages
25
Edit My Images
Yes
Hello

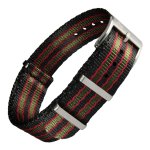
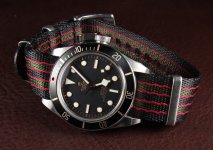
I'm learning how to shoot photos of my product. This is a photo I've managed to shoot. I believe this is a big improvement over my previous attempt.

vintage2.jpg


IMG_0714.JPG

I bought a photo cube which was a good way of getting consistent lighting and angle of light between shots, but it made everything look flat. So I took it out of the photbox and hit the item with some diffused lighting from a DIYer site light. Which was a big improvement but it's hard to get the angle and position of the light correctly.

I want a light that I can adjust brightness, height, position so I can do overhead artistic shots.

Any recommendations of budget lighting?
 
You've asked this question before https://www.talkphotography.co.uk/t...-lighting-lens-i-need-to-do-this-shot.730523/ and my answers are still the same.

You've taken some of my suggestions on board and you've achieved a massive improvement, but there's a way to go . . . Going off-topic a bit, your shots need to be sharp, and this one isn't - you may need to focus more carefully, and/or use a smaller lens aperture and/or have a slightly higher viewpoint to overcome this problem.

Back on topic, you've used a site lamp, designed down to a price and intended to provide a large quantity of light but a poor quality of light. The biggest single problem with this type of light for photography is the Color Rendition Index (CRI), which will be very low and which will always reproduce colours such as red, orange, yellow, green and blue very inaccurately. This, together with the need to have adjustable power, is the main reason why you need to use flash.

You want pointing in the right direction - Get two of these flashguns (cheaper makes are available) https://www.lencarta.com/godox-tt685ii-speedlight (cheaper makes are available on eBay, for example this second-hand one https://www.ebay.co.uk/itm/275049961352?hash=item400a415788:g:4bQAAOSwjIxhqSJY) - suitable for Canon cameras - and get one of these small softboxes too, https://www.lencarta.com/rectangular-speedlight-softbox-life-of-photo-20x30cm
Frankly, this type of softbox is pretty useless for most purposes but will be ideal for these tiny items, you'll need to position it above the subject, typically a bit behind as well. See https://www.talkphotography.co.uk/tutorials/which-is-the-right-softbox-for-you.154/ and https://www.talkphotography.co.uk/tutorials/creating-diffused-specular-highlights.137/

You'll also need a couple of lighting stands. I normally suggest good ones, but as you'll only be mounting small flashguns on them you can go cheap, and there are plenty of very cheap ones on eBay that are good enough.

And of course you'll also need a flash trigger to fire the flashes.

Does this help?
 
Sorry, I'm dabbling with it and completely forgot that I posted here before.

Are they both not sharp enough, The former is my second attempt and I thought it was sharp enough. the latter is my first attempt.
The first image is made up of 6 focus stacked layers so it's supposed to pick the sharpest bits from the 6 images.

Thanks for the speedlight suggestion, do you have any recommendations for continuous light?

I heard that the learning curve is much higher with strobe lights because you can't visually see how the light affects the object until you have taken the photo and reviewed it on the computer. With continuous light you can position them to get the product to look the best with your eyes and capture the ideal photo.
 
No, nowhere near sharp enough IMO. Focus stacking is a solution, but you'll probably need a lot more than 6 combined shots. https://www.talkphotography.co.uk/tutorials/focus-stacking-–-getting-everything-in-focus.150/

Continuous lighting has become very popular, partly because of improvements to LED lighting, partly because it's often cheaper, but perhaps mainly because a lot of people believe as you do that flash is difficult. It isn't! The LED lights that are actually usable, such as this one https://www.lencarta.com/godox-ml60-led-light-studio-flash-continuous-light are physically too large for this type of work (not strickly true but there's no point in using equipment that's too big and awkward). And the adjustable-power LED panel lights, although OK for the overhead light, is again too large for the front/side light, so flashgun are the answer.

Continuous lighting also has the disadvantage of not always being powerful enough to overcome the ambient light.

So, back to flash . . . Flashguns don't have the benefit of (effective) modelling lamps, but trial and error works perfectly well when shooting on digital, and you don't need a computer to view the image, that's what the camera screen is for. And, if you almost shut your eyes while firing a test flash, you can get a pretty good idea of the lighting effect anyway.
 
I couldn't do more than 6 shots. because I would get front to back of the photo in 6. I was using the focusing ring mainly because the aliexpress focusing rail was just too rubbish. The focusing ring tends to be stiff and then you exert a bit of force and it jumps too much.

Maybe I need to invest in a more expensive focusing rail which will give me precise microsteps.

I will give the speedlights a try, not sure how they work.

I would still like to see the photos on screen because my eyes aren't great and difficult to make out what I'm shooting on the 3" camera screen.

How would speedlights work exactly? Do I have to manually set the time or does the camera and speedlight sync up automatically? Do speedlights still work in in live view mode when i release the shutter on the computer?

I know you say I dont need live view, I dont need continuous light. But what you have to reealise is I'm completely new to photography and I'm learning everything brand new.

I have EOS 600D with kit lens (18-55mm), can I get any sharper photos with this camera and lens?
 
Last edited:
I would still like to see the photos on screen because my eyes aren't great and difficult to make out what I'm shooting on the 3" camera screen.
My eyes aren't great either, but I manage, you will too - you probably just need more practice and more self-confidence.
How would speedlights work exactly? Do I have to manually set the time or does the camera and speedlight sync up automatically? Do speedlights still work in in live view mode when i release the shutter on the computer?
Could you be over-thinking it? You just set the lens aperture - and by the way, which aperture did you use for those shots? - and set the camera shutter speed to 1/125th, although your camera may work with flash at 1/200th, there's nothing to be gained by using a higher shutter speed.
The radio trigger fits into the camera hotshoe, and fires the flashgun at the right moment. Some flashgun have a built-in radio receiver, others need one plugged into them.
Take a test shot, increase or reduce the power to suit, and you're done.
I know you say I dont need live view, I dont need continuous light. But what you have to reealise is I'm completely new to photography and I'm learning everything brand new.
You've got a digital camera that shows you the results immediately, and you've got a static subject that can't move. You'll be fine.
I have EOS 600D with kit lens (18-55mm), can I get any sharper photos with this camera and lens?
Other people on here know far more about your camera and lens than I do, but I think that they should be up to the job.
 
Ok I'll order some speedlights, 2 should do the trick, either side?

Aperature was something around f5.x for the former and f22 for the latter :p. I didn't know that you lose so much detail if you go that high when I started.

For me, I'm happy with the results so far, but I'm sure if I do it the way you've shown and get better pictures I'll look back at what I have now and realise how poor they were :p
 
f/5 won't give the best results with a kit lens, I'd suggest f/11 for both the best sharpness and the best depth of field. Yes, the diffraction limitation that occurs at f/22 can be pretty bad. With your cropped frame sensor camera, you shouldn't use an aperture smaller than f/11.

One flashgun placed front and to the side, probably a couple of feet or so from the subject, because the greater the distance, the harder the light, which means that the texture will show up much better. A reflector (a piece of white paper, probably about A5 size) positioned to catch light that's missing the subject, reflect it back to the other side. Get the reflector pretty close to the subject to maximise the light from it.

As I explained earlier, the other light will be fitted with the softbox and normally be above, pointing down and a bit behind the subject, pointing slightly forwards. Time and practice will quickly establish the best position for the effect that you want.

Have fun and post your results:)

BTW, maybe some Canon users can confirm that your lens should be OK? I'm guessing that it will be fine but I don't use Canon and don't have any kit lenses, so I don't know for sure.
 
My 10p's worth would be to invest in a dedicated Macro lens for detail in shots like yours :)

Just a thought

Shot using natural light from a window and a Sony 90mm f2.8 Macro lens

mC3X6xK.jpg


Les :)
 
Thanks Les. IIRC the advice was extension tubes are a suitable substitute.

Do I still need a macro lens if I can zoom in and fill the frame with the object?
 
My 10p's worth would be to invest in a dedicated Macro lens for detail in shots like yours :)

Just a thought

Shot using natural light from a window and a Sony 90mm f2.8 Macro lens

mC3X6xK.jpg


Les :)
Seiko . . . nice watch but I've had to give up on mine, needs cleaning and it has to go back to Seiko for that, so I now have a dead accurate but cheap smartwatch on my wrist and my real watch is in a box:(
A macro lens is perfect for watches but not necessary for the OP - nice to have but a very expensive solution to a non-problem. Your shot shows the good resolution of your watch, but personally I feel that the lighting lets it down badly.

OK for hobby shots, but commercial shots need to be right in every respect, otherwise the goods simply don't sell.
 
Hey Garry

I have 2 speedlights now YN560-ii

This is my latest incarnation of the product above.

I feel it's really good but still a notch below the big business competitors who use commercial photographers.

I am still using the kit lens 18mm to 55mm EFS. I do wonder whether I should upgrade the lens, or spend the money on a tripod and focus rail. The focus ring is jerky and hard to get precise increments. But a good focusing rail will probably get me better stacked photos.
 

Attachments

  • SB-vntbnd profile.jpg
    SB-vntbnd profile.jpg
    169.7 KB · Views: 34
  • SI series hero shot smaller.jpg
    SI series hero shot smaller.jpg
    211.9 KB · Views: 35
  • SB-vntgbnd mounted2.jpg
    SB-vntgbnd mounted2.jpg
    159.8 KB · Views: 34
Last edited:
The first image is quite good IMO... I think it might be a little better if the band was a bit flatter or rotated (or both) so the logo is more visible.

The other two seem like you used both lights without a real reason/purpose... particularly the second image with the crossing shadows and blown highlights left/right. Start with one light and only add the second if you really need it... and then only add as much as you really need. Consider using reflectors (white/silver/black) instead of the second flash.

What size are your modifiers? They look to be too small or placed too far away... or both.
 
Haha you read my photos like an open book.

Modifiers - I presume you mean the softbox that I attach onto the speedlight? They are 15cm wide and 15cm away from the speedlight light source.

It just seemed right to use speedlights either side, I do understand what you mean about have two evenly spaced speedlights either side - I just did it to hit the objects even;y but having high brightness one side, and "dark(er) side" on the other would look more artistic.

I am really pleased I've hit the mark on the mqain profile shot which is main profile picture of the product.
 
Modifiers - I presume you mean the softbox that I attach onto the speedlight? They are 15cm wide and 15cm away from the speedlight light source.
Those don't count... you might as well not use anything at all. Do yourself a favor and get a sheet/shower curtain/diffusion paper and use your speedlight w/ 15cm softbox to light that. This is a pretty good video on photographing a watch with a single light.

View: https://youtu.be/7e1nbN42cQk
 
Back
Top