Black and white filter compensation

cardiff_gareth

Suspended / Banned
Messages
2,734
Name
Gareth
Edit My Images
Yes
Hi all,
I've just bought some Cokin filters for black and white photography, a deep red (+3), orange (+1) and a yellow (+1/3).

I naturally understand that as the filters are dark they'll effect the light entering to the film. As the filters say on them the plus numbers on them I'm guessing that's what I need to add to adjust to exposure correctly.

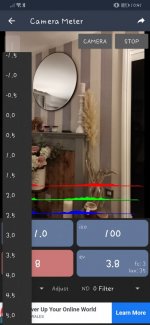
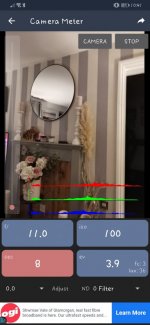
As I have a Bronica that has no built in meter I use this phone app that I find is pretty accurate.

It has at the bottom left an adjust button for exposure compensation. Presumably the +1/3, +1 and +3, I just dial in here and use that reading?

It sounds a weird thing to ask but I wasn't sure it was this or f stop increases and I wanted to make sure I'm dialling on the right exposure as film and chemicals is getting more and more expensive!

Thanks
 

Attachments

  • Screenshot_20220107_224140_com.willblaschko.android.lightmeterv2.free.jpg
    Screenshot_20220107_224140_com.willblaschko.android.lightmeterv2.free.jpg
    62.6 KB · Views: 6
  • Screenshot_20220107_224130_com.willblaschko.android.lightmeterv2.free.jpg
    Screenshot_20220107_224130_com.willblaschko.android.lightmeterv2.free.jpg
    66.7 KB · Views: 6
The figures quoted sound about right as filter factors in stops. The phone app is another matter, as I have no experience with them. I assume the figures there are also stops, but if you try dialing one in, you can see the effect by how the exposure changes.

One third sounds a bit low for a yellow filter, by the way.
 
The following factors are from a filter maker's advertisment*. Two factors per filter, the first for ortho, the second for panchromatic film. These are clearly the extra exposure required in terms of shutter speed, so e.g. the red filter's "8" means multiply the time by 8, which is 3 stops.

Light yellow 2/1.5
Medium yellow 3/2
Dark yellow 4/3
Light green
Medium green 4/2
Yellow green 4/2
Blue -/1.5
Orange -/4
Red -/8
UV 1.5/1.5

*BJP Almanac, 1952, Actina advert.
 
Last edited:
These are the filters I've won. They're all Cokin filters.

So! Before I try them out with an expensive film I'll get a roll of Foma and experiment with the phone app and adjust to what it says on the filter cases?
 

Attachments

  • Screenshot_20220108_101834_com.ebay.mobile.jpg
    Screenshot_20220108_101834_com.ebay.mobile.jpg
    44.5 KB · Views: 8
  • Screenshot_20220108_101818_com.ebay.mobile.jpg
    Screenshot_20220108_101818_com.ebay.mobile.jpg
    46.7 KB · Views: 8
  • Screenshot_20220108_101802_com.ebay.mobile.jpg
    Screenshot_20220108_101802_com.ebay.mobile.jpg
    43.5 KB · Views: 8
So! Before I try them out with an expensive film I'll get a roll of Foma and experiment with the phone app and adjust to what it says on the filter cases?

Sounds like a good plan. I suggest taking a shot with and without the filters, for a couple of different scenes (12 shots in all). That will enable you to see the effect of the filters in comparison with the unfiltered shots, as well as assessing whether the extra stops you have added for each filter are appropriate.
 
Sounds reasonable to me. Obviously, simple worlds like "yellow" don't give a precise colour or density (Wratten numbers do) so certainly go with the maker's recommendation.
 
Can you not test them on a digital camera, noting the exposures and "Bob's your uncle". That's what I did with mine, and it seems fine; Hoya: Yellow +1 stop, Orange +2 stops, Red +3 stops.
 
  • Like
Reactions: Nod
Not needed. But - a red filter will do more than just darken skies. Since we're talking about a sunny day, there will be shadows. The light in shadows comes from the sky, and the sky is blue. Hence a red filter will darken shadows. Additionally, foliage (let's assume we aren't mid winter) reflects infra red (and therefore the redder end of red as well). This can lead to foliage actualy being lightened by a red filter, not darkened as you might expect with green. This is called the Wood effect, after the man who described it rather than the base material of trees.

One trick to simulate moonlight is to underexpose with a red filter in daylight.

In general, the fewer filters you use, the better. Stacking is not a good idea unless there's no choice.
 
Surely the difference between 2/3 and 1 stop is completely ignorable in most black and white film situations?

I'd agree with that, unless you're paranoid about giving the absolute minimum exposure. Personally, I'm not as for me the penalties of underexposure are far worse than overexposure.
 
Tbh with B&W negatve film I just wing it ( What with all the other variables and innaccuracies involved between exposing film in camera and actually arriving with a wet print, I'd need a masters degree in maths and one of them scientific calculators....I prefer to use fingers and grey matter! :LOL: )

Simplicity is the key for me:


1 stop comp for yellow

2 stops comp for orange or green

3 stops comp for red or polarising ( and blue iirc ....please feel free to clarify the blue as it's an age since i used it)


So much easier to remember and without a doubt an awful lot less faff trying to calculate thirds of stops when out in the field.

Works for me, however i don't strive for perfection..........Thus, your method will depend very much on how precise you wish to be.
 
The basis of colour filters is that with b&w film,** they lighten their own colour and darken their complement colour thus for example:

A yellow filter lightens yellow and darkens blue hence blue skies become darker

** Note that this relates to panchromatic b&w film. The effects on ortho film are considerably different!
 
Well I loaded a roll of Pan F 50 into my Bronica and stopped off along the coast on the way to collect my kids from school and rattled a few images off. Using my phone app I set the adjust to 2 to compensate for the polariser. Then I set that to 0 and set ND filter to ND2 which gave a different reading so I shot that. Then, and he's a classic! I whip out my Cokin filter and.... Realise that Cokin P is an 85mm filter and not 100mm so it won't fit on the front of the filter holder so now I need to buy a smaller holder for these or locate some 100mm filters :LOL:

Well I decided to just hold it in front of the lens and see what the exposure on the app was using a ND4 filter and then fire a frame off like this with what the app said as well as a slightly longer shutter speed.

Anyway, had to get the kids so will finish the roll in the coming days.
 
Back
Top