Nikon 200/500 stuck zoom

Compuwight

Suspended / Banned
Messages
1,113
Name
Steve France
Edit My Images
Yes
I friend has been using her Nikon 200-500 zoom for several years without issue, then suddenly it got stuck at 500 and refused to move. She sent it away for repair and was quoted over £800, stating parts may be loose/damaged internally. This was a well known and respected repair specialist and I suspect it included a complete refurbish, however, not cost effective for my friend.

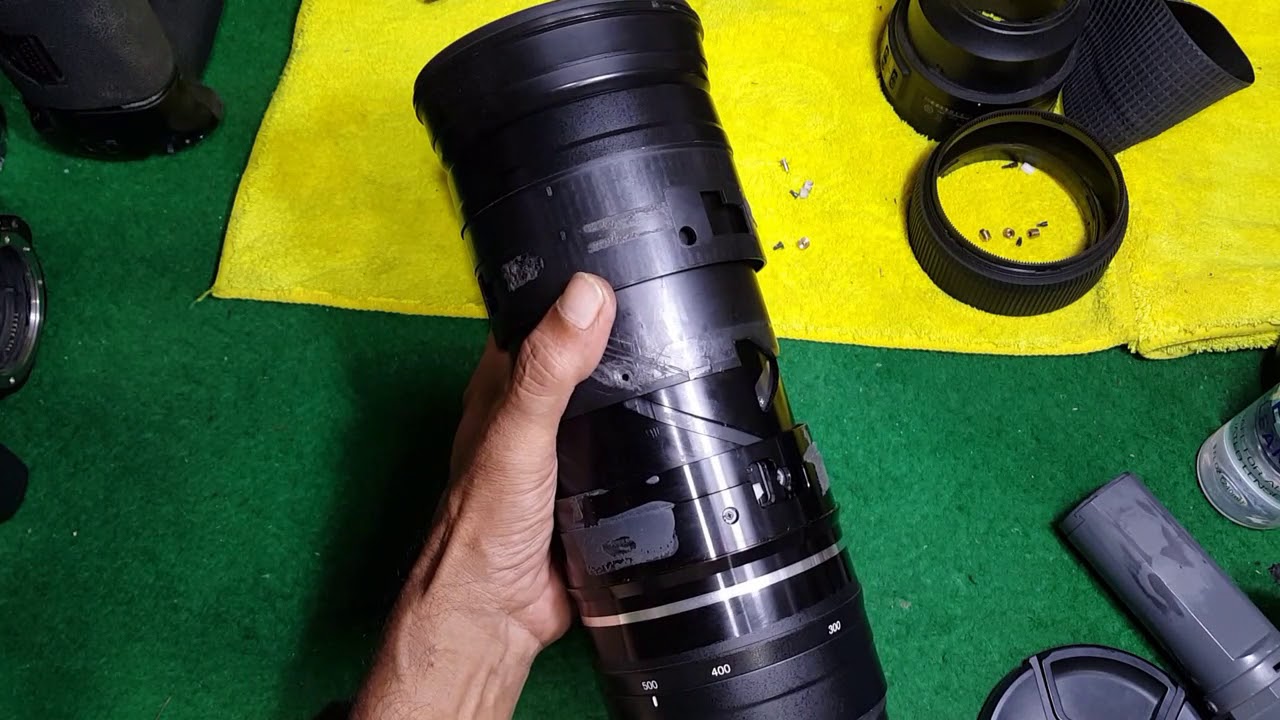
I agreed to have a quick lock as this lens is known for this issue and sometimes it's an easy fix !

I removed the rubber zoom ring and the access covers with ease, however, on checking all the screws were in place and not loose. With gentle rocking I could move the zoom ring a little but it is well and truly stuck.

Has anyone here gone to the next stage of removing the 3 spacers and lifting the zoom ring to expose the inner bushes, which I suspect may be the issue ?

Does anyone know of a source for replacement bushes....

Thanks in advance.........
 
Last edited:
Thanks for your input, I have watched these and some others, however, they get sketchy on the phase after removing the shroud. Removing the 3 screws holding the nylon spacers into the zoom grooves might allow the spacers to free fall into the lens itself. The last video shows these already removed...

At the moment the risks of completely trashing it are outweighed as it still makes a very good 500 prime !
Ah!

I wondered who she got to quote for it's repair?

One such, apart from Nikon themselves, place AFAIK is Fixation in London......but fairly sure others have been mentioned hereabouts at TP :thinking: .......and whether 'they' would be more palatable price wise?

Edit ~ Fixation do list this version(?) as a repairable one AF-S 200-500mm f/5.6 ......on the surmise that is the same model version?

PS IIRC there was mentioned a few times a one man operation who does camera & lens repairs, I think based on Kent?
 
Last edited:
I have found instructions BUT not sure or confident to proceed past 5) without seeing it done...

1) Roll back the rubber on the zoom ring.
2) On the exposed zoom ring, remove the orange tape with 3 silver rectangle embedded (put it somewhere safe).
3) Ensure lens is zoomed to 500mm, on the left of each of the 3 rectangular holes on the zoom ring, there is a small circular hole where you can see a screw. Remove that screw, as well as the white plastic ring around that screw. Now the zoom ring should be free to move, independent of the front element.
4) Rotate the zoom ring to around 350-380mm
5) Gently push or wriggle the extendable front tube of the lens IN about halfway, you should see a screw in each of the rectangular holes of the zoom ring. For me, one of the screws was not there (allowing the nut to jam the lens), but running around free within the lens. Remove those 3 screws (CAUTION - after the last screw is removed, the front tube of the lens is free to detach from the rest of the lens!)
6) Remove the front tube of the lens. The 3 nuts (for the 3 screws that were just removed) may fall out on their own, if they don't, remove them with a pincer. In my case, one of the nuts was trapped between the zoom ring and the 'internal rotating ring'. Align the offending nut with the slanted groove on the 'internal rotating ring' to get the nut out.
7) You're done taking it apart. Now comes the hard part - putting the front lens tube back.
8) Set the zoom ring to 350-380mm. Rotate the 'internal rotating ring' about halfway in, until you see the straight groove through the spiral gap, that's where the nuts are supposed to be. The nuts have 2 flat sides, which need to be aligned with the lens longitudinally. Hold one nut in place with your forefinger and another nut with your thumb. Use your free hand to put the 3rd nut in place. Now, slide the front tube of the lens back slowly, until the front lens tube covers the 3 nuts, leaving only the hole for the screw to go in. (If any of the 3 nuts get dislodged during this process, you just have to try again). Now screw back those 3 screws.
9) Extend the front lens tube fully (pull it). Rotate the zoom ring to 500mm.
10) Put back the white plastic ring into the small round hole left of the 3 rectangular holes and screw the small screw in place. Do this for the other 2 screws/white plastic rings.
11) Congrats! You should be able to utilise the full range of the zoom now.
12) Now, put back the orange tape onto the zoom ring, ensuring the 3 silver rectangles fit into the rectangular holes nicely. You may have to use extra tape to secure the ends of the orange tape which may not stick well now.
13) Roll back the rubber onto the zoom ring and you're done!
Phew! I see why you hesitate......because of unknown hurdles & outcome
 
I had the same problem on my old 200-500. Repair was around £300-£350 I think (was about 6-7 years ago though). The repair was done by Nikon UK, and took 3 months before I got the lens back, due awaiting spares.
Does seem to be a common issue with this lens !
 
Might be worth contacting Alan. Great bloke. Send him those links and repair breakdown. He may be willing to do the work for you. He’s very reasonable.

 
Back
Top