Lightstand Sand Bags

sep9001

Suspended / Banned
Messages
5,610
Name
Kev
Edit My Images
Yes
Hi

I don't use my studio lights much, and even if I do I only use them at home.

I might have to use the elsewhere, it is going to be indoors so have ordered some sand bags.

Question is what is best to put inside so it does not make a mess. Should I just get some pebbles and put them in, instead of sand?

Thank you
 
Thank you all, think water bottle option would be best for the very occasional use I may have.
 
I bought a big bag of kids' play sand from Amazon, but if you live near a beach - don't get caught. ;)
 
The "Sand Bags" in my studio are now filled with fine gravel, about like they put on streets when adding oil and stone to the streets. Years ago my sand bags were filled with sand, but always leaked on the studio floor, even though they have a zipper behind another zipper to keep them from leaking. I tried putting the sand in plastic bags, then putting these into the double zipper sand bags, but this usually didn't last long either.

In my studio I now also use the weights available for the pop-up shade tents. They are plastic covered round disks with a slot to the center in each, so they fit around the center post of these stands and they weigh about 5 lbs each. They are filled with concrete. One or two of these will stack easily on the cross braces of the smaller light stands and hold them quite well. For C-Stands I still use the standard sand bags, but with the gravel in them. For remote location shooting, empty sand bags that can be filled with whatever at the shoot location works well, but please return the whatever to wherever it came from when packing back up. You don't want to carry that much weight anyway. They also make water containers for weighting the shade tents, and these work well if you will be shooting where water is available. In my field kit I also carry several hanks of parachute cord, and use it when needing to tie a light stand, tripod, or whatever down to something. Don't forget Gaffing Tape, as it helps when the parachute cord doesn't quite work well enough. Long boot shoe laces are a good alternative to the parachute cord, but take many in your pack.

Charley
 
Me, I just stop at any construction site and ask politely if I can take some sand. When the guys see the size of my sandbags and the little dibble I use to fill them, they are reassured and tell me to go ahead and knock myself out. :cool:
 
Last edited:
I put pea gravel in zip-lok bag and put that in the sandbag, if the sandbag gets damp just take it out until everything dry
 
You can buy cloth bags on amazon, fill this with sharp sand which is not as fine as play sand and then put that in the pocket unless your constantly moving them it should be fine and durable enough, if not use the safe method and double bag it.

sharp sand is cheap as chips.
 
I use fine gravel, since it doesn't tend to leak out past the double zippers in the sand bags and get on my studio floor. What is used to pave roads mixed with tar is what I am referring to. You want the clean version though. For the smaller and lighter light stands I picked up some of the weights that were made for the Pop-up tent/shades. Each of these are C shaped with a slot to the center, so they will fit around the center column of most of these light stands. They come in boxes of 4 here. Each is plastic covered, but inside is a piece of cast concrete and weigh about 5 lbs each. . I can place two of these, stacked one on top of the other, on the leg braces of most of these light stands, making them quite tip and wind proof. They won't work with C-Stands though, as their center columns are too large to fit the slot in the weight . The double pouch sand bags joined together works better for C-Stands when placed over the tallest/longest leg of the C-Stand. Additional can be added over the other legs, as long as they don't touch the floor. Two stacked on top of each other over the tallest leg will work too. When doing shoots far away from civilization, I have used the other version of the Pop-up weights, that are folding plastic bottles and you fill ethem with up to 2 gallons of water (16 lbs) at or near the shoot location, then drain and collapse them for the return trip. I have also taken the double pouch sand bags with us empty, and then filled them with dirt, rocks, etc at the shoot location. When you do this, return this material from where you got it. You don't want to carry it back anyway. Just borrow it, then return it. Another way to secure a light stand is to tie it to something considerably large, like a railing or boulder. My bag contains Gaffer Tape and two 50' lengths of bright orange parachute cord (from Walmart or Amazon). Long boot laces work too and pack smaller and lighter. Several times I have used one of the lengths of parachute cord to pull my gear up some steep rocky outcrops on shoots in the wild too.

This is just some ideas on alternatives that I have resorted too on some of my photo shoots. Sometimes you need to "Think Outside the Photography Box" for these things. Ever use a tripod attached upside down off the ceiling? I have a few times in my studio and it worked well for the need.


Charley
 
I've used pea gravel in plastic bags, put inside the sandbags.
 
10-20mm shingle / pebbles from the garden.

Avoid sand - it will leak out eventually.

Unsolicited top tip:

If using the folding tripod type of stand then make sure your sandbags go on the legs of the stand and attached to the centre column, not on the horizontal cross members. I once had a stand fail when the sandbag caused the bottom end cap to pop off the column & the whole lot came down.

If you're using C stands then the sandbag goes on the top leg.
 
"If using the folding tripod type of stand then make sure your sandbags go on the legs of the stand and attached to the centre column, not on the horizontal cross members. I once had a stand fail when the sandbag caused the bottom end cap to pop off the column & the whole lot came down."

Well, all of my tripod light stands were modified by adding a 1" long dowel and epoxy to the bottom of the center column, with a hole drilled in the center to accept a 1/4-20 Hanger Bolt 2" long . This type of bolt has machine threads on one end, wood threads on the other, and no head. To each of my tripod stands I have added this hanger bolt, so that I can attach my tripod stands upside down to my ceiling lighting support grid using an Electricians Beam Clamp. This is small and C-clamp shaped with a bold in the top to tighten against anything that's in the notch (like my 1 x 1 x 1'4 steel angle support grid). There are two threaded holes at 90 degrees to each in this clamp that are threaded 1/4-20 or 3/8-16 , so photography equipment, and my light stands can be attached "upside down" to the ceiling grid. I can even extend the tripod legs up against the ceiling for increased light stability. I attach the lights to the stands in the usual way, as they don't care if their attachment point holds them upside down. This gives me the ability to adjust the height of my light by adjusting the tripod, and I have power mains outlets on the studio ceiling, so the power cables run up to the ceiling to plug in. Doing this eliminates power cables and light stand leg trip hazards on the studio floor, making my studio much safer than most. I still have and use C-Stands on the floor sometimes when they will likely need to move around during a shoot, but the power comes from above, so at least the cables aren't on the floor and the stands on the floor are kept to an absolute minimum. It's a much safer place to work this way.

Charley
 
"If using the folding tripod type of stand then make sure your sandbags go on the legs of the stand and attached to the centre column, not on the horizontal cross members. I once had a stand fail when the sandbag caused the bottom end cap to pop off the column & the whole lot came down."

Well, all of my tripod light stands were modified by adding a 1" long dowel and epoxy to the bottom of the center column, with a hole drilled in the center to accept a 1/4-20 Hanger Bolt 2" long . This type of bolt has machine threads on one end, wood threads on the other, and no head. To each of my tripod stands I have added this hanger bolt, so that I can attach my tripod stands upside down to my ceiling lighting support grid using an Electricians Beam Clamp. T
I might need to see a picture. It sounds as though the end cap has now become a weight bearing element. What's to stop it coming off and dumping the entire load?
 
The dowel is 1 1/2" long and secured with epoxy to the inside bottom of the center column of the light stand. It has a hole in it's center of the proper size to accept the wood thread of the hanger bolt and it is screwed fully 1" into this hole. The hanger bolts have no heads, but threaded differently on each half. In this case wood thread on one half and 1/4-20 thread on the other half and the 1/4-20 part is left sticking out of the bottom end of the center column of the tripod . This was done to allow me to hang this type of light stand upside down to my ceiling attached lighting grid by using an Electricians Beam Clamp, which is a small clamp similar to a C-Clamp with a bolt included to secure it closed tightly at the edge of any steel beam or steel angle. This Beam clamp has two 1/4-20 threaded holes in it at 90 degrees orientation to each other to allow attaching things to the clamp, which is then attached to the ceiling lighting grid. I have hung 50 lbs of weight from one of these light stands to test the safety of doing this and had no problem, but a studio strobe light and the stand together weigh less than 5 lbs, so a factor of 10X for this safety test. The wooden dowel fits tightly, with just enough gap around it for the epoxy. It's an oak dowel, so quite strong in itself. I also use safety chains looped around the studio strobe and the ceiling grid to protect the studio strobe from falling, should it somehow come loose from the spigot on the stand, or the stand itself fall apart. This was the best easy way to hang light stands and lights from above, so I could continue to use the stand's height adjustments to get the studio strobes at their desired height, but from the ceiling and not the floor.

I will take some photos and attach them as soon as I can.

Charley


A quick edit to add quick photos. I'm using a 15 year old camera for this as I need small low resolution photos for this post. The camera used is a 15 year old Samsung pocket camera that was my daughters. I normally use it just for recording my setups in case I want to repeat them. My meds are giving me shakes, so some are not all that clear, but they were quick and easy to post.

First photo - The bottom modified end of a tripod showing the 1/4-20 stud on the center column

2nd photo - The same stand, but with an electricians beam clamp threaded on.

3rd photo - One of the beam clamps showing the back and bottom with the 1/4-20 threaded holes

4th photo - Same beam clamp with a light attaching spigot threaded into one of the 1/4-20 threaded holes.

5th photo - Two beam clamps bolted together back to back. I use these to attach the shorter 5' steel angles to the ceiling mounted 10' angles. These 5' angles are always placed to cross above the 10' angles for safety. A loose beam clamp might drop one end of a 5' angle otherwise. These 5' angles bridge between any two 10' angles, so that I can hang something between the ceiling mounted 10' angles giving me the ability to hang a light most anywhere.

6th photo - Three versions of the electricians beam clamps as I use them. I sometimes also attach a cold shoe to one of these using a 1/2" long round head 1/4-20 bolt threaded from inside the clamp out. You can see this in photo 4

7th photo - One of my light stands attached to the ceiling light grid angle using a beam clamp. I extended the legs of this tripod up against the ceiling for stability, but it usually isn't necessary.


8th photo - A view of the lower part of the stand with one of my studio strobes attached. Notice the safety chain from above to the light, and power coming from above. There is a Wiremold (Mains) outlet every 6" along this strip running along each end of the ceiling 10' long angles from behind camera all the way to the backdrop system., so I can power a light within 5' of anywhere that it is located on the ceiling grid. Where each light plugs in there is a wireless power control module that lets me power on/off all of the lights in a group/type wirelessly from a remote at the camera. I have 8 (soon to be 10) LED light panels hanging as close to the ceiling as possible for doing video shoots, and infant or dog still shoots. One of the LED light panels can be seen hanging in the upper right of this shot. In this photo you can also see how I hang my most used soft boxes from hooks on the wall. These are on the wall camera left. I have others in the closet that I don't use often, so keep them collapsed and in their bags.

I built this ceiling mounted lighting support grid primarily for safety, to get as many tripods and power cables off the studio floor as possible , to minimize trip hazards. I'm 83 and no longer have the stability or strength that I once had, but it's also to keep anyone else who comes to my studio safer. Can you imagine my 8 LED (soon to be 10) light panels on tripod stands and spaced about 2' apart in a kind-of wide leg "U" around a banquet table and two people making a health food info video, with the power cables for them running on the floor everywhere? Even my tether cable runs across the ceiling light support grid from my PC to about the center of where my camera is located, but with enough slack to let me move freely around that half of my studio. If it touches the floor it is rare, and only briefly. I have a wheeled metal toolbox camera left that I keep my gaffer tools in, and with a padded top (tool box tray liner) for a place to set my camera while briefly not using it.

I'll try to post more photos of the studio, but I'm running out of time today. Other things must be taken care of. I'm the caregiver for my wife, recovering from broken back and pelvis, and my adult #3 adult son who is handicapped with MD who is in an electric wheelchair, and it's almost dinner time and I'm the cook.

Charley
 

Attachments

  • SAM_0014a.jpg
    SAM_0014a.jpg
    61.3 KB · Views: 12
  • SAM_0023a.jpg
    SAM_0023a.jpg
    62.2 KB · Views: 9
  • SAM_0020a.jpg
    SAM_0020a.jpg
    49.2 KB · Views: 9
  • SAM_0021a.jpg
    SAM_0021a.jpg
    50.5 KB · Views: 7
  • SAM_0022a.jpg
    SAM_0022a.jpg
    55.3 KB · Views: 7
  • SAM_0018a.jpg
    SAM_0018a.jpg
    50.9 KB · Views: 10
  • SAM_0015a.jpg
    SAM_0015a.jpg
    63.3 KB · Views: 12
  • SAM_0016a.jpg
    SAM_0016a.jpg
    65.9 KB · Views: 12
Last edited:
Well, questions got me a little off the topic of sand bags and I had mentioned that I was sometimes using the leg weights intended for pop-up Sun screens and shelters.

Here are a few photos of these leg weights and how I use them with my tripod light stands. Each of these is concrete, that's covered with a plastic shell that has a slot to it's center to fit around the center post of a tripod light stand. In use, I place one or two of these around the center column just above the stand's leg braces, so they rest on the light stand's leg braces, adding 5 or 10 lbs of weight to the very center of the light stand's base. These are easy to handle and don't leak, but I would never use these away from my studio.

I prefer taking fabric sand bags empty to remote shoots, so they carry easily. Then filling them at the shoot location with rocks, pebbles, sand, dirt or whatever I can find on location that fits and is heavy. After the shoot I return whatever material that I used to where it was found, and carry the empty sand bags back home.

At remote shoots I also carry several hanks of bright orange parachute cord. I use this cord for tying large rocks or other not likely to move to my camera tripod and light stands. In not-so remote areas tying to railings, my car bumper, or just about anything that isn't likely to move. I have also used these to haul my gear up cliffs, etc. The bright orange color keeps people from tripping over it, and also is visible enough that I won't leave any of it behind. This cord is reasonably priced (I get it at Walmart) so I don't hesitate to cut it up when needed. I have more in my studio for next time.

Always take gaffer tape with you too to a field shoot, and pack up the used pieces of parachute cord and gaffer tape to trash them when returning back to civilization. Gaffer tape lets me do many things. A quick shield of the lens to prevent Solar Flare when you forgot to bring the plastic one for your lens with you, helping the parachute cord stay tight and in place around an odd shaped something, securing many cables together to prevent trip hazards, using parachute cord and gaffing tape to tie one of your light stands to a farmer's fence post near the shoot, etc. It's amazing how many times I have thanked myself for taking a roll with me.

Photo 1 One of the 5 lb weights

Photo 2 The bottom half of a tripod light stand with one weight, showing how I position them on the leg braces and around the center column

Photo 3 Two weights stacked on the leg braces for 10 lbs total weight

Photo 4 The tripod base without the weights in place.


I hope these photos answer all of your pop-up shade weight questions and how to use them for light stands. Oh, they come in boxes of four, and over here in the USA they are available wherever the pop-up shades are available for sale. Mine came from a Sporting Goods Store about 2 miles from me.

Charley
 

Attachments

  • SAM_0024a.jpg
    SAM_0024a.jpg
    75.4 KB · Views: 3
  • SAM_0025a.jpg
    SAM_0025a.jpg
    69.2 KB · Views: 3
  • SAM_0026a.jpg
    SAM_0026a.jpg
    62.8 KB · Views: 3
  • SAM_0027a.jpg
    SAM_0027a.jpg
    70.4 KB · Views: 3
@juggler,

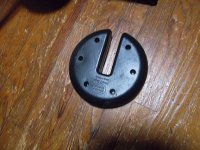
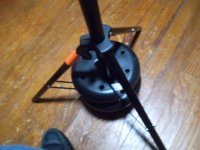
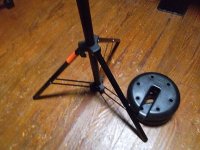
I removed the plastic cap at the bottom of the center column, used metal working sanding cloth to make a gripping rough surface on the inside of the bottom of the center column for the epoxy to stick well to, then inserted the dowel with it's center hole already drilled through it and epoxy applied to the dowel as well as the inside lower 1 1/2" of the column, then let the epoxy cure. I then drilled a center hole in the plastic end cap and placed it back in the bottom end of the center column.

The hanger bolt was then threaded up into the hole in the plastic bottom cap and into the dowel until about 1/2-3/4" of machine thread remained. The opposite end of this 2" long hanger bolt is threaded like a lag screw, so the threads are designed to grip the oak dowel wood well.

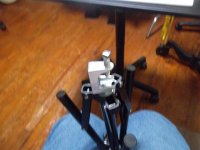
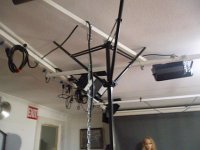
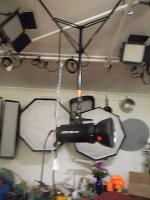
I wouldn't attempt to hang my body weight from one of my light stands that are attached to my ceiling grid, but less than 10 lbs is the most that I expect to ever need to hang from them, and it's typically only 2-4 lbs. of Godox SK400 or SK300 light and a soft box, usually octal and 30" inches or less in size, or a square or rectangular up to 10" X 60". I do have larger lights, but they aren't ever needed in my small studio, except for two old 500 watt focusing spot lights, and they are semi permanently hung with 3/8-16 hardware and also safety chained. I wouldn't expect my 1 X 1 X 1/4" steel angle that makes up the lighting grid, to be capable of handling my 220 lb body weight either, but it is more than strong enough to support 6 GVM 480 LS LED light panels very well. Keep in mind that all of my light attachment points are the standard spigots like the top of light stands. This, to me, is the point that I worry more about failing, with only one wing bolt screwed in against the narrow center area of the spigot. That's why I always use some light chain (but rated at 200 lb) to make a safety loop around the light grid angle and a sturdy point, like the handle of the light that I'm hanging on the upside down light stand. The light stand or it's spigot connection can fail, but the safety chain loop will prevent both from falling to the floor.

I was once the stage manager of an Off Broadway theater, and made considerable use of this same safety loop system whenever hanging anything, lighting or other, above the stage. Being a small theater, I did my gaffing, lighting, set builds, feature movie projection, and anything else needed with just one helper. We did it all.

Charley
 
Back
Top