

You are using an out of date browser. It may not display this or other websites correctly.
You should upgrade or use an alternative browser.
You should upgrade or use an alternative browser.
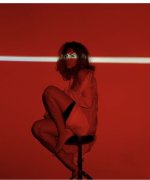
How to create this lighting?
- Thread starter Cattt
- Start date
Sangoma
Suspended / Banned
- Messages
- 2,951
- Name
- Steve, Coventry, England
- Edit My Images
- Yes
Yes, now you say it and on enlarging the thumbnail, it is clearI hate using this answer; but not all of that is down to the lighting.
Careful makeup to amplify the white lit area plus some PP (it’d be impractical to mask the white light to only illuminate the flesh area on the model)
")
jknights
Suspended / Banned
- Messages
- 527
- Name
- Jonathan (JK)
- Edit My Images
- No
I would say this is possible with a pair of gels stuck on the front of a good strobe to leave a slit. If the light is used close to the subject then there is little light bleed between the two areas.
It is all about getting the model close to the light source.
Alternatively it could be done is Photoshop.
Just shoot the image in normal light then overlay a red layer with a clear stripe.
These days I would say that Photoshop was the favourite.
It is all about getting the model close to the light source.
Alternatively it could be done is Photoshop.
Just shoot the image in normal light then overlay a red layer with a clear stripe.
These days I would say that Photoshop was the favourite.

Sangoma
Suspended / Banned
- Messages
- 2,951
- Name
- Steve, Coventry, England
- Edit My Images
- Yes
Similar, but not the same.This is done in Photoshop.
If you want to make the edge of the light area less obvious/sharp then you can just blur the edge with a feather.
Here is an example.
View attachment 380716
That has maintained skin colours, not painted parts white
Phil V
Suspended / Banned
- Messages
- 26,303
- Name
- Phil
- Edit My Images
- No
The difference between the image in the op and yours is phenomenal.This is done in Photoshop.
If you want to make the edge of the light area less obvious/sharp then you can just blur the edge with a feather.
Here is an example.
View attachment 380716
The light in the OP clearly follows the contours of the model.
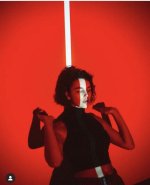
There’s definitely some retouching happened in the second image in the OP but that lighting effect was definitely done in camera.
sk66
Suspended / Banned
- Messages
- 9,557
- Name
- Steven
- Edit My Images
- Yes
Image one is a *slit gel/lighting; image two is paint/makeup.I love it! No idea how to re create it...
(*it's just as likely two gelled lights)
Last edited:
Scooter
Suspended / Banned
- Messages
- 625
- Name
- Owen
- Edit My Images
- No
Image one is a *slit gel/lighting; image two is paint/makeup.
(*it's just as likely two gelled lights)
I agree - the first one is a bit like this one I shot with a projection attachment plus a red fill light (bounced off the white studio ceiling/walls)
View: https://www.flickr.com/photos/owenlloyd/52634548380/in/dateposted-public/
Except they have used two hard lights - as the red light is also casting a hard-edged shadow.
The second one - does look like body paint - the white strip is under the outfit - unless the clothes are just super light absorbent... The shadow angle from the "white light" exactly matches the shadow angle from the red light - which leads me to believe there is only one light in this picture. Of course, that one light could be a projector with a color transparency in it or a digital cine projector - I've used both for this sort of thing.
There's also an outside chance they both just used the "Light" renderer in BorisFX Optics which will map shadow patterns to existing contours
Last edited:
swanseamale47
Suspended / Banned
- Messages
- 10,876
- Name
- wayne clarke
- Edit My Images
- Yes
I think you need a focused light source, just putting a slit in a gel wont get the sharp edges, I'd suspect maybe a projector with a slide of the red/white?
juggler
Suspended / Banned
- Messages
- 5,059
- Name
- Simon
- Edit My Images
- No
Optical snoot with gobo or spot projector as key light, red gelled fill would do similar.I love it! No idea how to re create it...
Pixapro sell a few different models. Bowens & Elinchrom used to as well.
Though I'm with @Scooter, I think this one is actually a single projector with a slide. That's the simplest explanation for the matching shadows.
sk66
Suspended / Banned
- Messages
- 9,557
- Name
- Steven
- Edit My Images
- Yes
I was trying to decide how close/far it would have to be for the edge of a gel to show as a hard line... if it's even possible.I think you need a focused light source, just putting a slit in a gel wont get the sharp edges, I'd suspect maybe a projector with a slide of the red/white?
Funny thing is, the first image shows a painted line across the top as well as the illumination line; the second image only shows painted lines.
Scooter
Suspended / Banned
- Messages
- 625
- Name
- Owen
- Edit My Images
- No
You're right Wayne. If you wanted to do this by shining a light through a red gel with a strip cut out of it (ie a "cucoloris" or "cookie") and get those very defined edges to the white strip, the gel or gels would need to be:-I think you need a focused light source, just putting a slit in a gel wont get the sharp edges, I'd suspect maybe a projector with a slide of the red/white?
- Close to the model
- Far away from the light source
- Massive (more or less 1:1)
An easier way to make defined shapes like that is to use a projection or spotlight attachment on your strobe or other light source. These have some focusing optics on the front to focus an image of a slide or stencil just like a slide projector. The stencils are called "GoBOs" ("GOes Before Optics")
juggler
Suspended / Banned
- Messages
- 5,059
- Name
- Simon
- Edit My Images
- No
You're right Wayne. If you wanted to do this by shining a light through a red gel with a strip cut out of it (ie a "cucoloris" or "cookie") and get those very defined edges to the white strip, the gel or gels would need to be:-
Here's a write-up I did years ago for DIYP where I used a bit of cardboard with holes in it - see how big it has to be and the shadow edges still aren't that defined - I'd have to get it so close it would be in the shot to get sharp edges to it. https://www.diyphotography.net/how-...tudio-with-continuous-lights-and-diy-cookies/
- Close to the model
- Far away from the light source
- Massive (more or less 1:1)
An easier way to make defined shapes like that is to use a projection or spotlight attachment on your strobe or other light source. These have some focusing optics on the front to focus an image of a slide or stencil just like a slide projector. The stencils are called "GoBOs" ("GOes Before Optics")
Interestingly.. but slightly off topic .. the material a cookie is made of affects the shadow edge hardness. Somewhere I've got a test I did with a shiny metal ladder and a wooden ladder. The wooden ladder gave harder edged shadows. I assume it's to do with reflections off the side surfaces of whatever you're using.
It's only just occurred to me to do a test comparing card, silver foil & cinefoil. I'd expect no difference at all. I'll give it a go tomorrow if I get chance before my shoot.
jknights
Suspended / Banned
- Messages
- 527
- Name
- Jonathan (JK)
- Edit My Images
- No
I agree that the images were probably shot with a projector but the second image is interesting as it shows very little white light bleed into the hair.
I must have another go with my projector. I need to check what inserts it uses and maybe make some different ones.
I really like this section of the forum as it makes for interesting challenges both mental and photographic.
I must have another go with my projector. I need to check what inserts it uses and maybe make some different ones.
I really like this section of the forum as it makes for interesting challenges both mental and photographic.
As others have said, this is a fill light gelled red for the room, then an optical spot for the white line, well above the exposure of the red. There's a bunch of these on the market now, and among them it seems the Jinbei DP-06 is a lead to consider for ease of use and mounting options.
jknights
Suspended / Banned
- Messages
- 527
- Name
- Jonathan (JK)
- Edit My Images
- No
Thanks @jlafferty having the name allowed me to find the projector.
Neat bit of kit.
Loads of videos on YouTube about this and similar products.
View: https://m.youtube.com/watch?v=E9BLf3AfsEM
Neat bit of kit.
Loads of videos on YouTube about this and similar products.
TimHughes
Suspended / Banned
- Messages
- 3,655
- Name
- Tim
- Edit My Images
- Yes
A bit late to this - I also think this is optical snoot like the jinbei example above. I’m not sure about white over powering a red fill. I suspect some white balance trickery might be at play too. For example setting the camera WB to the max to make the ambient almost red with an opposite color gel on the optical snoot (cyan?) to produce the white lines after some further color adjustment in post.
That's an interesting take. Or... it could be an optical projection of a red gobo that has a slit missing at its center. I'm looking at it and realizing now the model's shadows projected against the wall are the same source as the slit, which means it's not a solid gobo; and there's not secondary shadow. So... likely a colored projection. Edit: I’d missed it but Scooter had called it earlier - nice!A bit late to this - I also think this is optical snoot like the jinbei example above. I’m not sure about white over powering a red fill. I suspect some white balance trickery might be at play too. For example setting the camera WB to the max to make the ambient almost red with an opposite color gel on the optical snoot (cyan?) to produce the white lines after some further color adjustment in post.
Last edited:
If you want additional inspo for stuff like this, search YouTube for Nick Fancher’s “Studio Anywhere” I think it’s called. He’s got a 1hr 45min+ edit of a workshop where he uses an actual digital projector - the kind you’d use to share vacation slides or project a movie. He even shared the make/model.
Edit: here it is -
View: https://youtu.be/7Eoy7or7Pdk
Edit: here it is -
Last edited:
TimHughes
Suspended / Banned
- Messages
- 3,655
- Name
- Tim
- Edit My Images
- Yes
That's an interesting take. Or... it could be an optical projection of a red gobo that has a slit missing at its center. I'm looking at it and realizing now the model's shadows projected against the wall are the same source as the slit, which means it's not a solid gobo; and there's not secondary shadow. So... likely a colored projection. Edit: I’d missed it but Scooter had called it earlier - nice!
This is using a variation of method described above:
- red gel for the background fill
- blue gel over the dots using a focus spot
- WB set to the max 14K to produce white dots
- no post-production needed
I'm looking for a volunteer model to show the results with someone in the shot and shadows - it should work.

Last edited:

TimHughes
Suspended / Banned
- Messages
- 3,655
- Name
- Tim
- Edit My Images
- Yes
This puzzle did get my curiosity, so I also tried a slit gel. It works, however as you're focusing on the gel to get a sharp edge, any imperfections in the edge show up as well as any dust spots on the gel itself. I could not cut a perfectly straight edge that holds up to magnification, and I could not prevent dust spots as the heat in the focus spot is causing airflow all the time. In comparison, using white balance trickery you're able to use the razor-sharp metal edges of the focus spot and no problems with dust spots.

Nailed it! No post needed is what we strive for. Good job
And thanks for sharing!jknights
Suspended / Banned
- Messages
- 527
- Name
- Jonathan (JK)
- Edit My Images
- No
Well done @TimHughes
In your projector are the gels in the same location as the gobo?
My projector for testing arrived today and I havent had chance to look at it in detail but it seems that the gels go into the same slot in the body as the gobo. This slot is between the light source and the lens used for focusing the gobo pattern.
I guess I could put the gels in a holder in front of the lens (subject/model side).
Looks like I will have fun experimenting next week. Might experiment with making some gobos.
TimHughes
Suspended / Banned
- Messages
- 3,655
- Name
- Tim
- Edit My Images
- Yes
thanks!Nailed it! No post needed is what we strive for. Good job
Well done @TimHughes
In your projector are the gels in the same location as the gobo?
My projector for testing arrived today and I havent had chance to look at it in detail but it seems that the gels go into the same slot in the body as the gobo. This slot is between the light source and the lens used for focusing the gobo pattern.
I guess I could put the gels in a holder in front of the lens (subject/model side).
Looks like I will have fun experimenting next week. Might experiment with making some gobos.
The focus spots come with gels that clip onto the front of the kit lens. In this case blue on the front, then used the metal shapers to create the strip of light. The red light is from a separate light source.
It might not be obvious, but the focus spot lens mount is canon EF and it's about 100mm so the projected shapes are narrow and quite small even with a long distance. You can use any EF lens you want to change the projected shape.