

You are using an out of date browser. It may not display this or other websites correctly.
You should upgrade or use an alternative browser.
You should upgrade or use an alternative browser.
First attempt editing with Affinity photo
- Thread starter Alan Gray
- Start date
john.margetts
Suspended / Banned
- Messages
- 2,996
- Name
- John
- Edit My Images
- Yes
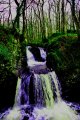
I have no idea what you were trying to achieve, but for me the colours are far, far too garish and over-saturated.
Thanks JohnI have no idea what you were trying to achieve, but for me the colours are far, far too garish and over-saturated.
I re looked at it after posting and totally agree
ancient_mariner
Moderator
- Messages
- 27,774
- Name
- Toni
- Edit My Images
- No
OK, you've not posted in one of the crit sections, rather a discussion area. If your aim was to try to create something that looked like a computer simulation of a photograph taken on another planet then I'd say the software has worked very well. If you were trying to gently enhance the image of a waterfall then I'd say there's far too much processing and effects being used and it all looks rather odd and un-natural.
So the question is, what did you want to acheive? Just because *we* don't like it doesn't mean it's 'wrong'.
Something that can help, especially when starting out, is to have a reference image to use for comparison - one that looks natural or like your objective with the finished picture.
So the question is, what did you want to acheive? Just because *we* don't like it doesn't mean it's 'wrong'.
Something that can help, especially when starting out, is to have a reference image to use for comparison - one that looks natural or like your objective with the finished picture.
Last edited:
john.margetts
Suspended / Banned
- Messages
- 2,996
- Name
- John
- Edit My Images
- Yes
I have two rules for editing photographs. 1. Do not touch most adjustments - they are rarely required. 2. When moving a slider, do not move it very far.
If you do need many adjustments, or if the adjustments need a lot of movement, you need to retake the photograph.
If you do need many adjustments, or if the adjustments need a lot of movement, you need to retake the photograph.
Hi ancient marinerOK, you've not posted in one of the crit sections, rather a discussion area. If your aim was to try to create something that looked like a computer simulation of a photograph taken on another planet then I'd say the software has worked very well. If you were trying to gently enhance the image of a waterfall then I'd say there's far too much processing and effects being used and it all looks rather odd and un-natural.
So the question is, what did you want to acheive? Just because *we* don't like it doesn't mean it's 'wrong'.
Something that can help, especially when starting out, is to have a reference image to use for comparison - one that looks natural or like your objective with the finished picture.
I was just trying to enhance the picture but went well over the top should of re looked at it before posting
ancient_mariner
Moderator
- Messages
- 27,774
- Name
- Toni
- Edit My Images
- No
I have two rules for editing photographs. 1. Do not touch most adjustments - they are rarely required. 2. When moving a slider, do not move it very far.
If you do need many adjustments, or if the adjustments need a lot of movement, you need to retake the photograph.
This is especially true when learning. A rule of thumb I once read was that after making the adjustment you thought was required, you should then back the slider off half way. As you develop an eye and feel for things then it's possible to become more adventurous, but even now I keep this maxim in the back of my mind.
ancient_mariner
Moderator
- Messages
- 27,774
- Name
- Toni
- Edit My Images
- No
Hi ancient mariner
I was just trying to enhance the picture but went well over the top should of re looked at it before posting
No worries Alan - just give it another go.
- Messages
- 105,684
- Name
- The other Chris
- Edit My Images
- Yes
One thing to consider is your computer monitor. I tend to edit and then view it on several different screens, e.g. upload to flickr (or email it to yourself) and view on your phone or another computer if you have access to one. This not only shows you what other people might see but also gives you a chance to pause and review.
ancient_mariner
Moderator
- Messages
- 27,774
- Name
- Toni
- Edit My Images
- No
What was the original like?
- Messages
- 105,684
- Name
- The other Chris
- Edit My Images
- Yes
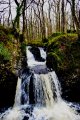
It certainly does and well done for having another go, it's the best way to learnI think this looks a bit better
")
What was the original like?
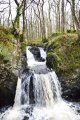
This is the original with nothing done to it
Thanks for your comments they do help
Attachments

Thanks NevilleI don't think you needed to do much at all to the original.
The thing is the guy that was giving me a few pointers on photography said every photo needs some editing but originally i think i went way to far but once i re looked i think it was a lot better
ancient_mariner
Moderator
- Messages
- 27,774
- Name
- Toni
- Edit My Images
- No
Something to remember is that editing should always make the image look better. Occasionally I will do some fairly strong editing on an image only to finish and realise the original was better. That appears to be the case here. [emoji846]
ancient_mariner
Moderator
- Messages
- 27,774
- Name
- Toni
- Edit My Images
- No
Was the original a jpg or raw file? If jpg the the camera has already done a bit of editing to make it look like this.Thanks Neville
The thing is the guy that was giving me a few pointers on photography said every photo needs some editing but originally i think i went way to far but once i re looked i think it was a lot better
jpegWas the original a jpg or raw file? If jpg the the camera has already done a bit of editing to make it look like this.
ancient_mariner
Moderator
- Messages
- 27,774
- Name
- Toni
- Edit My Images
- No
You have Edit My Images: 'NO' showing so I won't try to re-edit your image for you. Now I don't use affinity (I have it, but never really used it) but if this picture were mine I would probably try both increasing & reducing contrast, adjusting black and white points, highlights and shadows, perhaps warm it up a tiny bit. There's not a great deal of processing needed for this image because the camera has already done almost everything needed, and done it pretty well too.
viewfromthenorth
Suspended / Banned
- Messages
- 3,269
- Name
- Andy
- Edit My Images
- No
I realise that if you are new to the software you’ll want to see what it can do, which is absolutely fine, as you’ll need to know what the tools do and what the possibilities are. Experimentation let’s you understand where the boundaries are.
However, my advice would be don’t edit for the sake of editing. Think before you start about what you want to achieve, and how you want the finished photo to look, then apply the tools you’ve used in experimentation to achieve this. Easier said then done of course, and there’s always a massive learning curve but stick with it[emoji106]
However, my advice would be don’t edit for the sake of editing. Think before you start about what you want to achieve, and how you want the finished photo to look, then apply the tools you’ve used in experimentation to achieve this. Easier said then done of course, and there’s always a massive learning curve but stick with it[emoji106]
Thanks for all the positive comments much appreciated.I realise that if you are new to the software you’ll want to see what it can do, which is absolutely fine, as you’ll need to know what the tools do and what the possibilities are. Experimentation let’s you understand where the boundaries are.
However, my advice would be don’t edit for the sake of editing. Think before you start about what you want to achieve, and how you want the finished photo to look, then apply the tools you’ve used in experimentation to achieve this. Easier said then done of course, and there’s always a massive learning curve but stick with it[emoji106]
Im only new here but if it was me for the picture I would have gone for Black and white and try to get the contract and saturation just right as I feel like the colour drags. your eye away to the edges of the photo, just my personal preference though ")
Bobsyeruncle
Suspended / Banned
- Messages
- 17,422
- Name
- Bob
- Edit My Images
- Yes
It does....Hi Alan, As I do not have AffinityI can`t really help, but does it give you the opportunity to see a before and after option. Say a split-screen or similar?
If so check as you edit.
tuomaskivioja
Suspended / Banned
- Messages
- 3
- Name
- Tuomas Kivioja
- Edit My Images
- Yes
Definitely way too over-saturated..but don't be discouraged, that's exactly the mistake I was making at the start! With time, you will get the eye for it)
)