Garry Edwards
Moderator
- Messages
- 13,475
- Name
- Garry Edwards
- Edit My Images
- No
I don’t normally do equipment reviews because gear means very little to me, but I thought this might be interesting . . .
As reviews go, it may be slightly unusual because I’m not being paid to write it, and I bought the product myself, which makes me pretty unbiased, compared to most reviews on YT.
And it isn’t a slick sales piece, produced by a happy smiley influencer who knows nothing about the subject; it’s been produced by a curmudgeonly old man based on a lifetime of experience of photographic lighting.
It’s about this focusing spotlight, bought from Temu at what I think is a bargain price. The usual copyright restrictions apply, so please click this link to see the product.

Similar products are listed on Amazon, but at several times the price.
It was an impulse buy, I don’t actually need it and probably won’t use it much, but unlike nearly all other impulse buys I’m glad that I bought it.
If you have the patience to read through all this, you’ll find a video at the end, which hopefully explains it fairly fully.
It uses gobos to project a design/shape onto either the front subject or the rear subject (the background). GoBo’s are designs stamped out of thin metal (a "GoBO" (GOes Before Optics). This term is widely mis-used, but you know what I mean
Now, going back a bit – going back a lot – I had a professional focusing spot, sold by Elinchrom and very nicely made, I believe by a German manufacturer. Back then I did photography for a living and the high cost, large size and heavy weight simply didn’t matter. What that one has is 4 sliding shutters which, used in combination, can produce just about any shape of light and I used it mainly for lighting wine bottle labels and similar, in the days when Photoshop wasn’t all that clever and everything was shot on film anyway. I also used it for all sorts of other photography, using the gobos rather than the sliding shutters, for example I would project sunlight streaming from a window on to a wall in roomset shots, or to create other types of background effects, I used it to create very specific, targeted lighting on still life shots, I used it for rim lighting, side lighting, and it was also great for artistic nude photography, using a gobo to light the model, hiding the bits that I didn’t want to show. I do sort of still have that one, in the sense that I know where it is, in the Garry corner of the Lencarta warehouse, but I no longer have Elinchrom flash heads, so it can stay there for now
Here’s a pic of it

I’m showing it because two of those important sliding shutters are visible in the photo.
In my experience, those sliding shutters are the most important feature, they don’t just slide in and out, they can be skewed as well, which allows the creation of unlimited shapes.
Temu also list a similar product that does have 4 sliding shutters. I can’t comment on it because I haven’t seen it, and what little I know about it is based on the terrible description in the listing, but it may be more versatile than the one I have
Normally, and especially for any kind of people photography, I will use it with a flash head, but it can also be used with any S-fit LED light, and it’s easier to demonstrate with a continuous light. As with everything else, when using flash we adjust the power setting, when using continuous light we adjust the shutter speed.
But, with people photography, we need to be aware of the limitations when using it with an LED light. The manufacturer says that it’s OK to use it with a light of up to 300 watts, but their instructions are less than stellar, my guess is that they mean the LED equivalent of 300 watts of tungsten light, so somewhere between 30 watts and 60 watts. My own Godox LED light is 60 watts, and the modelling lamp on my Visico flash is 23 watts. The instructions indicate that the main lens can be reversed to change the magnification, but I haven’t worked out how to do that, and I won’t need to.
These spot attachments are far from energy-efficient; basically all of the light hits the gobo or shutters and most of it bounces straight back, and of course will continue to do so infinitely, at the speed of light, so there’s a substantial loss of lighting power because nearly all of that bounced light is lost. Exactly how much this loss amounts to will depend on how much of the gobo is solid and how much lets the light through, but if we roughly guess at a loss of around 3 stops, we’re losing about 87.5% of our lighting power compared to a standard reflector – yes, we can use a high iso, but flash is by far the better choice for people photography anyway, let alone when we’re cutting the effective power dramatically.
An important word of warning! There’s nowhere for the heat to go, so if we use it with a continuous light we need to be very careful not to leave it switched on for any longer than absolutely necessary, if it overheats you’ll need to buy a new light. The same warning applies with a flash head, only have the modelling lamp on for a very few seconds, or you’ll have the same problem when the capacitors explode, and you’ll probably need the fire brigade too – don’t ask me how I know that")
I tested something similar once from a different maker, I got the impression that it would fall apart if I even looked at it closely, and the design was seriously flawed. Basically, they’re just a tube, with somewhere for the gobo to go, and a strong condenser lens to focus the light. The other one had the condenser lens right next to the gobo, and every tiny spec of dust would be enlarged and would be in sharp focus. This one is basically just 3 tubes joining each other and reducing in size, it has the main lens in the middle section and the focusing lens is right at the end, and is perfect, and the machine is also made from decent-quality metal, there’s little or nothing to break or wear out.
Compatibility:
It has the almost universal S-fit mount for Bowens and nearly all other lights. I tried it with my Lencarta SmartFlash, it fits and works, but the old design of E27 modelling lamp is far too long, so it can only work with the modelling lamp removed. That sounds like a major challenge but it isn’t, or at least it isn’t a real problem when using gobos, because we can use trial and error to position and focus it


It's the same with my Bowens flash, and again not a problem.
I also have a flash head that's fitted with an LED modelling lamp, which makes things a bit easier


Most of the time, at least when using it to light a specific part of a subject, we not only don’t need to focus it, it’s actually better with the projected image way out of focus, so that we end up with no sharp edges at all, let’s show you what I mean.
The shot below is lit in the sense that the overall scene is lit, and I've also backlit/sidelit the two muffins at the back, using a tight honeycomb, and a tiny bit of light has spilled on to the gap between the two pieces of the broken muffin at the front, but at this stage there's no (intentional) lighting on this part of the subject. Now, if push had come to shove - if I didn't have this focusing spot - I would have managed with another honeycomb, but fortunately I didn't need to. The challenge, with another honeycomb, would have been to light only the bit that needs to be lit, the rough edges of even the tightest honeycomb make it difficult to stop unwanted light wandering where it isn't wanted, especially, as in this case, when the light has to come from the front/side.

Then I used a gobo to light the broken bit, and got this, with the other lights switched off. As you can see, the light from the spot is far more controllable and hasn't spilled elsewhere, which is a big benefit.

I tried various gobos, all out of focus so that they didn't leave a clear impression of their design, and they all worked pretty well. The unlit areas are of course caused by the gobo blocking the light, personally I feel that these unlit areas help to show the texture of the muffin and the use of the light has created just enough light to bring it to life. And here’s the complete shot

That’s fairly subtle, but probably about right. If there’s a trick to precise lighting, it’s getting the light to make a big difference without anyone (except another photographer) actually seeing the extra lighting. And a focusing spotlight allows the light to be positioned far more precisely than a honeycomb, and invaluable though honeycombs are, the precision of the focusing spot can be a great asset.
I tried a few different gobos, different shapes, different patterns, but nearly all of them produced very similar results, simply because they were out of focus. This is probably because the subject here has an irregular, rough surface, and I think that each of the gobos worked because of that.
Will it work with a flashgun fitted to a S-fit adapter? In theory it will, although lack of power is likely to be a problem.
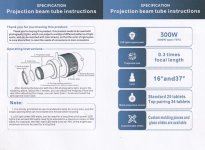
The instructions, such as they are, are below. They seem to think that it should be used with a LED light but, subject to the limitations above, it can of course also be used with a flash.

From memory, my original focusing spot had about 6 gobos, others were available but very expensive, this one has 33. It also has 2 half-gobos, which adds to the versatility because they work as sliding shutters - to some degree - and can be used either with or without gobos. 2 sliding shutters are useful, and especially as they can be rotated to some extent, one of them is shown in the pic below, bottom right, it would have been better as a rectangle shape. 2 is nowhere near as good as 4, and it can’t have 4 because there is limited adjustment of position.
Just a few of these gobos – including some of the least tasteful – are shown here.

As the video shows, the gobos are made from what appears to be stainless steel, they’re shown as black here because I’m too lazy to photograph them, I simply stuck them in my office scanner.
Interestingly, 3 of the gobos are angled rather than square-on, and I think that this shows some thought. One of the challenges of using a gobo to light the background is that it’s usually difficult if not impossible to position the focusing spot square to the background, so we get a distorted effect. The angled gobos, which of course are reversible, allow us to get a straight-on effect from an angle, from left or right, above or below the subject.

If sharp focus isn’t an issue we can of course (sometimes) use gobos that aren’t at an angle simply by rotating the background left, right, up or down.
They say that 35mm slides can be used in place of gobos, but the few that I have are plastic-mounted and are too thick to fit into the slot.
The lens doesn’t zoom, we change the size of the projected image by zooming with our feet, or in this case by moving it closer or further away, not a problem. We can get pin-sharp focus at just 25cm from the lens, which is remarkable, my space isn’t big enough to test at the maximum distance but, as these things lose a lot of light and the inverse square law works against us, that doesn’t matter.
And, especially when using it to light the background, we may not want the gobo image to be in sharp focus anyway. We can always, up to a point, get the background out of focus if there’s enough space between subject and background, but we can also de-focus the image, adding to the versatility.
It also comes with a set of red, green and blue plastic “gels”, to change the colour of the light if required, and these are the correct colour choices. It also has a pale pink one. As we all know, we can combine any 2 filters to create other colours, and can control the saturation via exposure – but for obvious reasons (no light transmitted at all) we can’t use all of the RGB filters together.
So, which is better, a tight honeycomb or a focusing spotlight? There’s an element of overlap, but they are different tools that work in different ways and create different results, so having both is a good idea. A focusing spotlight will, if required, produce a very “clean” result, with very sharp edges and perfectly even illumination, a honeycomb can’t do that. A honeycomb can be used for backlighting, without creating lens flare, a focusing spotlight can sort of do that, but not as well.
So, is it worth having?
Yes, for those of us who know that photography is all about the lighting and want to light our subjects creatively. But I view it as a specialist tool, to be used only when it’s really needed, a bit like a fisheye lens . . .
And, finally, I believe that our very own Owen Lloyd @Scooter uses focusing spotlights, and I hope that he and other people will contribute in this thread and post some examples – no pressure
As reviews go, it may be slightly unusual because I’m not being paid to write it, and I bought the product myself, which makes me pretty unbiased, compared to most reviews on YT.
And it isn’t a slick sales piece, produced by a happy smiley influencer who knows nothing about the subject; it’s been produced by a curmudgeonly old man based on a lifetime of experience of photographic lighting.
It’s about this focusing spotlight, bought from Temu at what I think is a bargain price. The usual copyright restrictions apply, so please click this link to see the product.
Similar products are listed on Amazon, but at several times the price.
It was an impulse buy, I don’t actually need it and probably won’t use it much, but unlike nearly all other impulse buys I’m glad that I bought it.
If you have the patience to read through all this, you’ll find a video at the end, which hopefully explains it fairly fully.
It uses gobos to project a design/shape onto either the front subject or the rear subject (the background). GoBo’s are designs stamped out of thin metal (a "GoBO" (GOes Before Optics). This term is widely mis-used, but you know what I mean
Now, going back a bit – going back a lot – I had a professional focusing spot, sold by Elinchrom and very nicely made, I believe by a German manufacturer. Back then I did photography for a living and the high cost, large size and heavy weight simply didn’t matter. What that one has is 4 sliding shutters which, used in combination, can produce just about any shape of light and I used it mainly for lighting wine bottle labels and similar, in the days when Photoshop wasn’t all that clever and everything was shot on film anyway. I also used it for all sorts of other photography, using the gobos rather than the sliding shutters, for example I would project sunlight streaming from a window on to a wall in roomset shots, or to create other types of background effects, I used it to create very specific, targeted lighting on still life shots, I used it for rim lighting, side lighting, and it was also great for artistic nude photography, using a gobo to light the model, hiding the bits that I didn’t want to show. I do sort of still have that one, in the sense that I know where it is, in the Garry corner of the Lencarta warehouse, but I no longer have Elinchrom flash heads, so it can stay there for now
Here’s a pic of it
I’m showing it because two of those important sliding shutters are visible in the photo.
In my experience, those sliding shutters are the most important feature, they don’t just slide in and out, they can be skewed as well, which allows the creation of unlimited shapes.
Temu also list a similar product that does have 4 sliding shutters. I can’t comment on it because I haven’t seen it, and what little I know about it is based on the terrible description in the listing, but it may be more versatile than the one I have
Normally, and especially for any kind of people photography, I will use it with a flash head, but it can also be used with any S-fit LED light, and it’s easier to demonstrate with a continuous light. As with everything else, when using flash we adjust the power setting, when using continuous light we adjust the shutter speed.
But, with people photography, we need to be aware of the limitations when using it with an LED light. The manufacturer says that it’s OK to use it with a light of up to 300 watts, but their instructions are less than stellar, my guess is that they mean the LED equivalent of 300 watts of tungsten light, so somewhere between 30 watts and 60 watts. My own Godox LED light is 60 watts, and the modelling lamp on my Visico flash is 23 watts. The instructions indicate that the main lens can be reversed to change the magnification, but I haven’t worked out how to do that, and I won’t need to.
These spot attachments are far from energy-efficient; basically all of the light hits the gobo or shutters and most of it bounces straight back, and of course will continue to do so infinitely, at the speed of light, so there’s a substantial loss of lighting power because nearly all of that bounced light is lost. Exactly how much this loss amounts to will depend on how much of the gobo is solid and how much lets the light through, but if we roughly guess at a loss of around 3 stops, we’re losing about 87.5% of our lighting power compared to a standard reflector – yes, we can use a high iso, but flash is by far the better choice for people photography anyway, let alone when we’re cutting the effective power dramatically.
An important word of warning! There’s nowhere for the heat to go, so if we use it with a continuous light we need to be very careful not to leave it switched on for any longer than absolutely necessary, if it overheats you’ll need to buy a new light. The same warning applies with a flash head, only have the modelling lamp on for a very few seconds, or you’ll have the same problem when the capacitors explode, and you’ll probably need the fire brigade too – don’t ask me how I know that
I tested something similar once from a different maker, I got the impression that it would fall apart if I even looked at it closely, and the design was seriously flawed. Basically, they’re just a tube, with somewhere for the gobo to go, and a strong condenser lens to focus the light. The other one had the condenser lens right next to the gobo, and every tiny spec of dust would be enlarged and would be in sharp focus. This one is basically just 3 tubes joining each other and reducing in size, it has the main lens in the middle section and the focusing lens is right at the end, and is perfect, and the machine is also made from decent-quality metal, there’s little or nothing to break or wear out.
Compatibility:
It has the almost universal S-fit mount for Bowens and nearly all other lights. I tried it with my Lencarta SmartFlash, it fits and works, but the old design of E27 modelling lamp is far too long, so it can only work with the modelling lamp removed. That sounds like a major challenge but it isn’t, or at least it isn’t a real problem when using gobos, because we can use trial and error to position and focus it
It's the same with my Bowens flash, and again not a problem.
I also have a flash head that's fitted with an LED modelling lamp, which makes things a bit easier
Most of the time, at least when using it to light a specific part of a subject, we not only don’t need to focus it, it’s actually better with the projected image way out of focus, so that we end up with no sharp edges at all, let’s show you what I mean.
The shot below is lit in the sense that the overall scene is lit, and I've also backlit/sidelit the two muffins at the back, using a tight honeycomb, and a tiny bit of light has spilled on to the gap between the two pieces of the broken muffin at the front, but at this stage there's no (intentional) lighting on this part of the subject. Now, if push had come to shove - if I didn't have this focusing spot - I would have managed with another honeycomb, but fortunately I didn't need to. The challenge, with another honeycomb, would have been to light only the bit that needs to be lit, the rough edges of even the tightest honeycomb make it difficult to stop unwanted light wandering where it isn't wanted, especially, as in this case, when the light has to come from the front/side.
Then I used a gobo to light the broken bit, and got this, with the other lights switched off. As you can see, the light from the spot is far more controllable and hasn't spilled elsewhere, which is a big benefit.
I tried various gobos, all out of focus so that they didn't leave a clear impression of their design, and they all worked pretty well. The unlit areas are of course caused by the gobo blocking the light, personally I feel that these unlit areas help to show the texture of the muffin and the use of the light has created just enough light to bring it to life. And here’s the complete shot
That’s fairly subtle, but probably about right. If there’s a trick to precise lighting, it’s getting the light to make a big difference without anyone (except another photographer) actually seeing the extra lighting
. And a focusing spotlight allows the light to be positioned far more precisely than a honeycomb, and invaluable though honeycombs are, the precision of the focusing spot can be a great asset.I tried a few different gobos, different shapes, different patterns, but nearly all of them produced very similar results, simply because they were out of focus. This is probably because the subject here has an irregular, rough surface, and I think that each of the gobos worked because of that.
Will it work with a flashgun fitted to a S-fit adapter? In theory it will, although lack of power is likely to be a problem.
The instructions, such as they are, are below. They seem to think that it should be used with a LED light but, subject to the limitations above, it can of course also be used with a flash.
From memory, my original focusing spot had about 6 gobos, others were available but very expensive, this one has 33. It also has 2 half-gobos, which adds to the versatility because they work as sliding shutters - to some degree - and can be used either with or without gobos. 2 sliding shutters are useful, and especially as they can be rotated to some extent, one of them is shown in the pic below, bottom right, it would have been better as a rectangle shape. 2 is nowhere near as good as 4, and it can’t have 4 because there is limited adjustment of position.
Just a few of these gobos – including some of the least tasteful – are shown here.
As the video shows, the gobos are made from what appears to be stainless steel, they’re shown as black here because I’m too lazy to photograph them, I simply stuck them in my office scanner.
Interestingly, 3 of the gobos are angled rather than square-on, and I think that this shows some thought. One of the challenges of using a gobo to light the background is that it’s usually difficult if not impossible to position the focusing spot square to the background, so we get a distorted effect. The angled gobos, which of course are reversible, allow us to get a straight-on effect from an angle, from left or right, above or below the subject.
If sharp focus isn’t an issue we can of course (sometimes) use gobos that aren’t at an angle simply by rotating the background left, right, up or down.
They say that 35mm slides can be used in place of gobos, but the few that I have are plastic-mounted and are too thick to fit into the slot.
The lens doesn’t zoom, we change the size of the projected image by zooming with our feet, or in this case by moving it closer or further away, not a problem. We can get pin-sharp focus at just 25cm from the lens, which is remarkable, my space isn’t big enough to test at the maximum distance but, as these things lose a lot of light and the inverse square law works against us, that doesn’t matter.
And, especially when using it to light the background, we may not want the gobo image to be in sharp focus anyway. We can always, up to a point, get the background out of focus if there’s enough space between subject and background, but we can also de-focus the image, adding to the versatility.
It also comes with a set of red, green and blue plastic “gels”, to change the colour of the light if required, and these are the correct colour choices. It also has a pale pink one. As we all know, we can combine any 2 filters to create other colours, and can control the saturation via exposure – but for obvious reasons (no light transmitted at all) we can’t use all of the RGB filters together.
So, which is better, a tight honeycomb or a focusing spotlight? There’s an element of overlap, but they are different tools that work in different ways and create different results, so having both is a good idea. A focusing spotlight will, if required, produce a very “clean” result, with very sharp edges and perfectly even illumination, a honeycomb can’t do that. A honeycomb can be used for backlighting, without creating lens flare, a focusing spotlight can sort of do that, but not as well.
So, is it worth having?
Yes, for those of us who know that photography is all about the lighting and want to light our subjects creatively. But I view it as a specialist tool, to be used only when it’s really needed, a bit like a fisheye lens . . .
And, finally, I believe that our very own Owen Lloyd @Scooter uses focusing spotlights, and I hope that he and other people will contribute in this thread and post some examples – no pressure